Using L3 (BGP) routing for your Ceph storage

Many Ceph storage environments out there are deployed using a L2 underlay.

This means that the Ceph servers (MON, OSD, etc) are connected using LACP/Bonding to a pair of switches. On their ‘bond0’ device (example) they are assigned an IPv4/IPv6 address and this is used for connectivity between the Ceph nodes and the Ceph clients.

Although this works fine, I try to avoid L2 as much as possible in datacenter deployments. L2 scales up to a certain point, but it has it’s limitations. Modern Top-of-Rack (ToR) switches can easily route traffic and wire-speed. This used to be a limitation of switches in the past. When designing environments I prefer using a L3 approach.

This blogpost is there to show you the rough concept. It’s NOT a copy and paste tutorial. You will need to adapt it to your situation.

Network setup and BGP configuration

Using Juniper QFX5100 switches and Frrouting on the Ceph nodes I’ve established BGP sessions between the ToR and Ceph nodes according to the diagram below.
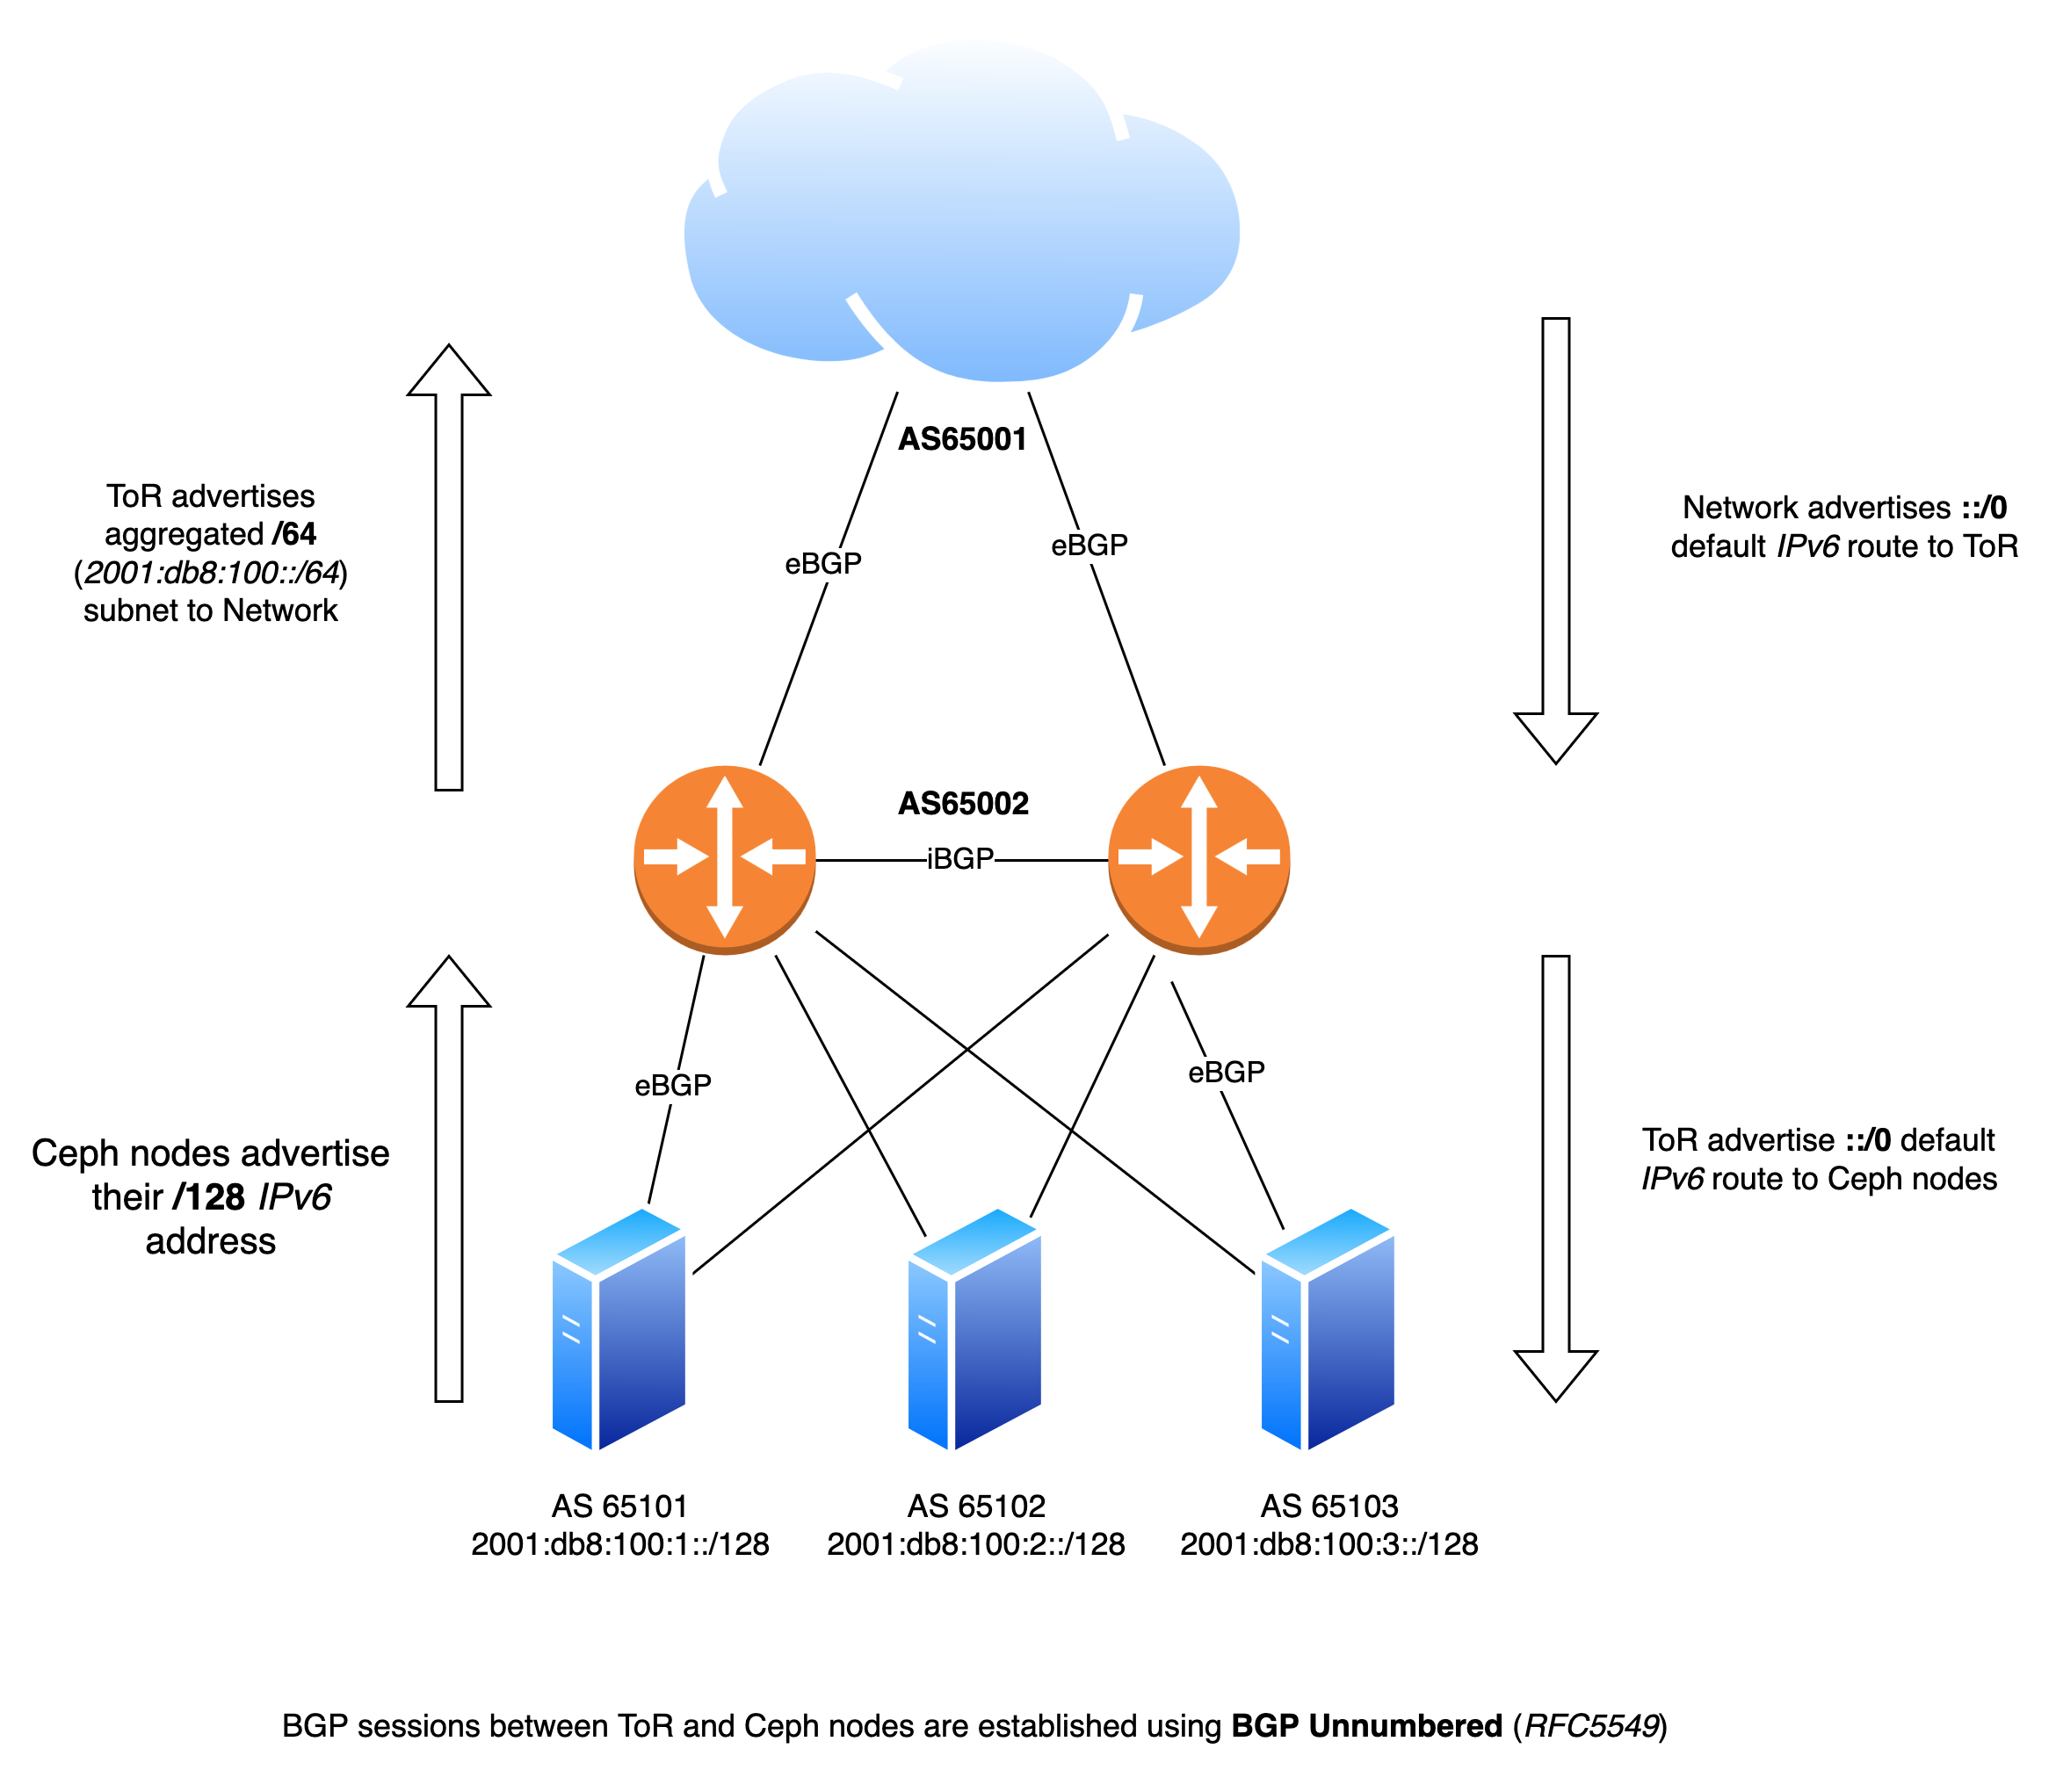
Each nodes has two independent BGP sessions with the Top-of-Rack in it’s rack. Via these BGP sessions they advertise their local IPv6 /128 address. Via the same sessions they receive a default ::/0 IPv6 route.

ceph01# sh bgp summary 

IPv6 Unicast Summary (VRF default):
BGP router identifier 1.2.3.4, local AS number 65101 vrf-id 0
BGP table version 10875
RIB entries 511, using 96 KiB of memory
Peers 2, using 1448 KiB of memory
Peer groups 1, using 64 bytes of memory

Neighbor        V    AS   MsgRcvd   MsgSent   TblVer  InQ OutQ  Up/Down State/PfxRcd   PfxSnt Desc
enp196s0f0np0   4 65002    487385    353917        0    0    0 3d18h17m            1        1 N/A
enp196s0f1np1   4 65002    558998    411452        0    0    0 01:38:55            1        1 N/A

Total number of neighbors 2
ceph01#

Here we see two BGP sessions active over both NICs of the Ceph node. We can also see that a default IPv6 route is received via BGP.

ceph01# sh ipv6 route ::/0
Routing entry for ::/0
  Known via "bgp", distance 20, metric 0
  Last update 01:42:00 ago
    fe80::e29:efff:fed7:4719, via enp196s0f0np0, weight 1
    fe80::7686:e2ff:fe7c:a19e, via enp196s0f1np1, weight 1

ceph01# 

The Frrouting configuration ( /etc/frr/frr.conf ) is fairly simple:

frr defaults traditional
hostname ceph01
log syslog informational
no ip forwarding
no ipv6 forwarding
service integrated-vtysh-config
!
interface enp196s0f0np0
 no ipv6 nd suppress-ra
exit
!
interface enp196s0f1np1
 no ipv6 nd suppress-ra
exit
!
interface lo
 ipv6 address 2001:db8:100:1::/128
exit
!
router bgp 65101
 bgp router-id 1.2.3.4
 no bgp ebgp-requires-policy
 no bgp default ipv4-unicast
 no bgp network import-check
 neighbor upstream peer-group
 neighbor upstream remote-as external
 neighbor enp196s0f0np0 interface peer-group upstream
 neighbor enp196s0f1np1 interface peer-group upstream
 !
 address-family ipv6 unicast
  redistribute connected
  neighbor upstream activate
 exit-address-family
exit
!
end

On the Juniper switches a configuration was defined for the BGP Unnumbered (RFC5549) configuration as well. This blogpost explains very well on how BGP Unnumbered works on JunOS, I am not going to repeat it. I will highlight a couple of pieces of configuration.

root@tor01# show interfaces xe-0/0/1
description ceph01;
unit 0 {
    mtu 9216;
    family inet6;
}

root@tor01# show protocols router-advertisement 
interface xe-0/0/1.0;
root@tor01# show | compare 
[edit]
+  policy-options {
+      as-list bgp_unnumbered_as_list members 65101-65199;
+  }
[edit protocols]
+   bgp {
+       group ceph {
+           family inet6 {
+               unicast;
+           }
+           multipath;
+           export default-v6;
+           import ceph-loopback;
+           dynamic-neighbor bgp_unnumbered {
+               peer-auto-discovery {
+                   family inet6 {
+                       ipv6-nd;
+                   }
+                   interface xe-0/0/1.0;
+                   interface xe-0/0/2.0;
+                   interface xe-0/0/3.0;
+               }
+           }
+           peer-as-list bgp_unnumbered_as_list;
+       }
+   }
[edit policy]
+ policy-statement default-v6 {
+    from {
+        route-filter ::/0 exact;
+   }
+   then accept;
+}
+ policy-statement ceph-loopback {
+    from {
+        route-filter 2001:db8:100::/64 upto /128;
+   }
+   then accept;
+}

This will set up the BGP sessions via the interfaces xe-0/0/1 until xe-0/0/3 using IPv6 Autodiscovery.

The Ceph nodes should now be able to ping the other nodes:

PING 2001:db8:100::2(2001:db8:100::2) 56 data bytes
64 bytes from 2001:db8:100::2: icmp_seq=1 ttl=63 time=0.058 ms
64 bytes from 2001:db8:100::2: icmp_seq=2 ttl=63 time=0.063 ms
64 bytes from 2001:db8:100::2: icmp_seq=3 ttl=63 time=0.071 ms

--- 2001:db8:100::2 ping statistics ---
3 packets transmitted, 3 received, 0% packet loss, time 2037ms
rtt min/avg/max/mdev = 0.058/0.064/0.071/0.005 ms

Ceph configuration

From Ceph’s perspective there is not much to do. We just need to specify the IPv6 subnet Ceph is allowed to use and bind to.

[global]
	 mon_host = 2001:db8:100::1, 2001:db8:100::2, 2001:db8:100::3
	 ms_bind_ipv4 = false
	 ms_bind_ipv6 = true
	 public_network = 2001:db8:100::/64

This is all the configuration needed for Ceph 🙂

wdh@ceph01:~$ sudo ceph health
HEALTH_OK
wdh@infra-04-01-17:~$ sudo ceph mon dump
election_strategy: 1
0: [v2:[2001:db8:100::1]:3300/0,v1:[2001:db8:100::1]:6789/0] mon.ceph01
1: [v2:[2001:db8:100::2]:3300/0,v1:[2001:db8:100::2]:6789/0] mon.ceph02
2: [v2:[2001:db8:100::3]:3300/0,v1:[2001:db8:100::3]:6789/0] mon.ceph02
dumped monmap epoch 6
wdh@infra-04-01-17:~$ 

VXLAN with VyOS and Ubuntu 18.04

VXLAN

Virtual Extensible LAN uses encapsulation technique to encapsulate OSI layer 2 Ethernet frames within layer 4 UDP datagrams. More on this can be found on the link provided.

For a Ceph and CloudStack environment I needed to set up a Proof-of-Concept using VXLAN and some refurbished hardware. The main purpose of this PoC is to verify that VXLAN works with CloudStack, Ceph and Ubuntu 18.04

VyOS

VyOS is an open source network operating system based on Debian Linux. It supports VXLAN, so using this we were able to test VXLAN in this setup.

In production a other VXLAN capable router would be used, but for a PoC VyOS works just fine running on a regular server.

Configuration

The VyOS router is connected to ‘the internet’ with one NIC and the other NIC is connected to a switch.

Using static routes a IPv4 subnet (/24) and a IPv6 subnet (/48) are routed towards the VyOS router. These are then splitted and send to multiple VLANs.

As it took me a while to configure VXLAN under VyOS

I’m only posting that configuration.

interfaces {
    ethernet eth0 {
        address 31.25.96.130/30
        address 2a00:f10:100:1d::2/64
        duplex auto
        hw-id 00:25:90:80:ed:fe
        smp-affinity auto
        speed auto
    }
    ethernet eth5 {
        duplex auto
        hw-id a0:36:9f:0d:ab:be
        mtu 9000
        smp-affinity auto
        speed auto
        vif 300 {
            address 192.168.0.1/24
            description VXLAN
            mtu 9000
        }
    vxlan vxlan1000 {
        address 10.0.0.1/23
        address 2a00:f10:114:1000::1/64
        group 239.0.3.232
        ip {
            enable-arp-accept
            enable-arp-announce
        }
        ipv6 {
            dup-addr-detect-transmits 1
            router-advert {
                cur-hop-limit 64
                link-mtu 1500
                managed-flag false
                max-interval 600
                name-server 2a00:f10:ff04:153::53
                name-server 2a00:f10:ff04:253::53
                other-config-flag false
                prefix 2a00:f10:114:1000::/64 {
                    autonomous-flag true
                    on-link-flag true
                    valid-lifetime 2592000
                }
                reachable-time 0
                retrans-timer 0
                send-advert true
            }
        }
        link eth5.300
        mtu 1500
        vni 1000
    }
    vxlan vxlan2000 {
        address 109.72.91.1/26
        address 2a00:f10:114:2000::1/64
        group 239.0.7.208
        ipv6 {
            dup-addr-detect-transmits 1
            router-advert {
                cur-hop-limit 64
                link-mtu 1500
                managed-flag false
                max-interval 600
                name-server 2a00:f10:ff04:153::53
                name-server 2a00:f10:ff04:253::53
                other-config-flag false
                prefix 2a00:f10:114:2000::/64 {
                    autonomous-flag true
                    on-link-flag true
                    valid-lifetime 2592000
                }
                reachable-time 0
                retrans-timer 0
                send-advert true
            }
        }
        link eth5.300
        mtu 1500
        vni 2000
    }
}

VLAN 300 on eth5 is used to route VNI 1000 and 2000 in their own multicast groups.

The MTU of eth5 is set to 9000 so that the encapsulated traffic of VXLAN can still be 1500 bytes.

Ubuntu 18.04

To test if VXLAN was actually working on the Ubuntu 18.04 host I made a very simple script:

ip link add vxlan1000 type vxlan id 1000 dstport 4789 group 239.0.3.232 dev vlan300 ttl 5
ip link set up dev vxlan1000
ip addr add 10.0.0.11/23 dev vxlan1000
ip addr add 2a00:f10:114:1000::101/64 dev vxlan1000

That works! I can ping 10.0.0.11 and 2a00:f10:114:1000::1 from my Ubuntu 18.04 machine!

Running headless VirtualBox inside Nested KVM

For the Ceph training at 42on I use VirtualBox to build Virtual Machines. This is because they work under MacOS, Windows and Linux.

For the internal Git at 42on we use Gitlab and I wanted to use Gitlab’s CI to build my Virtual Machines automatically.

As we don’t have any physical hardware at 42on (everything runs in the cloud) I wanted to see if I could run VirtualBox Headless inside a VM with Nested KVM enabled.

Nested KVM

The first thing I checked was if my KVM Virtual Machine actually supported Nested KVM. This can be verified with the kvm-ok command under Ubuntu:

root@glrun01:~# kvm-ok 
INFO: /dev/kvm exists
KVM acceleration can be used
root@glrun01:~#

Now that’s verified I tried to install VirtualBox.

VirtualBox

Installing VirtualBox is straight forward. Just add the repository and install the packages. Don’t forget to reboot afterwards to make sure all kernel modules are loaded and properly installed.

apt-get install virtualbox

VirtualBox Extension Pack

The trick to get everything working properly is to install Oracle’s VirtualBox Extension Pack. It took me a while to figure out that I need to install it manually. It wasn’t done by default after install.

You need to download the pack and install it using the VBoxManage command.

wget http://download.virtualbox.org/virtualbox/5.0.24/Oracle_VM_VirtualBox_Extension_Pack-5.0.24.vbox-extpack
vboxmanage extpack install Oracle_VM_VirtualBox_Extension_Pack-5.0.24.vbox-extpack
vboxmanage list extpacks
vboxmanage setproperty vrdeextpack "Oracle VM VirtualBox Extension Pack"

With that installed and configured I rebooted the machine again just to be sure.

It works!

With that it actually worked. The VirtualBox VMs can now be built inside a Nested KVM machine controlled by Gitlab’s CI 🙂

AnyIP: Bind a whole subnet to your Linux machine

IPv6 Prefix Delegation

In my previous post I wrote how you can use Docker with IPv6 and Prefix Delegation.

A IPv6 subnet routed to a Linux machine can be used with other things than Docker. That’s where the AnyIP feature of the kernel comes in.

Linux Kernel AnyIP

The AnyIP feature of the Linux kernel allows you to bind a complete IPv4 or IPv6 subnet to your system.

Instead of adding all addresses manually to the kernel you can tell it to bind a complete subnet.

Configuring

IPv4

ip -4 route add local 192.168.0.0/24 dev lo

In this case the Linux kernel will now respond to ARP requests for any IPv4 address in the 192.168.0.0/24 subnet.

IPv6

ip -6 route add local 2001:db8:100::/64 dev lo

In this case the kernel will respond for Neigh Sollicitations on any IPv6 address in the 2001:db8:100::/64 subnet.

Example usage

Let’s assume that you have the IPv6 prefix 2001:db8:100::/60 routed to your Linux machine through IPv6 prefix delegation.

From that /60 subnet we take the first /64 subnet and attach it to lo.

ip -6 route add local 2001:db8:100::/64 dev lo

You can now ping any of the addresses in that subnet:

  • 2001:db8:100::1
  • 2001:db8:100::100
  • 2001:db8:100::200
  • 2001:db8:100::dead:b33f

If you would start a webserver which listens on port 80 you can use any of the IPv6 addresses in that subnet and the webserver will respond to it.

Use cases

It could be that you want to to mass-shared hosting on a system where you want to assign each hostname/domainname it’s own IPv6 address. Instead of attaching single IPs to a interface you can simply attach a complete subnet and point traffic to any of the IPs in that subnet.

Demo

On a virtual machine on PCextreme’s Aurora Compute I deployed a Instance with Prefix Delegation enabled.

After running ‘dhclient’ I got the subnet 2a00:f10:500:40::/60 assigned to my Instance.

It was then just one line to attach a /64 subnet:

ip -6 route add local 2a00:f10:500:40::/64 dev lo

Random address generator

I wrote a small piece of Python code to generate a random IPv6 address:

#!/usr/bin/env python3
"""
Generate a random IPv6 address for a specified subnet
"""

from random import seed, getrandbits
from ipaddress import IPv6Network, IPv6Address

subnet = '2a00:f10:500:40::/64'

seed()
network = IPv6Network(subnet)
address = IPv6Address(network.network_address + getrandbits(network.max_prefixlen - network.prefixlen))

print(address)

Using a small loop in Bash I could now ping random addresses in that subnet:

while [ true ]; do ping6 -c 2 `./random-ipv6.py`; done

Some example output:

--- 2a00:f10:500:40:d142:1092:ea84:74b4 ping statistics ---
2 packets transmitted, 2 received, 0% packet loss, time 1000ms
rtt min/avg/max/mdev = 10.252/11.680/13.108/1.428 ms
PING 2a00:f10:500:40:4e50:f264:6ea9:d184(2a00:f10:500:40:4e50:f264:6ea9:d184) 56 data bytes
64 bytes from 2a00:f10:500:40:4e50:f264:6ea9:d184: icmp_seq=1 ttl=56 time=10.0 ms
64 bytes from 2a00:f10:500:40:4e50:f264:6ea9:d184: icmp_seq=2 ttl=56 time=10.0 ms

--- 2a00:f10:500:40:4e50:f264:6ea9:d184 ping statistics ---
2 packets transmitted, 2 received, 0% packet loss, time 1000ms
rtt min/avg/max/mdev = 10.085/10.087/10.089/0.002 ms
PING 2a00:f10:500:40:d831:1f89:b06d:fe12(2a00:f10:500:40:d831:1f89:b06d:fe12) 56 data bytes
64 bytes from 2a00:f10:500:40:d831:1f89:b06d:fe12: icmp_seq=1 ttl=56 time=9.77 ms
64 bytes from 2a00:f10:500:40:d831:1f89:b06d:fe12: icmp_seq=2 ttl=56 time=10.1 ms

--- 2a00:f10:500:40:d831:1f89:b06d:fe12 ping statistics ---
2 packets transmitted, 2 received, 0% packet loss, time 1005ms
rtt min/avg/max/mdev = 9.777/9.958/10.140/0.207 ms
PING 2a00:f10:500:40:2c45:26ee:5b93:fa2(2a00:f10:500:40:2c45:26ee:5b93:fa2) 56 data bytes
64 bytes from 2a00:f10:500:40:2c45:26ee:5b93:fa2: icmp_seq=1 ttl=56 time=10.2 ms
64 bytes from 2a00:f10:500:40:2c45:26ee:5b93:fa2: icmp_seq=2 ttl=56 time=10.0 ms

Maximum amount of Docker containers on a single host

While playing with Docker I wanted to know how many containers I could spawn on a single system.

A quick for-loop told me that the maximum is 1023 containers on a single host:

Error response from daemon: Cannot start container 09c8f46b59ccc311e8d0352789db6debd0fa1df98186c5cda98583d762d48601: adding interface vetha5d205e to bridge docker0 failed: exchange full

The limitation here is the Linux bridging which can’t have more then 1023 interfaces attached. Specifically net/bridge/br_private.h BR_PORT_BITS cannot be extended because of spanning tree requirements.

wido@wido-desktop:~$ docker ps|wc -l
1024
wido@wido-desktop:~$

Although that says 1024 there is a header line, so we have to subtract one. That brings it to 1023.

wido@wido-desktop:~$ docker version
Client:
 Version:      1.8.3
 API version:  1.20
 Go version:   go1.4.2
 Git commit:   f4bf5c7
 Built:        Mon Oct 12 05:37:18 UTC 2015
 OS/Arch:      linux/amd64

Server:
 Version:      1.8.3
 API version:  1.20
 Go version:   go1.4.2
 Git commit:   f4bf5c7
 Built:        Mon Oct 12 05:37:18 UTC 2015
 OS/Arch:      linux/amd64
wido@wido-desktop:~$

Failover with Nexenta, NFS and the RSF-1 plugin

The title might seem a bit cryptic, but this post is about a High Available Nexenta cluster with the RSF-1 we are deploying.

While we are waiting for the moment where we can start using Ceph we are implementing new storage for our hosting clusters. Our current Linux machines with LVM and XFS are not up to the task anymore.

After some testing and discussing we chose to use Nexenta. What Nexenta is and how awesome ZFS is can be found on other places on the net, I’m not going to discuss that here.

I wanted to publish our findings about the HA plugin and NFS.

In short, we have two headends connected with two SAS JBOD’s. The RSF-1 plugin makes sure the ZPOOL is imported on one headend at the time. If one headend fails, the plugin automatically fails the pool over to the other headend.

The plugin provides one HA IP which is shared between the headends, you probably get the point.

We’ve been doing some testing and noticed that when we mount NFS (v3) over TCP the failover takes a staggering 6 minutes! Well, the failover doesn’t take 6 minutes, but that’s the time it takes for the TCP connections to recover.

When mounting over UDP the service is continued in 50 seconds, so that’s a big difference!

Some testing showed that this is due to the following kernel settings:

net.ipv4.tcp_retries1 = 3
net.ipv4.tcp_retries2 = 15

This page explains what those two values actually control.

We’ve been experimenting with those values and lowering retries1 to 1 gave us the same recovery times as with UDP, but sometimes the recovery would still take 6 minutes..

For now I advise to use NFS with UDP (which gives better performance anyway), but if you need to use TCP for some reason try fiddling with these values.

Distributed storage under Linux, is it there yet?

When it comes down to storage under Linux you have a lot of great options if you are looking for local storage, but what if you have so much data that local storage is not really an option? And what if you need multiple servers accessing the data? You’ll probably take NFS or iSCSI with a clustered filesystem like GFS or OCFS2.

When using NFS or iSCSI it will come down to one, two or maybe three servers storing your data, where one will have a primary role for 99.99% of the time. That is still a Single Point-of-Failure (SPoF).

Although this worked (and still is) fine, we are running into limitations. We want to store more and more data, we want to expand without downtime and we want expansion to go smoothly. Doing all that under Linux now is a ……. Let’s say: Challenge.

Energy costs are also rising, if you like it or not, it does influence the work of a system administrator. We were used to having a Active/Passive setup, but that doubles your energy consumption! In large environments that could mean a lot of money. Do we still want that? I don’t think so.

Distributed storage is what we need, no central brain, no passive nodes, but a fully distributed and fault tolerant filesystem where every node is active and it has to scale easily without any disruption in service.

I think it’s nearly there and they call it Ceph!

Ceph is a distributed file system build on top of RADOS, a scalable and distributed object store. This object store simply stores objects in pools (which some people might refer to as “buckets”). It’s this distributed object store which is the basis of the Ceph filesystem.

RADOS works with Object Store Daemons (OSD). These OSDs are a daemon which have a data directory (btrfs) where they store their objects and some basic information about the cluster. Typically a data directory of a OSD is a one hard disk formatted with btrfs.

Every pool has a replication size property, this tells RADOS how many copies of an object you want to store. If you choose 3 every object you store on that pool will be stored on three different OSDs. This provides data safety and availability, loosing one (or more) OSDs will not lead to data loss nor unavailability.

Data placement in RADOS is done by CRUSH. With CRUSH you can strategically place your objects (and it’s replica’s) in different rooms, racks, rows and servers. One might want to place the second replica on a separate power feed then the primary replica.

A small RADOS cluster could look like this:

This is a small RADOS cluster, three machines with 4 disks each and one OSD per disk. The monitor is there to inform the clients about the cluster state. Although this setup has one monitor, these can be made redundant by simple adding more (odd number is preferable).

With this post I don’t want to tell you everything about RADOS and the internal working, all this information is available on the Ceph website.

What I do want to tell you is how my experiences are with Ceph at this point and where it’s heading.

I started testing Ceph about 1.5 years ago, I stumbled on it when reading the changelog of 2.6.34, that was the first kernel where the Ceph kernel client was included.

I’m always on a quest to find a better solution for our storage, right now we are using Linux boxes with NFS, but that is really starting to hurt in many ways.

Where did Ceph get in the past 18 months? Far! I started testing when version 0.18 just got out, right now we are at 0.31!

I started testing the various components of Ceph, started on a small number of virtual machines, but currently I have two clusters running, a “semi-production” where I’m running various virtual machines with RBD and Qemu-KVM. My second cluster is a 74TB cluster with 10 machines, each having 4 2TB disks.

Filesystem            Size  Used Avail Use% Mounted on
[2a00:f10:113:1:230:48ff:fed3:b086]:/   74T  13T   61T  17% /mnt/ceph

As you can see, I’m running my cluster over IPv6. Ceph does not support dual-stack, you will have to choose between IPv4 or IPv6, where I prefer the last one.

But you are probably wondering how stable or production ready it is? That question is hard to answer. My small cluster where I run the KVM Virtual Machines (through Qem-KVM with RBD) has only 6 OSDs and a capacity of 600GB. It has been running for about 4 months now without any issues, but I have to be honest, I didn’t stress it either. I didn’t kill any machines nor did hardware fail. It should be able to handle those crashes, but I haven’t stressed that cluster.

The story is different with my big cluster. In total it’s 15 machines, 10 machines hosting a total of 40 OSDs, the rest are monitors, meta data servers and clients. It started running about 3 months ago and since I’ve seen numerous crashes. I also chose to use the WD Green 2TB disks in my cluster, that was not the best decision. Right now I have a 12% failure rate of these disks. While the failure of those disks is not a good thing, it is a good test for Ceph!

Some disk failures caused some serious problems causing the cluster to start bouncing around and never recovering from that.. But, about 2 days ago I noticed two other disks failing and the cluster fully recovered from it while a rsync was writing data to it. So, it seems to be improving!

During my further testing I have stumbled upon a lot of things. My cluster is build with Atom CPU’s, but those seem to be a bit underpowered for the work. Recovery is heavy for OSDs, so whenever something goes wrong in the cluster I see the CPU’s starting to spike towards the 100%. This is something that is being addressed.

Data placement goes in Placement Group’s, aka PGs. The more data or OSDs you add to the cluster, the more PGs you’ll get. The more PGs you have, the more memory your OSDs start to consume. My OSDs have 4GB (Atom limitation) each. Recovery is not only CPU hungry, but it will also eat your memory. Although the use of tcmalloc reduced the memory usage, OSDs sometimes use a lot of memory.

To come to some sort of a conclusion. Are we there yet? Short answer: No. Long answer: No again, but we will get there. Although Ceph still has a long way to go, it’s on the right path. I think that Ceph will become the distributed storage solution under Linux, but it will take some time. Patience is the key here!

The last thing I wanted to address is the fact that testing is needed! Bugs don’t reveal themselves you have to hunt them down. If you have spare hardware and time, do test and report!

Multipath iSCSI with Ubuntu 10.04 and a EqualLogic SAN

Recently we purchased a EqualLogic PS6000XVS for a KVM environment.

In most of our iSCSI systems we use Multipath I/O, we do this by giving the iSCSI Target two NIC’s and give each NIC a IP-Address in a different subnet over a physically different network. This way we have two seperate I/O path’s to the iSCSI Target.

The EqualLogic does not support this, it only supports one virtual IP in one network, so multipathing gets a bit difficult.

On the Dell Wiki there is configuration howto, so I read that carefully.

The examples are for RedHat, but we are using Ubuntu, but that should not make a big difference, but it did….

Our storage network is in the subnet 192.168.32.0/19 where the virtual IP of the EqualLogic is 192.168.32.1. You should know, this is a virtual IP, in total we have three PS6000 nodes, which do some magic by responding with a different MAC Address for 192.168.32.1 towards each client.

One of our clients has the following configuration for the storage connectivity:

eth0      Link encap:Ethernet  HWaddr 14:FE:B5:C6:62:E0  
          inet addr:192.168.37.4  Bcast:192.168.63.255  Mask:255.255.224.0
          UP BROADCAST RUNNING MULTICAST  MTU:9000  Metric:1
          RX packets:27263332 errors:0 dropped:0 overruns:0 frame:0
          TX packets:25323692 errors:0 dropped:0 overruns:0 carrier:0
          collisions:0 txqueuelen:1000 
          RX bytes:24569609290 (22.8 GiB)  TX bytes:132201626154 (123.1 GiB)
          Interrupt:170 Memory:e6000000-e6012800 

eth1      Link encap:Ethernet  HWaddr 14:FE:B5:C6:62:E2  
          inet addr:192.168.38.4  Bcast:192.168.63.255  Mask:255.255.224.0
          UP BROADCAST RUNNING MULTICAST  MTU:9000  Metric:1
          RX packets:27246580 errors:0 dropped:0 overruns:0 frame:0
          TX packets:25335109 errors:0 dropped:0 overruns:0 carrier:0
          collisions:0 txqueuelen:1000 
          RX bytes:24549507448 (22.8 GiB)  TX bytes:132201622012 (123.1 GiB)
          Interrupt:178 Memory:e8000000-e8012800

It took some work to get this working. Bot NIC’s are connected to the same subnet, through different switches though.

The first problem you will run into is the ARP flux problem of Linux, I’m not going to write to much about this, on the internet there is more then enough information written about this topic.

I ended up with this configuration:

auto eth0
iface eth0 inet static
        address 192.168.37.4
        netmask 255.255.224.0
        post-up sysctl -w net.ipv4.conf.eth0.rp_filter=0
        post-up sysctl -w net.ipv4.conf.eth0.arp_ignore=1
        post-up sysctl -w net.ipv4.conf.eth0.arp_announce=2

auto eth2
iface eth2 inet static
        address 192.168.38.4
        netmask 255.255.224.0
        post-up sysctl -w net.ipv4.conf.eth2.rp_filter=0
        post-up sysctl -w net.ipv4.conf.eth2.arp_ignore=1
        post-up sysctl -w net.ipv4.conf.eth2.arp_announce=2

For Open-iSCSI I created two interfaces called ieth0 and ieth1 and routed my iSCSI traffic through them. How you can do this can be found at the Dell wiki.

But it did not work! I was able to ping the EqualLogic over eth0, but not over eth1. If I brought down eth0, it would work over eth1, but not vise versa. It took me a while to find it, but it’s due to a default setting in Ubuntu, done in /etc/sysctl.d/10-network-security.conf, this enables rp_filter (Reverse Path Filtering) by default, so I modified that file

# Turn on Source Address Verification in all interfaces to
# prevent some spoofing attacks.
#net.ipv4.conf.default.rp_filter=1
#net.ipv4.conf.all.rp_filter=1

And voila! My iSCSI multipathing started to work! My multipath shows:

[size=1.0T][features=1 queue_if_no_path][hwhandler=0][rw]
\_ round-robin 0 [prio=2][active]
 \_ 13:0:0:0 sdk 8:160 [active][ready]
 \_ 14:0:0:0 sdj 8:144 [active][ready]
eql-0-8a0906-4f2b9e409-2b800184d024d9db_c () dm-4 EQLOGIC,100E-00
[size=2.0T][features=1 queue_if_no_path][hwhandler=0][rw]
\_ round-robin 0 [prio=2][active]
 \_ 6:0:0:0 sdg 8:96  [active][ready]
 \_ 11:0:0:0 sdf 8:80  [active][ready]

This should work under Ubuntu 10.04. Took me some time to figure it all out, but now it’s working like a charm. But still, I prefer multipathing over two different VLAN’s and subnets, really odd that the EqualLogic does not support this!

Make-kpkg fails due to a ‘+’/plus appended to the kernel version

This weekend i tried to compile a patched 2.6.35 kernel and wanted to install this on multiple machines. But it kept failing when the .deb files were created.

make-kpkg kept complaining that the kernel version, 2.6.35-rbd+ was not in the “control info”.

After some searching i found out this was due to CONFIG_LOCALVERSION_AUTO not being set.

Setting this to ‘y’ solved it for me, now my kernel compiled and got packed the way it should.

Multipath iSCSI under Linux

Building a iSCSI Target (Server) under Linux is fairly simple, just install Enterprise iSCSI Target (IET) and you are ready. The Initiator (Client) is simple to, just use Open-iSCSI and you are ready to go, but how do you make this redundant?

When i first started using iSCSI i heard about the term “multipath”, i read that you could make a redundant IP link to your iSCSI Target with multipath, but how?

Searching on the web didn’t give me real practical anwsers. After using multipath for about 2 years now, i thought, why don’t i make a blog post about it so other people can have redundant iSCSI to!

For this example i have a iSCSI Target with two IP’s:

  1. 172.16.0.1/255.255.255.0
  2. 172.16.1.1/255.255.255.0

These IP’s given to eth0 and eth1, via two switches the connectivity is given to my initiator with the IP’s:

  1. 172.16.0.101/255.255.255.0
  2. 172.16.1.101/255.255.255.0

So there is a redundant network connection to the target, now we just have to start using this.

My target has as IQN: “iqn.2009-11-11.widodh.storage:iscsi-001”

I suppose you know how to configure IET and Open-iSCSI, so i’ll just skip the regular configuration. In this example my Target exports one LUN of 10GB.

On the client (Ubuntu 9.04 (Jaunty)) you have to install:

  1. open-iscsi
  2. multipath-tools

And that’s it, there is no configuration needed for multipath, this is all done dynamically.

Now we are going to discover the Target on both IP’s and log on to it:

iscsiadm -m discovery -t sendtargets -p 172.16.1.1
iscsiadm -m discovery -t sendtargets -p 172.16.0.1
iscsiadm -m node -T iqn.2009-11-11.widodh.storage:iscsi-001 -p 172.16.0.1 --login
iscsiadm -m node -T iqn.2009-11-11.widodh.storage:iscsi-001 -p 172.16.1.1 --login

The nicest thing about this is, that Multipath itself discovers that there is a redundant connection to a SCSI device and everything is done for you.

In “/dev/mapper” you’ll find (for example) “14945540000000000000000000100000099b2f8000f000000″and that is your multipath device.

You can list your multipath devices with:

multipath -ll

In my example this looked like:

14945540000000000000000000100000099b2f8000f000000dm-0 IET     ,VIRTUAL-DISK  
[size=35G][features=0][hwhandler=0]
\_ round-robin 0 [prio=1][active]
 \_ 4:0:0:0 sdd 8:48  [active][ready]
\_ round-robin 0 [prio=1][enabled]
 \_ 3:0:0:0 sdc 8:32  [active][ready]

Multipath detected a redundant path for “sdc” and “sdd” and created a device which i could use.

If one of the connections goes down for what ever reason, you should see this in your dmesg:

[ 2070.285310] device-mapper: multipath: Failing path 8:32.

Multipath will then show:

sdc: checker msg is "directio checker reports path is down"
14945540000000000000000000100000099b2f8000f000000dm-0 IET     ,VIRTUAL-DISK  
[size=35G][features=0][hwhandler=0]
\_ round-robin 0 [prio=1][active]
 \_ 4:0:0:0 sdd 8:48  [active][ready]
\_ round-robin 0 [prio=0][enabled]
 \_ 3:0:0:0 sdc 8:32  [failed][faulty]

Yes, you will see a lot of SCSI errors in your dmesg, but since you have a redundant path that is nothing to be worried about.

Just keep in mind, use “/dev/mapper/14945540000000000000000000100000099b2f8000f000000” as your block device for whatever you intent to use it!

Multipath in combination with iSCSI is really great, a simple network hickup will never get your services down and you can keep your network like a basic Layer-2 network, no STP is needed, the redundant paths can go over fully seperated links which decreases the chance for downtime!

Have fun using multipath!