Recently, I became a RIPE member, which resulted in an IPv6 /29 subnet being allocated to me. One of my main goals was to route a /48 from this /29 to my home, allowing me to use my own IPv6 addresses on my local network.
However, my ISP (Ziggo Zakelijk) does not allow me to announce my own IPv6 address space. Instead, they have statically assigned me a /48 subnet (2001:41f0:6f67::/48) as part of my business account.
Regardless, I wanted the flexibility to switch ISPs in the future without the hassle of renumbering my home network. And, of course, it’s also a fun technical challenge to get this working! Geeky stuff!
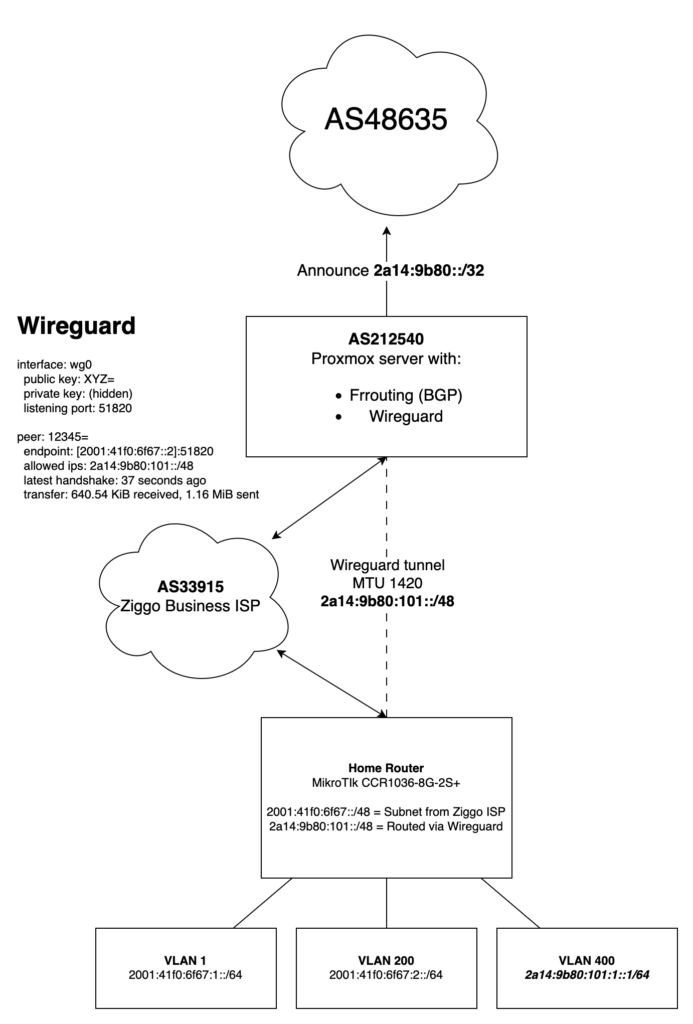
Wireguard from AS212540
In a datacenter in Amsterdam, I have a Dell R430 server running Proxmox, where I also run the FRRouting (FRR) daemon to announce AS212540.
ipv6 route 2a14:9b80::/32 Null0
ip router-id 2.57.57.4
!
router bgp 212540

 address-family ipv6 unicast
  redistribute kernel
  redistribute connected
  redistribute static
  neighbor upstream-v6 activate
  neighbor upstream-v6 soft-reconfiguration inbound
  neighbor upstream-v6 route-map upstream-in in
  neighbor upstream-v6 route-map upstream-out out
My idea was to use WireGuard from this server to route a /48 to my Mikrotik CCR1036-8G-2S+ running at home. I would then be able to use parts of my own IPv6 space at home.
- Route my own IPv6 /48 to my house
- Use Wireguard from my Proxmox server in Amsterdam
- Use IPv6 as the underlay under Wireguard
- Use as little configuration as possible
Turned out that WireGuard as super easy to get up and running. In the end this was all the configuration I needed in /etc/wireguard/wg0.conf
[Interface]
Address = 2a14:9b80:0:1::1/64
ListenPort = 51820
PrivateKey = THISISMYPRIVATEKEY

[Peer]
PublicKey = PUBLICKEYOFMIKROTIK
AllowedIPs = 2a14:9b80:101::/48
Endpoint = [2001:41f0:6f67::2]:51820
There are plenty of tutorials online on how to set up WireGuard and generate the necessary keys. Instead, I want to show how I built an IPv6-only environment. No NAT, just pure routing!
If you look closely you can spot a few things
- 2001:41f0:6f67::2 is the WAN IP of my MikroTik router at home
- 2a14:9b80:101::/48 is the subnet I’m routing towards my house via Wireguard
The BGP announcement on my Proxmox server already routes the /32 to the server. Setting up a WireGuard tunnel was all that was needed to ensure the routes propagated in the local routing table.
root@proxmox:~# ip -6 route show
blackhole 2001:678:3a4:100::/56 dev lo proto static metric 20 pref medium
2a14:9b80::/64 dev vmbr2 proto kernel metric 256 pref medium
2a14:9b80:0:1::/64 dev wg0 proto kernel metric 256 pref medium
2a14:9b80:101::/48 dev wg0 metric 1024 pref medium
blackhole 2a14:9b80::/32 dev lo proto static metric 20 pref medium
default via 2001:678:3a4:1::3 dev vmbr0 proto kernel metric 1024 onlink pref medium
root@proxmox:~#
For the completeness here is the output of the wg command:
interface: wg0
  public key: IhYOkpqE0cIBclaR7zGLml/7BriPIMoMdjmM5dbkkGs=
  private key: (hidden)
  listening port: 51820

peer: ZZkW3L0OES1bqQKdDpe3GQ88G4I3ABZVasuEVyvS5iM=
  endpoint: [2001:41f0:6f67::2]:51820
  allowed ips: 2a14:9b80:101::/48
  latest handshake: 1 second ago
  transfer: 642.48 KiB received, 1.17 MiB sent
Source based routing
Since my home network already has native IPv6 through my ISP, I needed to make sure that only specific traffic was routed outbound via the WireGuard tunnel.
Typically, routing is based on the destination address, but in cases like this, it’s necessary to route based on the source address and sometimes the destination address as well.
In MikroTik, this is known as Policy Routing, which allows for this level of control. It took me a few hours to figure out, and I also discovered that I needed RouterOS 7.18, as earlier versions did not support this setup properly.
Eventually this is the configuration I ended up with, from which I will only show the relevant parts:
/interface wireguard
add listen-port=51820 mtu=1420 name=wg-hrl23
/interface wireguard peers
add allowed-address=::/0 endpoint-address=2001:678:3a4:1::100 endpoint-port=51820 interface=wg-hrl23 name=peer1 persistent-keepalive=30s public-key="IhYOkpqE0cIBclaR7zGLml/7BriPIMoMdjmM5dbkkGs="

/routing table
add disabled=no fib name=wireguard

/ipv6 route
add comment="Ziggo Zakelijk" disabled=no dst-address=::/0 gateway=2001:41f0:6f67::1
add blackhole dst-address=2a14:9b80:101::/48
add disabled=no gateway=wg-hrl23 routing-table=wireguard

/ipv6 address
add address=2001:41f0:6f67::2 comment="Ziggo Zakelijk" interface=ether1
add address=2001:41f0:6f67:1::1 interface=bridgeLocal
add address=2a14:9b80:101::1 interface=wg-hrl23
add address=2a14:9b80:101:1::1 interface=ether4

/ipv6 firewall filter
add action=accept chain=input comment="Wireguard with proxmox01" dst-port=51820 in-interface-list=WAN protocol=udp src-address=2001:678:3a4:1::100/128

/routing rule
add action=lookup dst-address=2001:41f0:6f67::/48 src-address=2a14:9b80:101::/48 table=main
add action=lookup-only-in-table disabled=no src-address=2a14:9b80:101::/48 table=wireguard
The last two lines are the most important!
- Traffic between my regular LAN and the subnet routed to my home via Wireguard should just be regular routed traffic
- Otherwise the traffic should be diverted to the routing table “wireguard” which routes the traffic outbound via Wireguard
Diagram
To clarify a couple of things I have created a Diagram to hopefully explain how it all comes together.
I hope this explains and inspires you to do the same!