AnyIP: Bind a whole subnet to your Linux machine

IPv6 Prefix Delegation

In my previous post I wrote how you can use Docker with IPv6 and Prefix Delegation.

A IPv6 subnet routed to a Linux machine can be used with other things than Docker. That’s where the AnyIP feature of the kernel comes in.

Linux Kernel AnyIP

The AnyIP feature of the Linux kernel allows you to bind a complete IPv4 or IPv6 subnet to your system.

Instead of adding all addresses manually to the kernel you can tell it to bind a complete subnet.

Configuring

IPv4

ip -4 route add local 192.168.0.0/24 dev lo

In this case the Linux kernel will now respond to ARP requests for any IPv4 address in the 192.168.0.0/24 subnet.

IPv6

ip -6 route add local 2001:db8:100::/64 dev lo

In this case the kernel will respond for Neigh Sollicitations on any IPv6 address in the 2001:db8:100::/64 subnet.

Example usage

Let’s assume that you have the IPv6 prefix 2001:db8:100::/60 routed to your Linux machine through IPv6 prefix delegation.

From that /60 subnet we take the first /64 subnet and attach it to lo.

ip -6 route add local 2001:db8:100::/64 dev lo

You can now ping any of the addresses in that subnet:

  • 2001:db8:100::1
  • 2001:db8:100::100
  • 2001:db8:100::200
  • 2001:db8:100::dead:b33f

If you would start a webserver which listens on port 80 you can use any of the IPv6 addresses in that subnet and the webserver will respond to it.

Use cases

It could be that you want to to mass-shared hosting on a system where you want to assign each hostname/domainname it’s own IPv6 address. Instead of attaching single IPs to a interface you can simply attach a complete subnet and point traffic to any of the IPs in that subnet.

Demo

On a virtual machine on PCextreme’s Aurora Compute I deployed a Instance with Prefix Delegation enabled.

After running ‘dhclient’ I got the subnet 2a00:f10:500:40::/60 assigned to my Instance.

It was then just one line to attach a /64 subnet:

ip -6 route add local 2a00:f10:500:40::/64 dev lo

Random address generator

I wrote a small piece of Python code to generate a random IPv6 address:

#!/usr/bin/env python3
"""
Generate a random IPv6 address for a specified subnet
"""

from random import seed, getrandbits
from ipaddress import IPv6Network, IPv6Address

subnet = '2a00:f10:500:40::/64'

seed()
network = IPv6Network(subnet)
address = IPv6Address(network.network_address + getrandbits(network.max_prefixlen - network.prefixlen))

print(address)

Using a small loop in Bash I could now ping random addresses in that subnet:

while [ true ]; do ping6 -c 2 `./random-ipv6.py`; done

Some example output:

--- 2a00:f10:500:40:d142:1092:ea84:74b4 ping statistics ---
2 packets transmitted, 2 received, 0% packet loss, time 1000ms
rtt min/avg/max/mdev = 10.252/11.680/13.108/1.428 ms
PING 2a00:f10:500:40:4e50:f264:6ea9:d184(2a00:f10:500:40:4e50:f264:6ea9:d184) 56 data bytes
64 bytes from 2a00:f10:500:40:4e50:f264:6ea9:d184: icmp_seq=1 ttl=56 time=10.0 ms
64 bytes from 2a00:f10:500:40:4e50:f264:6ea9:d184: icmp_seq=2 ttl=56 time=10.0 ms

--- 2a00:f10:500:40:4e50:f264:6ea9:d184 ping statistics ---
2 packets transmitted, 2 received, 0% packet loss, time 1000ms
rtt min/avg/max/mdev = 10.085/10.087/10.089/0.002 ms
PING 2a00:f10:500:40:d831:1f89:b06d:fe12(2a00:f10:500:40:d831:1f89:b06d:fe12) 56 data bytes
64 bytes from 2a00:f10:500:40:d831:1f89:b06d:fe12: icmp_seq=1 ttl=56 time=9.77 ms
64 bytes from 2a00:f10:500:40:d831:1f89:b06d:fe12: icmp_seq=2 ttl=56 time=10.1 ms

--- 2a00:f10:500:40:d831:1f89:b06d:fe12 ping statistics ---
2 packets transmitted, 2 received, 0% packet loss, time 1005ms
rtt min/avg/max/mdev = 9.777/9.958/10.140/0.207 ms
PING 2a00:f10:500:40:2c45:26ee:5b93:fa2(2a00:f10:500:40:2c45:26ee:5b93:fa2) 56 data bytes
64 bytes from 2a00:f10:500:40:2c45:26ee:5b93:fa2: icmp_seq=1 ttl=56 time=10.2 ms
64 bytes from 2a00:f10:500:40:2c45:26ee:5b93:fa2: icmp_seq=2 ttl=56 time=10.0 ms

Docker and IPv6 Prefix Delegation

As posted earlier I have IPv6 Prefix Delegation working at our office to test with Docker.

One of the missing links was to automatically configure Docker to use the prefix obtained through DHCPv6+PD. I manually configured the prefix in Docker, but I also had to run dhclient manually.

I figured this could be automated so I gave it a try.

Ubuntu Networking

At first I tried to figure out if Ubuntu’s networking was somehow able to request a prefix through DHCPv6. Long story short: Neither Ubuntu nor CentOS are able to do so. You have to script this manually.

dhclient

To obtain a prefix I had to run dhclient manually. That wasn’t to hard. Simply run:

dhclient -6 -P -d -v eth0

This resulted in obtaining a prefix:

Bound to *:546
Listening on Socket/eth0
Sending on   Socket/eth0
PRC: Confirming active lease (INIT-REBOOT).
XMT: Forming Rebind, 0 ms elapsed.
XMT:  X-- IA_PD d5:68:28:08
XMT:  | X-- Requested renew  +3600
XMT:  | X-- Requested rebind +5400
XMT:  | | X-- IAPREFIX 2001:980:XXXX:140::/60
XMT:  | | | X-- Preferred lifetime +7200
XMT:  | | | X-- Max lifetime +7500
XMT:  V IA_PD appended.
XMT: Rebind on eth0, interval 940ms.
RCV: Reply message on eth0 from fe80::da67:d9ff:fe81:bcec.
RCV:  X-- IA_PD d5:68:28:08
RCV:  | X-- starts 1457617054
RCV:  | X-- t1 - renew  +604800
RCV:  | X-- t2 - rebind +967680
RCV:  | X-- [Options]
RCV:  | | X-- IAPREFIX 2001:980:XXXX:140::/60
RCV:  | | | X-- Preferred lifetime 1209600.
RCV:  | | | X-- Max lifetime 2592000.
RCV:  X-- Server ID: 00:03:00:01:d8:67:d9:81:bc:f0
PRC: Bound to lease 00:03:00:01:d8:67:d9:81:bc:f0.
PRC: Renewal event scheduled in 604800 seconds, to run for 362880 seconds.
PRC: Depreference scheduled in 1209600 seconds.
PRC: Expiration scheduled in 2592000 seconds.

As you can see, I got a /60 prefix. Now I had to somehow get this automated and configure Docker to use it.

Upstart

Since I was testing with Docker 1.10 under Ubuntu 14.04 I had to use Upstart to run dhclient.

The /etc/init/dhclient6-pd.conf Upstart script I created was rather simple:

description     "DHCPv6 Prefix Delegation client"

start on runlevel [2345]
stop on runlevel [!2345]

respawn
respawn limit 30 3
umask 022

console log

exec dhclient -6 -P -d eth0

DHCP hook

dhclient has hooks which it can execute when something happens. I wrote a hook which extracted the delegated IPv6 prefix and restarted Docker.

I placed the hook in the default location for DHCP hooks: /etc/dhcp/dhclient-enter-hooks.d/docker-ipv6:

#!/bin/bash

SUBNET_SIZE=80
DOCKER_ETC_DIR="/etc/docker"
DOCKER_PREFIX_FILE="${DOCKER_ETC_DIR}/ipv6.prefix"

if [ ! -z "$new_ip6_prefix" ]; then
    SUBNET=$(sipcalc -S $SUBNET_SIZE $new_ip6_prefix|grep Network|head -n 1|awk '{print $3}')
    echo "${SUBNET}/${SUBNET_SIZE}" > $DOCKER_PREFIX_FILE

    if [ "$old_ip6_prefix" != "$new_ip6_prefix" ]; then
        service docker restart
    fi
fi

For this to work you need to modify /etc/default/docker so that this line reads:

DOCKER_OPTS="--ipv6 --fixed-cidr-v6=`cat /etc/docker/ipv6.prefix`"

The result

Docker was now running properly with a IPv6 subnet configured and my containers have a IPv6 address as well.

wido@wido-desktop:~$ docker exec -ti 94c8f02 ip addr show dev eth0
13: eth0:  mtu 1500 qdisc noqueue state UP group default 
    link/ether 02:42:ac:11:00:02 brd ff:ff:ff:ff:ff:ff
    inet 172.17.0.2/16 scope global eth0
       valid_lft forever preferred_lft forever
    inet6 2001:980:XXXX:140:0:242:ac11:2/80 scope global 
       valid_lft forever preferred_lft forever
    inet6 fe80::42:acff:fe11:2/64 scope link 
       valid_lft forever preferred_lft forever
wido@wido-desktop:~$

Native IPv6 in my Docker containers fully automated and dynamic!

All the scripts I used can be found on Github.

IPv6 Prefix Delegation on a Cisco 887VA behind a XS4All VDSL2 connection

XS4All connection

At the PCextreme office we have a XS4All VDSL2 connection which has native IPv6. We get a /48 from XS4All.

I wrote two earlier blogposts about getting the Cisco 887VA router setup which might be of interest before you continue reading:

IPv6 Prefix Delegation

From XS4All we get a /48 routed to our office using DHCPv6 Prefix Delegation. We are experimenting and testing with Docker at the office where we also want to test the IPv6 capabilities of Docker.

The goal was to sub-delegate /60 subnets out of a /56 towards clients internally. I had to figure out how to get this configured on Cisco IOS.

  • We get a /48 delegated from XS4All
  • The first /56 is used for our local networks (LAN, Guest and Servers)
  • The second /56 is used as a pool to delegate /60 subnets from

Sipcalc

To calculate the IPv6 subnets used the tool ‘sipcalc’. I needed to find the second /56 in our /48:

sipcalc -S 56 2001:980:XX::/48

The output is rather long, so I trimmed it a bit:

-[ipv6 : 2001:980:XX::/48] - 0

[Split network]
Network			- 2001:0980:XX:0000:0000:0000:0000:0000 -
			  2001:0980:XX:00ff:ffff:ffff:ffff:ffff
Network			- 2001:0980:XX:0100:0000:0000:0000:0000 -
			  2001:0980:XX:01ff:ffff:ffff:ffff:ffff
Network			- 2001:0980:XX:0200:0000:0000:0000:0000 -
			  2001:0980:XX:02ff:ffff:ffff:ffff:ffff
...
...
Network			- 2001:0980:XX:ff00:0000:0000:0000:0000 -
			  2001:0980:XX:ffff:ffff:ffff:ffff:ffff

-

In this case 2001:0980:XX:0100:0000:0000:0000:0000:/56 is the second /56 in our /48.

Cisco IOS

Some searching brought me to cisco.com which had some examples.

Eventually it was actually quite easy to get it working.

Configuration

You need a DHCPv6 pool inside the Cisco and tell it to start a DHCPv6 server on the proper interface.

ipv6 dhcp pool local-ipv6
 prefix-delegation pool local-ipv6-pd-pool lifetime 3600 1800
 dns-server 2001:888:0:6::66
 dns-server 2001:888:0:9::99
 domain-name pcextreme.nl
interface Vlan1
 ip address 192.168.5.1 255.255.255.0
 ip nat inside
 ip virtual-reassembly in
 ipv6 address xs4all-prefix ::1/64
 ipv6 enable
 ipv6 nd other-config-flag
 ipv6 nd ra interval 30
 ipv6 nd ra dns server 2001:888:0:6::66
 ipv6 nd ra dns server 2001:888:0:9::99
 ipv6 dhcp server local-ipv6 rapid-commit
 ipv6 mld query-interval 60
ipv6 local pool local-ipv6-pd-pool 2001:980:XX:100::/56 60

That’s all!

Asking for a Prefix

On my Ubuntu desktop I could now request a subnet:

wido@wido-desktop:~$ sudo dhclient -6 -P -v eth0
Internet Systems Consortium DHCP Client 4.2.4
Copyright 2004-2012 Internet Systems Consortium.
All rights reserved.
For info, please visit https://www.isc.org/software/dhcp/

Bound to *:546
Listening on Socket/eth0
Sending on   Socket/eth0
PRC: Soliciting for leases (INIT).
XMT: Forming Solicit, 0 ms elapsed.
XMT:  X-- IA_PD d5:68:28:08
XMT:  | X-- Request renew in  +3600
XMT:  | X-- Request rebind in +5400
XMT: Solicit on eth0, interval 1060ms.
RCV: Advertise message on eth0 from fe80::da67:d9ff:fe81:bcec.
RCV:  X-- IA_PD d5:68:28:08
RCV:  | X-- starts 1455279332
RCV:  | X-- t1 - renew  +900
RCV:  | X-- t2 - rebind +1440
RCV:  | X-- [Options]
RCV:  | | X-- IAPREFIX 2001:980:XX:100::/60
RCV:  | | | X-- Preferred lifetime 1800.
RCV:  | | | X-- Max lifetime 3600.
RCV:  X-- Server ID: 00:03:00:01:d8:67:d9:81:bc:f0
RCV:  Advertisement recorded.
PRC: Selecting best advertised lease.

As you can see I got 2001:980:XX:100::/60 delegated to my desktop.

IPv6 routes

After I asked for a subnet on my desktop this is how the routes look like. You can see a /60 being routed to my Link-Local Address.

firewall-vdsl-veldzigt#show ipv6 route
IPv6 Routing Table - default - 8 entries
Codes: C - Connected, L - Local, S - Static, U - Per-user Static route
       B - BGP, HA - Home Agent, MR - Mobile Router, R - RIP
       H - NHRP, D - EIGRP, EX - EIGRP external, ND - ND Default
       NDp - ND Prefix, DCE - Destination, NDr - Redirect, O - OSPF Intra
       OI - OSPF Inter, OE1 - OSPF ext 1, OE2 - OSPF ext 2, ON1 - OSPF NSSA ext 1
       ON2 - OSPF NSSA ext 2, la - LISP alt, lr - LISP site-registrations
       ld - LISP dyn-eid, a - Application
S   ::/0 [1/0]
     via Dialer0, directly connected
S   2001:980:XX::/48 [1/0]
     via Null0, directly connected
C   2001:980:XX::/64 [0/0]
     via Vlan1, directly connected
L   2001:980:XX::1/128 [0/0]
     via Vlan1, receive
C   2001:980:XX:1::/64 [0/0]
     via Vlan300, directly connected
L   2001:980:XX:1::1/128 [0/0]
     via Vlan300, receive
S   2001:980:XX:100::/60 [1/0]
     via FE80::C23F:D5FF:FE68:XX, Vlan1
L   FF00::/8 [0/0]
     via Null0, receive
firewall-vdsl-veldzigt#

The subnet is working now and I can use it to hand it out to my Docker containers.

ISC Kea DHCPv6 server

DHCPv6

In most situations StateLess Address AutoConfiguration (SLAAC) works just fine when you work with simple clients in a IPv6 network. But in other cases you want to assign pre-defined addresses or prefixes to clients and there DHCPv6 comes in to play.

While working on the IPv6 implementation for Apache CloudStack I found Kea, a DHCPv6 server from ISC.

DHCPv6 DUID

With IPv4 you could easily identify a client based on the MAC-address it send the DHCP request from. With IPv6 there is a DUID. The “DHCP Unique Identifier”. This is generated by the client and then used by the DHCPv6 server. A few possibilities the clients can choose from:

  • DUID-LL: DUID Based on Link-layer Address
  • DUID-LLT: Link-layer Address Plus Time
  • DUID-EN: Assigned by Vendor Based on Enterprise Number

While DUID seems nice, it can’t be dictated by the DHCPv6 server. The client generates the DUID itself and sends it towards the server. Not something you prefer if your are not in control of the clients.

In a cloud you are in control over the MAC-address, so that is what you want to use where possible. It can’t be spoofed by the client.

ISC Kea

Kea is a DHCPv4/DHCPv6 server being developed by the Internet Systems Consortium. It is a extensible and flexible DHCP server. Facebook uses it in their datacenters.

My goal was very simple. Set up Kea and see if I can use it to hand out an address to a client.

Configuration

I download the tarball and tested it with this configuration between two simple KVM VMs on my desktop.

{
    "Dhcp6": {
        "renew-timer": 1000,
        "rebind-timer": 2000,
        "preferred-lifetime": 3000,
        "valid-lifetime": 4000,
        "lease-database": {
            "type": "memfile",
            "persist": true,
            "name": "/tmp/kea-leases6.csv",
            "lfc-interval": 1800
        },
        "interfaces-config": {
            "interfaces": [ "eth1/2001:db8::1" ]
        },
        "mac-sources": ["duid"],
        "subnet6": [
            {
                "subnet": "2001:db8::/64",
                "id": 1024,
                "interface": "eth1",
                "pools": [
                    { "pool": "2001:db8::100-2001:db8::ffff" }
                ],
                "pd-pools": [
                    {
                        "prefix": "2001:db8:fff::",
                        "prefix-len": 48,
                        "delegated-len": 60
                    }
                ],
                "reservations": [
                    {
                        "hw-address": "52:54:00:d6:c2:a9",
                        "ip-addresses": [ "2001:db8::5054:ff:fed6:c2a9" ]
                    }
                ]
            }
        ]
    }
}

Starting Kea with this configuration was rather simple:

Starting Kea

$ kea-dhcp6 -c /etc/kea.json -d

Logs

When it starts you see some interesting bits in the log:

DHCP6_CONFIG_NEW_SUBNET a new subnet has been added to configuration: 2001:db8::/64 with params t1=1000, t2=2000, preferred-lifetime=3000, valid-lifetime=4000, rapid-commit is disabled
DHCPSRV_CFGMGR_ADD_SUBNET6 adding subnet 2001:db8::/64
HOSTS_CFG_ADD_HOST add the host for reservations: hwaddr=52:54:00:d6:c2:a9 ipv6_subnet_id=1024 hostname=(empty) ipv4_reservation=(no) ipv6_reservation0=2001:db8::5054:ff:fed6:c2a9
HOSTS_CFG_GET_ONE_SUBNET_ID_HWADDR_DUID get one host with IPv6 reservation for subnet id 1024, HWADDR hwtype=1 52:54:00:d6:c2:a9, DUID (no-duid)
HOSTS_CFG_GET_ALL_HWADDR_DUID get all hosts with reservations for HWADDR hwtype=1 52:54:00:d6:c2:a9 and DUID (no-duid)
HOSTS_CFG_GET_ALL_IDENTIFIER get all hosts with reservations using identifier: hwaddr=52:54:00:d6:c2:a9
HOSTS_CFG_GET_ALL_IDENTIFIER_COUNT using identifier hwaddr=52:54:00:d6:c2:a9, found 0 host(s)
HOSTS_CFG_GET_ONE_SUBNET_ID_HWADDR_DUID_NULL host not found using subnet id 1024, HW address hwtype=1 52:54:00:d6:c2:a9 and DUID (no-duid)
HOSTS_CFG_GET_ONE_SUBNET_ID_ADDRESS6 get one host with reservation for subnet id 1024 and including IPv6 address 2001:db8::5054:ff:fed6:c2a9
HOSTS_CFG_GET_ALL_SUBNET_ID_ADDRESS6 get all hosts with reservations for subnet id 1024 and IPv6 address 2001:db8::5054:ff:fed6:c2a9
HOSTS_CFG_GET_ALL_SUBNET_ID_ADDRESS6_COUNT using subnet id 1024 and address 2001:db8::5054:ff:fed6:c2a9, found 0 host(s)
HOSTS_CFG_GET_ONE_SUBNET_ID_ADDRESS6_NULL host not found using subnet id 1024 and address 2001:db8::5054:ff:fed6:c2a9
DHCPSRV_MEMFILE_DB opening memory file lease database: lfc-interval=1800 name=/tmp/kea-leases6.csv persist=true type=memfile universe=6
DHCPSRV_MEMFILE_LEASE_FILE_LOAD loading leases from file /tmp/kea-leases6.csv

You can see it has one reservation based on the MAC-address of the client which it handed out after it booted:

ALLOC_ENGINE_V6_HR_ADDR_GRANTED reserved address 2001:db8::5054:ff:fed6:c2a9 was assigned to client duid=[00:01:00:01:1e:47:7e:66:52:54:00:d6:c2:a9], tid=0xe7899a

Ubuntu client

The client was a simple Ubuntu 14.04 client with this network configuration:

auto eth0
iface eth0 inet dhcp
iface eth0 inet6 dhcp

And indeed, it obtained the correct address:

root@ubuntu1404:~# ip addr show dev eth0
2: eth0:  mtu 1500 qdisc pfifo_fast state UP group default qlen 1000
    link/ether 52:54:00:d6:c2:a9 brd ff:ff:ff:ff:ff:ff
    inet 192.168.100.100/24 brd 192.168.100.255 scope global eth0
       valid_lft forever preferred_lft forever
    inet6 2001:db8::5054:ff:fed6:c2a9/64 scope global deprecated dynamic 
       valid_lft 62sec preferred_lft 0sec
    inet6 fe80::5054:ff:fed6:c2a9/64 scope link 
       valid_lft forever preferred_lft forever
root@ubuntu1404:~#

Lease database

Kea can store the leases in a CSV file or MySQL database if you want. In this test I used /tmp/kea-leases6.csv as a CSV file to store the leases in.

In production a MySQL database is probably easier to use, but for the test CSV worked just fine.

PXE boot over IPv6 with iPXE

For a Ceph project I’m involved in we wanted to figure out if we could PXE-boot our servers over IPv6. In this case we were using SuperMicro 5018A-AR12L servers with a additional Intel X520 10Gbit NIC.

The Ceph cluster in this case will be IPv6 only and user Layer 3 routing between 6 racks and a 180 machines initially (7.2PB raw). No IPv4 in this network present. That’s the goal!

By default these NICs only boot over IPv4, so we had to figure out if we could reconfigure them in a way so that they would PXE-boot over IPv6.

My search brought me to the iPXE project. A PXE-boot project which you can flash into your NICs or chainload using TFTP.

Before I started flashing machines I created a test setup in VirtualBox to see if I could get it working over IPv6.

iPXE and IPv6

By default the ISO you can download from the iPXE website isn’t build with IPv6 support. You have to manually compile iPXE with v6 support.

git clone git://git.ipxe.org/ipxe.git
cd ipxe/src
nano config/general.h

Now change:

#undef NET_PROTO_IPV6

To:

#define NET_PROTO_IPV4          /* IPv4 protocol */
#define NET_PROTO_IPV6          /* IPv6 protocol */

Now we can compile iPXE:

make bin/ipxe.iso

VirtualBox

To test this all I set up VirtualBox on my laptop. I created a machine called IPv6Router and a VM called iPXE.

The IPv6Router Instance has two network connections:

  • eth0: NAT
  • eth1: Host-Only Network vboxnet0

The machine iPXE got just one connection:

  • eth0: Host-Only Network vboxnet0

Networking: DHCPv6, Router Advertisements, HTTP and DNS

Before I could use this setup I needed to install a few services and configure the network on this machine.

I choose Ubuntu 14.04 in this case, the Linux distribution I prefer most.

interfaces configuration

First I had to configure eth1

auto eth1
iface eth1 inet6 static
    address 2001:db8::1
    netmask 64

Install packages

Before I could continue I needed a couple of packages on the system. All I needed was available in the Ubuntu repositories. Apt could install them for me quickly.

apt-get install isc-dhcp-server radvd unbound apache2

After the network was configured and the right packages were available I could configure all the services.

DHCPv6

/etc/dhcp/dhcpd6.conf

option dhcp6.user-class code 15 = string;
option dhcp6.bootfile-url code 59 = string;
option dhcp6.client-arch-type code 61 = array of unsigned integer 16;

option dhcp6.name-servers 2001:db8::1;

if exists dhcp6.client-arch-type and
   option dhcp6.client-arch-type = 00:07 {
    option dhcp6.bootfile-url "http://[2001:db8::1]/ipxe.efi";
} else if exists dhcp6.user-class and
          substring(option dhcp6.user-class, 2, 4) = "iPXE" {
    option dhcp6.bootfile-url "http://[2001:db8::1]/ubuntu.cfg";
}

subnet6 2001:db8::/64 {}
service isc-dhcp-server6 restart

radvd

/etc/radvd.conf

interface eth1
{
        MinRtrAdvInterval 5;
        MaxRtrAdvInterval 60;
        AdvSendAdvert on;
        AdvOtherConfigFlag on;
        IgnoreIfMissing off;

        prefix ::/64 {
        };

        RDNSS 2001:db8::1 {
        };
};
service radvd restart

Unbound

/etc/unbound/unbound.conf.d/local.conf

server:
    interface: 0.0.0.0
    interface: ::0
    interface-automatic: yes
    access-control: 127.0.0.1 allow
    access-control: ::1 allow
    access-control: 2001:db8::/32 allow
service unbound restart

Apache webserver

iPXE and the Ubuntu installer I was trying to bootstrap needed a webserver to download files from. I used Apache for that purpose.

Since I also experimented with TFTP in the process I had all my files in /srv/tftp so that’s where I also pointed Apache.

The reason why I choose HTTP over TFTP is just speed. It’s a lot faster and more modern.

/etc/apache2/sites-available/001-preseed.conf

<VirtualHost *:80>
	ServerAdmin webmaster@localhost
	DocumentRoot /srv/tftp

	ErrorLog ${APACHE_LOG_DIR}/error.log
	CustomLog ${APACHE_LOG_DIR}/access.log combined

        <Directory /srv/tftp/>
            Options Indexes FollowSymLinks
            AllowOverride None
            Require all granted
        </Directory>
</VirtualHost>

Now enable this VirtualHost and disable the default one.

a2dissite 000-default
a2ensite 001-preseed

Restart Apache afterwards.

service apache2 restart

So with this configuration I’ve set up the following:

  • DHCPv6
  • IPv6 Router Advertisements
  • DNS resolving for clients
  • Apache for serving files over HTTP

Ubuntu Netboot using iPXE and Preseed

Now that everything is configured we can configure the configuration for iPXE.

Some searching on the internet brought me to help.ubuntu.com which explained how Ubuntu netboot could be used.

It is quite simple, you have to download netboot.tar.gz and extract it.

cd /srv/tftp
wget http://archive.ubuntu.com/ubuntu/dists/trusty-updates/main/installer-amd64/current/images/netboot/netboot.tar.gz
tar xvfz netboot.tar.gz

This will extract a directory ubuntu-installer. It contains all we need to start a network installation.

We can reference to these files in a iPXE configuration file.

/srv/tftp/ubuntu.cfg

#!ipxe

kernel /ubuntu-installer/amd64/linux noapic nolapic acpi=off irqpoll preseed/url=http://[2001:db8::1]/preseed/ubuntu1404.cfg debian-installer=en_US auto locale=en_US kbd-chooser/method=us hostname=alpha fb=false debconf/frontend=noninteractive keyboard-configuration/modelcode=SKIP keyboard-configuration/layout=USA keyboard-configuration/variant=USA console-setup/ask_detect=false netcfg/disable_autoconfig boolean=true netcfg/use_autoconfig boolean=true netcfg/disable_dhcp boolean=true
initrd /ubuntu-installer/amd64/initrd.gz
boot

Here I refer to a preseed file which is used by the Debian/Ubuntu installer. This process is called preseeding.

I had to add some tweaks to make it work over IPv6-only:

d-i netcfg/disable_autoconfig boolean true
d-i netcfg/use_autoconfig boolean true
d-i netcfg/disable_dhcp boolean true
d-i netcfg/dhcpv6_timeout string 10

/srv/tftp/preseed/ubuntu1404.cfg

# Language
d-i debian-installer/language string en
d-i debian-installer/locale string en_US.UTF-8
d-i localechooser/preferred-locale string en_US.UTF-8
d-i localechooser/supported-locales en_US.UTF-8

# Keyboard
d-i console-setup/ask_detect boolean false
d-i keyboard-configuration/layout select USA
d-i keyboard-configuration/variant select USA
d-i keyboard-configuration/modelcode string pc105

# Network
d-i netcfg/disable_autoconfig boolean true
d-i netcfg/use_autoconfig boolean true
d-i netcfg/disable_dhcp boolean true
d-i netcfg/dhcpv6_timeout string 10
d-i netcfg/get_hostname string this-host
d-i netcfg/get_domain string this-host

# Timezone
d-i time/zone string UTC
d-i clock-setup/utc-auto boolean true
d-i clock-setup/utc boolean true
d-i time/zone string Europe/Amsterdam


# Software
d-i debconf debconf/frontend select Noninteractive
d-i pkgsel/install-language-support boolean false
tasksel tasksel/first multiselect standard, ubuntu-server

# Storage
d-i partman-auto/method string regular
d-i partman-auto/disk string /dev/sda
d-i partman-auto/choose_recipe select atomic
d-i partman/confirm_write_new_label boolean true
d-i partman/confirm_nooverwrite boolean true
d-i partman/choose_partition select finish
d-i partman/confirm boolean true

# Mirror
d-i mirror/country string manual
d-i mirror/http/hostname string ubuntu.apt-get.eu
d-i mirror/http/directory string /ubuntu
d-i mirror/http/proxy string

# Users
d-i passwd/root-login boolean true
d-i passwd/make-user boolean false
d-i passwd/root-password password ceph
d-i passwd/root-password-again password ceph
d-i user-setup/encrypt-home boolean false
d-i user-setup/allow-password-weak boolean true

# No language support packages.
d-i pkgsel/install-language-support boolean false

# Additional packages
d-i pkgsel/include string ssh acpid ntp resolvconf

# Security updates
d-i pkgsel/update-policy select unattended-upgrades

# Upgrade
d-i pkgsel/upgrade select full-upgrade

# Update sshd_config to ensure root user is able to login
d-i preseed/late_command string sed -i 's/PermitRootLogin without-password/PermitRootLogin Yes/g' /target/etc/ssh/sshd_config

# Bootloader
d-i grub-installer/only_debian boolean true
d-i finish-install/reboot_in_progress note

Installing Ubuntu

I now started the iPXE Virtual Machine with ipxe.iso attached and it got up and running!

iPXE will boot, obtain a IPv6 address and run the Ubuntu installer. All over IPv6!
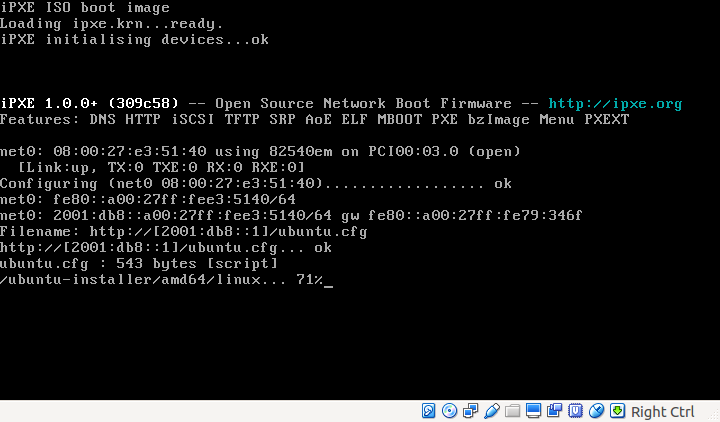
iPXE over IPv6

Using the internet on a IPv6-only network

At home I have native IPv6 via my ISP ZeelandNet since June 2014. Ever since I’ve been using the internet via IPv6 where possible.

Yesterday I thought it was time to create a IPv6-only VLAN + SSID at home and see what parts of the internet I could use while being on a IPv6-only network. No NAT64 or anything, just IPv6.

Linux router

I’m using a Soekris NET6501 with Ubuntu as my router at home. So I created a new VLAN and used that VLAN tag to create a new SSID on my Access Point.

Under Ubuntu I configured:

  • Radvd for Router Advertisements
  • Wide DHCPv6 Server for DNS servers

IPv6-only under iOS 9.1

I have an iPhone 5s and iPad Air 2 both running iOS 9.1 and I thought it was best to use these for testing the IPv6-only network.

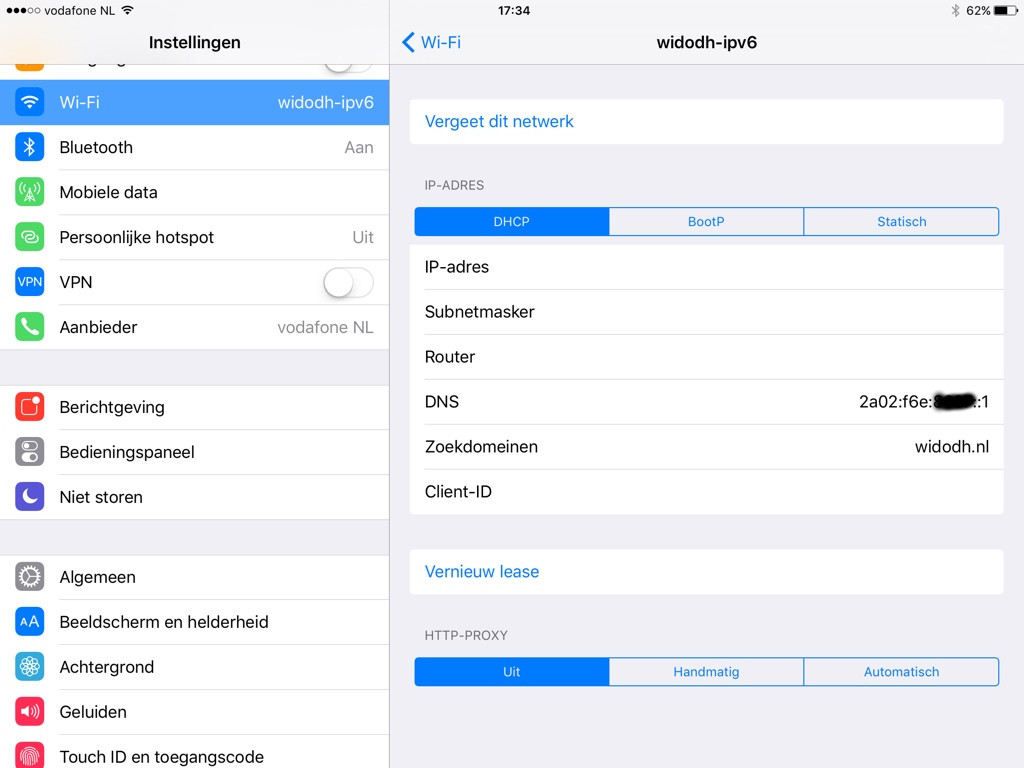
They connected just fine! But the WiFi overview didn’t show any IP-Address. Seems that is still IPv4-only.

iOS 9.1 IPv6-only network

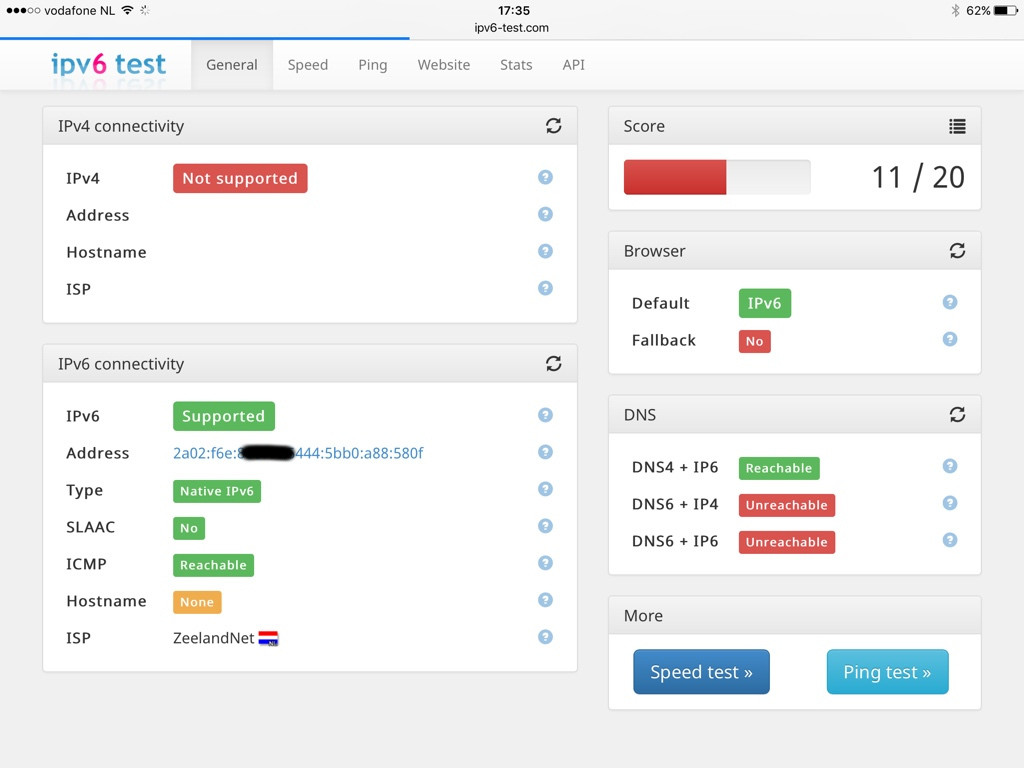
And ipv6-test.com showed that I had IPv6 connectivity only.

IPv6 test iOS 9.1

What works?

You might think that the internet breaks, but I think that already a lot of the large services work. A list of things which work:

  • Facebook / Messenger
  • Google: Search, YouTube, Maps and Gmail
  • NOS (Dutch news
  • Netflix
  • Apple Notifications
  • My own website and E-Mail
  • Various local sites I visit

What does not work?

Well, this could be a very long list. But there are certain services which should be highlighted for not supporting IPv6:

  • Twitter
  • Github
  • Apple App Store
  • Spotify
  • All Dutch Online banking

So yes, the biggest part of the internet does not work over IPv6. But most of the things work for me.

I’ll keep testing the internet using this IPv6-only SSID and I’ll probably keep bugging various admins to turn on IPv6.

Yealink SIP-T20P on a IPv6-only network

At PCextreme we are looking into replacing all our current Cisco, Linksys and Polycom IP phones with new phones. The old phones are worn out and have to be replaced.

We have two demands:

  • IPv6 support
  • TLS support

After some searching I found out that neither Cisco or Polycom support IPv6 in their phones with SIP, so they we off the list.

More searching led us to Yealink and we ended up ordering a SIP-T20P.

A couple of days later I created a IPv6-only VLAN on our XS4All VDSL2 connection to I was sure there was NO IPv4 available for the phone.

It took some time to figure it out, but using the T20 over IPv6 is fairly easy.

  • Start the phone
  • Go to the Advanced Network Settings (password: admin)
  • Set the network type to IPv6

The T20 (Firmware 7.72.0.75) does NOT support DHCPv6 (The T4xx models do), it relies on Router Advertisements. We had to manually enter the auto provisiong URL (over HTTP) and afterwards the phone provisioned itself.

If we choose to go for Yealink it will probably be the T4x models since they support DHCPv6 and we want the auto provisioning to be fully automatic.