Lenovo X1 Carbon FCC Unlock of EM7455 under Ubuntu 22.04

I recently upgraded my Lenovo X1 Carbon (5th gen) from Ubuntu 20.04 to 22.04 and my 4G connection stopped working.

I travel a lot and one of the great features of the Lenovo X1 Carbon is the (optional) 4G/LTE modem which I use with an additional data-sim of my provider (Vodafone NL).

After not really wanting to fix it (time constraints) I put some time in it and searching around a bit I found the solution for my problem.

It has has to do with the Sierra Wireless EM7455 modem and an updated version of ModemManager in Ubuntu 22.04. The modem is locked by default and has to be unlocked by sending a ‘magic’ combination of commands.

The logs would show the following line:

<warn>  [modem0] couldn't enable interface: 'Invalid transition'

Links

Before jumping to the solution, let me first share a few links which I used to diagnose and resolve the problem:

The solution

For in-depth details of the root-cause of the problem I recommend reading the modemmanager’s website, but in the end you need to run these commands:

sudo ln -s /etc/ModemManager/fcc-unlock.d /usr/share/ModemManager/fcc-unlock.available.d/1199:9079
sudo apt -y install libqmi-utils
sudo systemctl restart ModemManager

Now keep in mind that this solution only works if you have a Sierra Wireless EM7455 modem. You can check this with the output of the lsusb command.

Bus 004 Device 001: ID 1d6b:0003 Linux Foundation 3.0 root hub
Bus 003 Device 002: ID 1050:0407 Yubico.com Yubikey 4/5 OTP+U2F+CCID
Bus 003 Device 001: ID 1d6b:0002 Linux Foundation 2.0 root hub
Bus 002 Device 001: ID 1d6b:0003 Linux Foundation 3.0 root hub
Bus 001 Device 005: ID 138a:0097 Validity Sensors, Inc. 
Bus 001 Device 004: ID 13d3:5682 IMC Networks SunplusIT Integrated Camera
Bus 001 Device 003: ID 8087:0a2b Intel Corp. Bluetooth wireless interface
Bus 001 Device 019: ID 1199:9079 Sierra Wireless, Inc. EM7455
Bus 001 Device 001: ID 1d6b:0002 Linux Foundation 2.0 root hub

After creating the right symlink to unlock my Modem I was able to connect to the Vodafone network again and no longer had to use my phone’s wireless hotspot!

IPv6

wido@wido-laptop:~$ sudo ip addr show dev wwan0
12: wwan0: <BROADCAST,MULTICAST,NOARP,UP,LOWER_UP> mtu 1500 qdisc fq_codel state UNKNOWN group default qlen 1000
    link/ether fa:73:bc:24:0f:24 brd ff:ff:ff:ff:ff:ff
    inet 100.71.255.77/30 brd 100.71.255.79 scope global noprefixroute wwan0
       valid_lft forever preferred_lft forever
wido@wido-laptop:~$ 

Unfortunately Vodafone still (Jan 2023) does not support IPv6 on their 4G network. It’s coming I’ve heard….
Renaming a network interface with systemd-networkd on Ubuntu 18.04

On a Ubuntu system where I’m creating a VXLAN Proof of Concept with CloudStack I wanted to rename the interface enp5s0 to cloudbr0.

I found many documentation on the internet on how to do this with *.link files, but I was missing the golden tip, which was you need to re-generate your initramfs.

/etc/systemd/network/50-cloudbr0.link

[Match]
MACAddress=00:25:90:4b:81:54

[Link]
Name=cloudbr0

After you create this file, re-generate your initramfs:

update-initramfs -c -k all

You can now use cloudbr0 in *.network files to use it like any other network interface.

In my case this is how my interfaces look like:

1: lo:  mtu 65536 qdisc noqueue state UNKNOWN group default qlen 1000
    link/loopback 00:00:00:00:00:00 brd 00:00:00:00:00:00
    inet 127.0.0.1/8 scope host lo
       valid_lft forever preferred_lft forever
    inet6 ::1/128 scope host 
       valid_lft forever preferred_lft forever
6: cloudbr0:  mtu 9000 qdisc fq_codel state UP group default qlen 1000
    link/ether 00:25:90:4b:81:54 brd ff:ff:ff:ff:ff:ff
    inet 192.168.0.11/24 brd 192.168.0.255 scope global cloudbr0
       valid_lft forever preferred_lft forever
    inet6 2a00:f10:114:0:225:90ff:fe4b:8154/64 scope global dynamic mngtmpaddr noprefixroute 
       valid_lft 2591993sec preferred_lft 604793sec
    inet6 fe80::225:90ff:fe4b:8154/64 scope link 
       valid_lft forever preferred_lft forever
8: cloudbr1:  mtu 1450 qdisc noqueue state UP group default qlen 1000
    link/ether 86:fa:b6:31:6e:c1 brd ff:ff:ff:ff:ff:ff
    inet 172.16.0.11/24 brd 172.16.0.255 scope global cloudbr1
       valid_lft forever preferred_lft forever
    inet6 fe80::84fa:b6ff:fe31:6ec1/64 scope link 
       valid_lft forever preferred_lft forever
9: vxlan100:  mtu 1450 qdisc noqueue master cloudbr1 state UNKNOWN group default qlen 1000
    link/ether 56:df:29:8d:db:83 brd ff:ff:ff:ff:ff:ff

Testing Ceph BlueStore with the Kraken release

Ceph version Kraken (11.2.0) has been released and the Release Notes tell us that the new BlueStore backend for the OSDs is now available.

BlueStore

The current backend for the OSDs is the FileStore which mainly uses the XFS filesystem to store it’s data. To overcome several limitations of XFS and POSIX in general the BlueStore backend was developed.

It will provide more performance (mainly writes), data safety due to checksumming and compression.

Users are encouraged to test BlueStore starting with the Kraken release for non-production and non-critical data sets and report back to the community.

Deploying with BlueStore

To deploy OSDs with BlueStore you can use the ceph-deploy by using the –bluestore flag.

I created a simple test cluster with three machines: alpha, bravo and charlie.

Each machine will be running a ceph-mon and ceph-osd proces.

This is the sequence of ceph-deploy commands I used to deploy the cluster

ceph-deploy new alpha bravo charlie
ceph-deploy mon create alpha bravo charlie

Now, edit the ceph.conf file in the current directory and add:

[osd]
enable_experimental_unrecoverable_data_corrupting_features = bluestore

With this setting we allow the use of BlueStore and we can now deploy our OSDs:

ceph-deploy --overwrite-conf osd create --bluestore alpha:sdb bravo:sdb charlie:sdb

Running BlueStore

This tiny cluster how runs three OSDs with BlueStore:

root@alpha:~# ceph -s
    cluster c824e460-2f09-4994-8b2f-108aedc52d19
     health HEALTH_OK
     monmap e2: 3 mons at {alpha=[2001:db8::100]:6789/0,bravo=[2001:db8::101]:6789/0,charlie=[2001:db8::102]:6789/0}
            election epoch 14, quorum 0,1,2 alpha,bravo,charlie
        mgr active: charlie standbys: alpha, bravo
     osdmap e14: 3 osds: 3 up, 3 in
            flags sortbitwise,require_jewel_osds,require_kraken_osds
      pgmap v24: 64 pgs, 1 pools, 0 bytes data, 0 objects
            43356 kB used, 30374 MB / 30416 MB avail
                  64 active+clean
root@alpha:~#
root@alpha:~# ceph osd tree
ID WEIGHT  TYPE NAME        UP/DOWN REWEIGHT PRIMARY-AFFINITY 
-1 0.02907 root default                                       
-2 0.00969     host alpha                                     
 0 0.00969         osd.0         up  1.00000          1.00000 
-3 0.00969     host bravo                                     
 1 0.00969         osd.1         up  1.00000          1.00000 
-4 0.00969     host charlie                                   
 2 0.00969         osd.2         up  1.00000          1.00000 
root@alpha:~#

On alpha I see that osd.0 only has a small partition for a bit of configuration and the rest is used by BlueStore.

root@alpha:~# df -h /var/lib/ceph/osd/ceph-0
Filesystem      Size  Used Avail Use% Mounted on
/dev/sdb1        97M  5.4M   92M   6% /var/lib/ceph/osd/ceph-0
root@alpha:~# lsblk 
NAME   MAJ:MIN RM  SIZE RO TYPE MOUNTPOINT
sda      8:0    0    8G  0 disk 
├─sda1   8:1    0  7.5G  0 part /
├─sda2   8:2    0    1K  0 part 
└─sda5   8:5    0  510M  0 part [SWAP]
sdb      8:16   0   10G  0 disk 
├─sdb1   8:17   0  100M  0 part /var/lib/ceph/osd/ceph-0
└─sdb2   8:18   0  9.9G  0 part 
sdc      8:32   0   10G  0 disk 
root@alpha:~# cat /var/lib/ceph/osd/ceph-0/type
bluestore
root@alpha:~#

The OSDs should work just like OSDs running FileStore, but they should perform better.

Running headless VirtualBox inside Nested KVM

For the Ceph training at 42on I use VirtualBox to build Virtual Machines. This is because they work under MacOS, Windows and Linux.

For the internal Git at 42on we use Gitlab and I wanted to use Gitlab’s CI to build my Virtual Machines automatically.

As we don’t have any physical hardware at 42on (everything runs in the cloud) I wanted to see if I could run VirtualBox Headless inside a VM with Nested KVM enabled.

Nested KVM

The first thing I checked was if my KVM Virtual Machine actually supported Nested KVM. This can be verified with the kvm-ok command under Ubuntu:

root@glrun01:~# kvm-ok 
INFO: /dev/kvm exists
KVM acceleration can be used
root@glrun01:~#

Now that’s verified I tried to install VirtualBox.

VirtualBox

Installing VirtualBox is straight forward. Just add the repository and install the packages. Don’t forget to reboot afterwards to make sure all kernel modules are loaded and properly installed.

apt-get install virtualbox

VirtualBox Extension Pack

The trick to get everything working properly is to install Oracle’s VirtualBox Extension Pack. It took me a while to figure out that I need to install it manually. It wasn’t done by default after install.

You need to download the pack and install it using the VBoxManage command.

wget http://download.virtualbox.org/virtualbox/5.0.24/Oracle_VM_VirtualBox_Extension_Pack-5.0.24.vbox-extpack
vboxmanage extpack install Oracle_VM_VirtualBox_Extension_Pack-5.0.24.vbox-extpack
vboxmanage list extpacks
vboxmanage setproperty vrdeextpack "Oracle VM VirtualBox Extension Pack"

With that installed and configured I rebooted the machine again just to be sure.

It works!

With that it actually worked. The VirtualBox VMs can now be built inside a Nested KVM machine controlled by Gitlab’s CI 🙂

VirtualBox images to experiment with IPv6

Around me I noticed that a lot of people don’t have hands-on experience with IPv6. The networks they work in do not support IPv6 nor does their ISP provide them with native IPv6 connectivity at home.

On my local systems I often use Virtual Box to set up (IPv6) testing environments. I thought I’d create some Virtual Machine images to get some hands-on experience with IPv6.

The images and README can be found on Github and are aimed to be easy to install and work with.

Requirements

To run the images you need to have Virtual Box installed. You also should be able to use the Linux command line as the Virtual Machines are based on Ubuntu 16.04.

More information can be found in the repository on Github in the README file.

Download

You can download the images here.

How to use

Please take a look at the README on Github. It tells you how to use them.

Happy testing!

Hitch TLS Proxy performance with 15k certificates

While testing with the Hitch TLS proxy in front of Varnish I stumbled upon a slow startup with a large amount of certificates.

In this case we (at PCextreme) want to run Hitch with around 50.000 certificates configured.

The webpage of Hitch says:

Safe for large installations: performant up to 15 000 listening sockets and 500 000 certificates.

10 minutes

I started testing on my local desktop with 15.000 certificates. My desktop is a Intel NUC with Ubuntu 14.04.

wido@wido-desktop:~/repos/hitch/src$ time sudo ./hitch -n 4 -u nobody -g nogroup --config=/opt/hitch/hitch.conf

real    9m40.088s
user    9m38.482s
sys 0m0.829s
wido@wido-desktop:~/repos/hitch/src$

A 10 minute startup time for Hitch is rather long. We started searching for the root-cause.

OpenSSL

After some searching we discovered the OpenSSL version in Ubuntu 14.04 was the problem. Testing with Ubuntu 15.10 showed us different results.

root@VM-9d8e8cfd-e30f-4c40-8c4e-2e098b0f11a5:~# time hitch --daemon --pidfile=/run/hitch.pid --user hitch --group hitch --config=/etc/hitch/hitch.conf

real    0m18.673s
user    0m6.780s
sys    0m2.000s

18 seconds is a lot better than 10 minutes!

Ubuntu 14.04 comes with OpenSSL 1.0.1f and Ubuntu 15.10 with 1.0.2d and that is where the difference seems to be.

100.000 certificates

After this we started testing with 100k certificates. It took 48 seconds to start with that amount of certificates configured.

For production we will use Ubuntu 16.04 which has similar results as Ubuntu 15.10.

So if you find Hitch slow when starting, check your OpenSSL version.

Ubuntu and the changing MAC address with bonding

With the ‘new’ style for configuring bonding under Ubuntu your bond device will not always have the same MAC address across reboots.

For example, you configure your bond in the /etc/network/interfaces file:

auto p9p1
iface p9p1 inet manual
        bond-master bond0

auto p10p1
iface p10p1 inet manual
        bond-master bond0

auto bond0
iface bond0 inet manual
        bond-slaves none
        bond-mode 4
        bond-miimon 100
        bond-updelay 5
        bond-downdelay 5

During boot, both interface p9p1 and p10p1 will be hot-plugged under bond0. The first device to be plugged into the bonding device determines which MAC address the bonded device gets.

Due to hardware timing it might be p9p1 OR p10p1 which is the first. This behavior makes the MAC address selection inconsistent between reboots and that might cause problems with:

  • DHCP for IPv4
  • IPv6 with SLAAC (Stateless Auto Configuration)
  • DHCPv6

This has been filed as bug #1288196 with Ubuntu, but no fix from that side so far.

The solutions for now:

auto p9p1
iface p9p1 inet manual
        bond-master bond0

auto p10p1
iface p10p1 inet manual
        pre-up sleep 5
        bond-master bond0

This makes sure p10p1 always comes online 5 seconds after p9p1.

But you can also set a static MAC address for the bonding device:

auto bond0
iface bond0 inet manual
        hwaddress fe:80:12:04:6d:6f
        bond-slaves none
        bond-mode 4
        bond-miimon 100
        bond-updelay 5
        bond-downdelay 5

Choose what you prefer or works best in your situation.

Limit battery state of charge on a Lenovo X1 Carbon under Ubuntu

Since the end of 2012 I have a Lenovo X1 Carbon laptop running with Ubuntu 12.04

By default a laptop charges all the way up to 100% State of Charge, something which is very bad for a battery. There is a great video on Youtube about this if you want to know all the ins and outs.

The bottom line is that I wanted to limit the charge level to 90% for my laptop. Up until now I did this manually by pulling the plug at certain points, but that didn’t always work. I sometimes forgot and the battery would charge up to 100%.

On Github I found the tpacpi-bat project which allows you to limit the charge level of your battery.

How to install?

  • Clone the project
  • Run install.pl
  • Modify your /etc/rc.local file
  • Reboot

This is what you need to put in your rc.local:

tpacpi-bat -g SP 0
tpacpi-bat -g SP 1
tpacpi-bat -g SP 2

exit 0

As far as I know the X1 Carbon has 3 batteries, so for all three we set the charge limit to 90%. This is not persistent after reboots, so we have to set it every time we boot.

You’ll now see that your battery charges to 90% at max.

Multipath iSCSI with Ubuntu 10.04 and a EqualLogic SAN

Recently we purchased a EqualLogic PS6000XVS for a KVM environment.

In most of our iSCSI systems we use Multipath I/O, we do this by giving the iSCSI Target two NIC’s and give each NIC a IP-Address in a different subnet over a physically different network. This way we have two seperate I/O path’s to the iSCSI Target.

The EqualLogic does not support this, it only supports one virtual IP in one network, so multipathing gets a bit difficult.

On the Dell Wiki there is configuration howto, so I read that carefully.

The examples are for RedHat, but we are using Ubuntu, but that should not make a big difference, but it did….

Our storage network is in the subnet 192.168.32.0/19 where the virtual IP of the EqualLogic is 192.168.32.1. You should know, this is a virtual IP, in total we have three PS6000 nodes, which do some magic by responding with a different MAC Address for 192.168.32.1 towards each client.

One of our clients has the following configuration for the storage connectivity:

eth0      Link encap:Ethernet  HWaddr 14:FE:B5:C6:62:E0  
          inet addr:192.168.37.4  Bcast:192.168.63.255  Mask:255.255.224.0
          UP BROADCAST RUNNING MULTICAST  MTU:9000  Metric:1
          RX packets:27263332 errors:0 dropped:0 overruns:0 frame:0
          TX packets:25323692 errors:0 dropped:0 overruns:0 carrier:0
          collisions:0 txqueuelen:1000 
          RX bytes:24569609290 (22.8 GiB)  TX bytes:132201626154 (123.1 GiB)
          Interrupt:170 Memory:e6000000-e6012800 

eth1      Link encap:Ethernet  HWaddr 14:FE:B5:C6:62:E2  
          inet addr:192.168.38.4  Bcast:192.168.63.255  Mask:255.255.224.0
          UP BROADCAST RUNNING MULTICAST  MTU:9000  Metric:1
          RX packets:27246580 errors:0 dropped:0 overruns:0 frame:0
          TX packets:25335109 errors:0 dropped:0 overruns:0 carrier:0
          collisions:0 txqueuelen:1000 
          RX bytes:24549507448 (22.8 GiB)  TX bytes:132201622012 (123.1 GiB)
          Interrupt:178 Memory:e8000000-e8012800

It took some work to get this working. Bot NIC’s are connected to the same subnet, through different switches though.

The first problem you will run into is the ARP flux problem of Linux, I’m not going to write to much about this, on the internet there is more then enough information written about this topic.

I ended up with this configuration:

auto eth0
iface eth0 inet static
        address 192.168.37.4
        netmask 255.255.224.0
        post-up sysctl -w net.ipv4.conf.eth0.rp_filter=0
        post-up sysctl -w net.ipv4.conf.eth0.arp_ignore=1
        post-up sysctl -w net.ipv4.conf.eth0.arp_announce=2

auto eth2
iface eth2 inet static
        address 192.168.38.4
        netmask 255.255.224.0
        post-up sysctl -w net.ipv4.conf.eth2.rp_filter=0
        post-up sysctl -w net.ipv4.conf.eth2.arp_ignore=1
        post-up sysctl -w net.ipv4.conf.eth2.arp_announce=2

For Open-iSCSI I created two interfaces called ieth0 and ieth1 and routed my iSCSI traffic through them. How you can do this can be found at the Dell wiki.

But it did not work! I was able to ping the EqualLogic over eth0, but not over eth1. If I brought down eth0, it would work over eth1, but not vise versa. It took me a while to find it, but it’s due to a default setting in Ubuntu, done in /etc/sysctl.d/10-network-security.conf, this enables rp_filter (Reverse Path Filtering) by default, so I modified that file

# Turn on Source Address Verification in all interfaces to
# prevent some spoofing attacks.
#net.ipv4.conf.default.rp_filter=1
#net.ipv4.conf.all.rp_filter=1

And voila! My iSCSI multipathing started to work! My multipath shows:

[size=1.0T][features=1 queue_if_no_path][hwhandler=0][rw]
\_ round-robin 0 [prio=2][active]
 \_ 13:0:0:0 sdk 8:160 [active][ready]
 \_ 14:0:0:0 sdj 8:144 [active][ready]
eql-0-8a0906-4f2b9e409-2b800184d024d9db_c () dm-4 EQLOGIC,100E-00
[size=2.0T][features=1 queue_if_no_path][hwhandler=0][rw]
\_ round-robin 0 [prio=2][active]
 \_ 6:0:0:0 sdg 8:96  [active][ready]
 \_ 11:0:0:0 sdf 8:80  [active][ready]

This should work under Ubuntu 10.04. Took me some time to figure it all out, but now it’s working like a charm. But still, I prefer multipathing over two different VLAN’s and subnets, really odd that the EqualLogic does not support this!

Printing over IPv6 to a Canon MP495

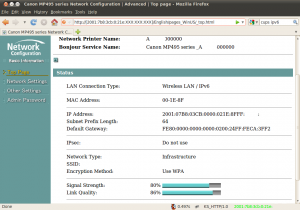
Yesterday I posted that my new Canon Pixma MP495 also supports IPv6.

I had to test if I could print over IPv6, so I switched from IPv4 to IPv6 in the printer configuration (Note: You have to select IPv4 or IPv6, there is no Dual-Stack!). Before doing so I wrote down the MAC Address of the printer, I would need that to find it on my network, since the printer would get a IP from the Router Announcements my Linux router send out.

After turning on IPv6 the printer got his address within a few seconds and I was able to browse through the webinterface with Firefox.

Now I wanted to print over IPv6, the first thing I checked was if CUPS under Ubuntu 10.04 supported IPv6. It seems that CUPS supports IPv6 since version 1.2 and Ubuntu 10.04 is shipped with CUPS 1.4, so that was OK.

Then I created a DNS record for my printer, I pointed a AAAA-record to my printer, just so I dind’t have to type the address all the time. And DNS has been developed for NOT typing IP-Addresses, isn’t it?

Now I had to configure CUPS to print over IPv6, my goal was to do this via the GUI and not use any command-line stuff, that was even easier that I thought.

Adding the printer can be done in a few simple steps:

  • Go to System -> Administration -> Printing
  • Add a printer
  • Choose “Network Printer”
  • Choose LPD/LPR Host or Printer
  • In the host field, put the DNS record to your printer (or add the printer in /etc/hosts)
  • Then choose “Probe”
  • At “Queue”, select “ps”
  • Click on “Forward”
  • Choose “Provide a PPD file”
  • Download this PPD file and choose it as the driver
  • Add the printer!

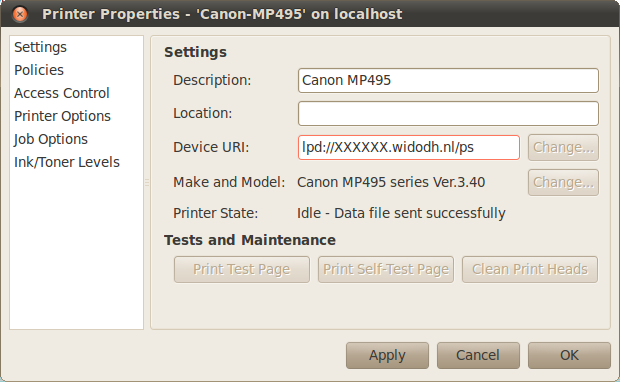
Your printer settings should then look like:

Your are all set, the printer should work over IPv6 after this steps. Happy printing over IPv6!