Proxmox by default does not support BGP+EVPN+VXLAN but there is a small piece of documentation on the Wiki of Proxmox.
Using the routing daemon Frrouting a Proxmox cluster can also be configured to use BGP with EVPN+VXLAN for it’s routing allowing for very flexible networks.
I won’t go into all the details of Frr, BGP, EVPN and VXLAN as the internet already more then enough resources about this. I’ll get right to it.
Frrouting
After installing Proxmox (7.1) on the node I temporarily connected the node via a ad-hoc connection to the internet to be able to install Frr.
curl -s https://deb.frrouting.org/frr/keys.asc | sudo apt-key add -
echo deb https://deb.frrouting.org/frr bullseye frr-7 | sudo tee -a /etc/apt/sources.list.d/frr.list
apt install frr frr-pythontools
After installing Frr I configured the /etc/frr/frr.conf config file:
frr version 7.5.1
frr defaults traditional
hostname infra-72-45-36
log syslog informational
no ip forwarding
no ipv6 forwarding
service integrated-vtysh-config
!
interface enp101s0f0np0
  no ipv6 nd suppress-ra
!
interface enp101s0f1np1
  no ipv6 nd suppress-ra
!
interface lo
  ip address 10.255.254.5/32
  ipv6 address 2a05:1500:xxx:xx::5/128
!
router bgp 4200400036
  bgp router-id 10.255.254.5
  no bgp ebgp-requires-policy
  no bgp default ipv4-unicast
  no bgp network import-check
  neighbor core peer-group
  neighbor core remote-as external
  neighbor core ebgp-multihop 255
  neighbor enp101s0f0np0 interface peer-group core
  neighbor enp101s0f1np1 interface peer-group core
  !
  address-family ipv4 unicast
    redistribute connected
    neighbor core activate
    exit-address-family
  !
  address-family ipv6 unicast
    redistribute connected
    neighbor core activate
    exit-address-family
  !
  address-family l2vpn evpn
    neighbor core activate
    advertise-all-vni
    exit-address-family
  !
line vty
!
In this case the host will be connecting to two Cumulus Linux routers using BGP Unnumbered.
The interfaces enp101s0f0np0 and enp101s0f1np1 are the uplinks of this node the the two routers.
/etc/network/interfaces
Now we need to make sure the /etc/network/interface file is populated with the proper information.
auto lo
iface lo inet loopback

auto enp101s0f1np1
iface enp101s0f1np1 inet manual
    mtu 9216

auto enp101s0f0np0
iface enp101s0f0np0 inet manual
    mtu 9216
This makes sure the interfaces (Mellanox ConnectX-5 2x25Gb SFP28) interfaces are online and running with an MTUof 9216.
The MTU of 9216 is needed so I can transport traffic with an MTU of 9000 within my VXLAN packets. VXLAN has an overhead of 50 bytes. So to transport an Ethernet packet of 1500 bytes you need to make sure you have at least an MTU of 1550 on your VXLAN underlay network.
VXLAN bridges
I now created a bunch of devices in the interfaces file:
auto vxlan201
iface vxlan201 inet static
    mtu 1500
    pre-up ip link add vxlan201 type vxlan id 201 dstport 4789 local 10.255.254.5 nolearning
    up ip link set vxlan201 up
    down ip link set vxlan201 down
    post-down ip link del vxlan201

auto vmbr201
iface vmbr201 inet manual
    bridge_ports vxlan201
    bridge-stp off
    bridge-fd 0

auto vxlan202
iface vxlan202 inet static
    mtu 1500
    pre-up ip link add vxlan202 type vxlan id 202 dstport 4789 local 10.255.254.5 nolearning
    up ip link set vxlan202 up
    down ip link set vxlan202 down
    post-down ip link del vxlan202

auto vmbr202
iface vmbr202 inet manual
    address 192.168.202.36/24
    bridge_ports vxlan202
    bridge-stp off
    bridge-fd 0
I created vmbr201 and vmbr202 which correspond to VNI 201 and 202 on the network. These can now be used with Proxmox to connect VMs to.
The IP-Address (10.255.254.5) set at the local argument of the ip command is the IP-address connected to the loopback interface and advertised using BGP.
This will be the address used for the VTEP in EVPN/VXLAN communication.
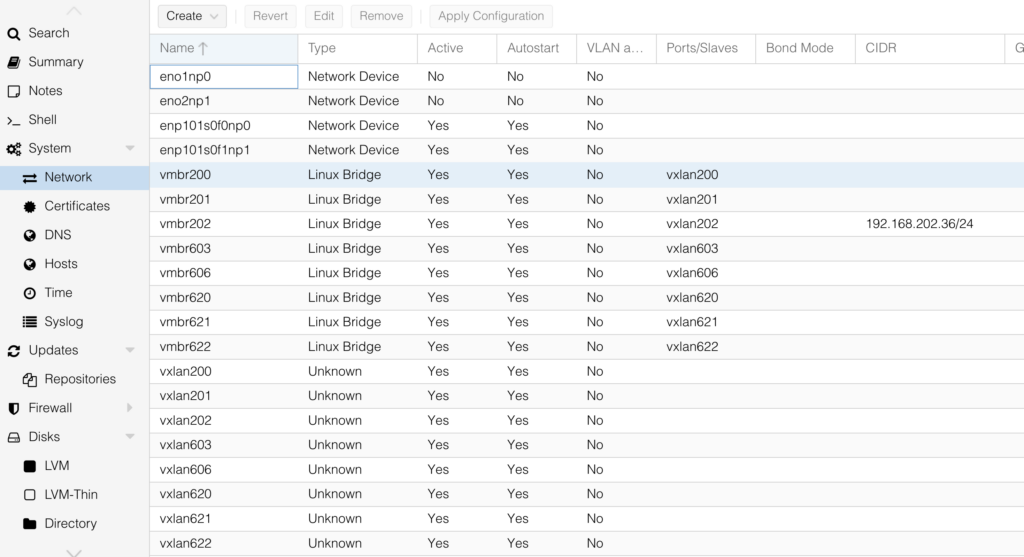
In reality however I have much more bridges
- vmbr200
- vmbr201
- vmbr202
- vmbr601
- vmbr602
- vmbr603
- vmbr604
Proxmox cluster network
To be able to create a cluster with Proxmox you need a Layer2 network between the hosts where corosync can be used for cluster communication.
In this case I’m using vmbr202 which has IP-address 192.168.202.36/24 on this node. Other nodes in the cluster have a IPv4 address in the same network and allows them to communicate with the others.