Creating a Management Routing Instance (VRF) on Juniper QFX5100

For a Ceph cluster I have two Juniper QFX5100 switches running as a Virtual Chassis.

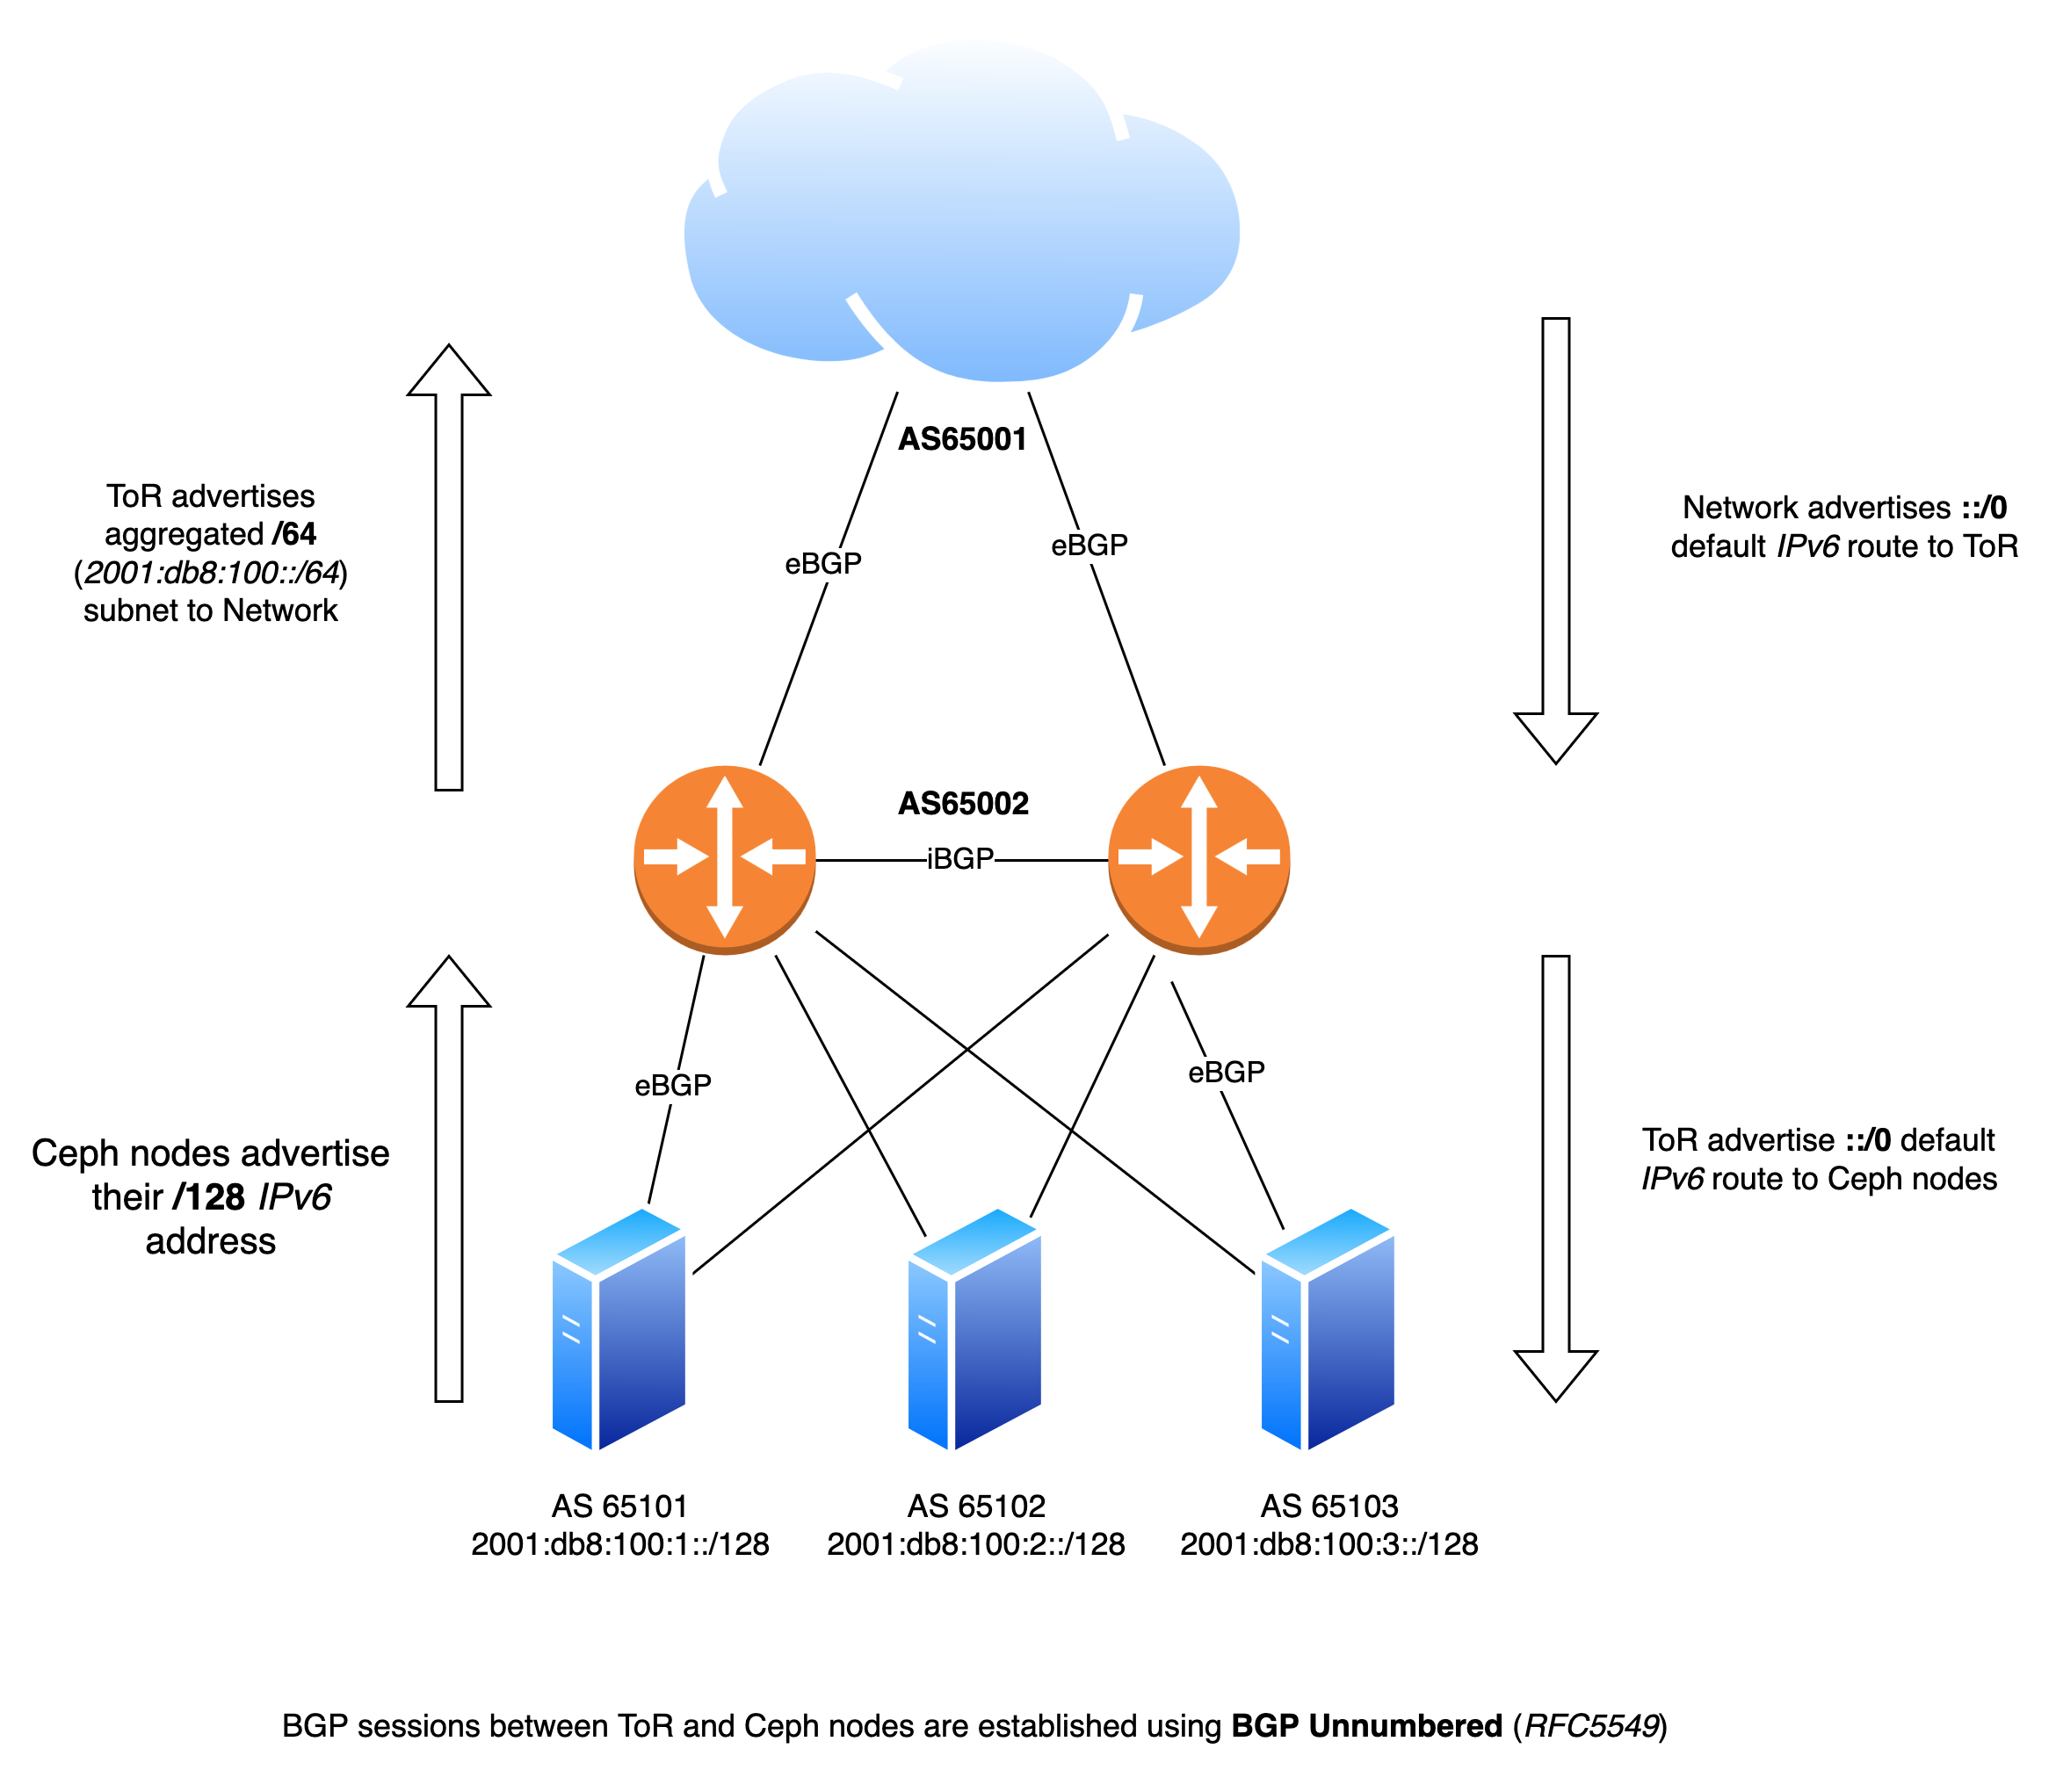
This Virtual Chassis is currently only performing L2 forwarding, but I want to move this to a L3 setup where the QFX switches use Dynamic Routing (BGP) and thus become the gateway(s) for the Ceph servers.

This should work, but one of the things I was missing is a dedicated Management Port which uses a different routing table/instance.

Starting with JunOS 17.3R1 you can create a Management Routing Instance as described on the website of Juniper.

set system management-instance

This now creates the Routing Instance called mgmt_junos.

I try to run as much as possible IPv6-only or at least prefer IPv6 over IPv4.

I ran into the problem that configuring an IPv6 address on my em0 interface just wouldn’t work. It kept saying that the IPv6 address was Duplicate.

This is probably something which happens because both QFX switches are connected to the same Out of Band switch and causes it to receive it’s DAD over a different link. I had to disable DAD on interface em0 to make it work.

In addition I configured all DNS lookups to be performed using this routing instance.

The end result for my configuration (snippets):

system {
management-instance;
name-server {
2a00:f10:ff04:153::53 routing-instance mgmt_junos;
2a00:f10:ff04:253::53 routing-instance mgmt_junos;
93.180.70.22 routing-instance mgmt_junos;
93.180.70.30 routing-instance mgmt_junos;
}
}
interfaces {
unit 0 {
family inet {
address 172.17.5.10/24;
}
family inet6 {
address 2a00:f10:XXX:XXX::100/64
dad-disable;
}
}
}
routing-instances {
mgmt_junos {
routing-options {
rib mgmt_junos.inet6.0 {
static {
route ::/0 next-hop 2a00:f10:XXX:XXX::1;
}
}
static {
route 0.0.0.0/0 next-hop 172.17.5.1;
}
}
}
}

This now allows me to SSH to my Juniper QFX Virtual Chassis over interface em0 which uses a different routing instance/table.

Should I make a mistake in the default routing instance, for example a BGP misconfiguration, I can still SSH to my switch(es).

Or if there is a routing error (BGP issue) I can also still reach the switches.

Comparing two Ceph CRUSH maps

Sometimes you want to test if changes you are about to make to a CRUSH map will cause data to move or not.

In this case I wanted to change a rule in CRUSH where it would use device classes, but I didn’t want any of the ~1PB of data in that cluster to move.

By swapping IDs I could prevent data to move:

root default {
id -50 # do not change unnecessarily
id -53 class hdd # do not change unnecessarily
id -122 class ssd # do not change unnecessarily
root default {
id -53 # do not change unnecessarily
id -50 class hdd # do not change unnecessarily
id -122 class ssd # do not change unnecessarily

Notice how I swapped the IDs. After this I updated the rule:

rule rgw {
id 6
type replicated
min_size 1
max_size 10
step take ams02-objects class hdd
step chooseleaf firstn 0 type host
step emit
}

I then compiled the CRUSHMap and ran crushtool to see if there were any differences:

root@mon01:~# crushtool -i crushmap --compare crushmap.new 
rule 0 had 0/10240 mismatched mappings (0)
rule 1 had 0/10240 mismatched mappings (0)
rule 2 had 0/10240 mismatched mappings (0)
rule 3 had 0/10240 mismatched mappings (0)
rule 4 had 0/10240 mismatched mappings (0)
rule 5 had 0/3072 mismatched mappings (0)
rule 6 had 0/10240 mismatched mappings (0)
maps appear equivalent
root@mon01:~#

No changes! So it was safe to inject this map:

root@mon01:~# ceph osd setcrushmap -i crushmap.new

HAProxy in front of Ceph Manager dashboard

The Ceph Mgr dashboard plugin allows for an easy dashboard which can show you how your Ceph cluster is performing.

In certain situations you can’t contact the Mgr daemons directly and you have to place a Proxy server between your computer and the Mgr daemons.

This can be done easily with HAProxy and the following configuration which assumes that:

  • SSL has been disabled in the Dashboard plugin
  • Dashboard plugin listens in port 8080
  • Mgr is running on the hosts mon01, mon02 and mon03
global
  log         127.0.0.1 local1
  log         127.0.0.1 local2 notice

  chroot      /var/lib/haproxy
  pidfile     /var/run/haproxy.pid
  maxconn     4000
  user        haproxy
  group       haproxy
  daemon

  stats socket /var/lib/haproxy/stats

defaults
  log                     global
  mode                    http
  retries                 3
  timeout http-request    10s
  timeout queue           1m
  timeout connect         10s
  timeout client          1m
  timeout server          1m
  timeout http-keep-alive 10s
  timeout check           10s
  maxconn                 3000
  option                  httplog
  no option               httpclose
  no option               http-server-close
  no option               forceclose

  stats enable
  stats hide-version
  stats refresh 30s
  stats show-node
  stats uri /haproxy?stats
  stats auth admin:haproxy

frontend https
  bind *:80
  default_backend ceph-dashboard

backend ceph-dashboard
  balance roundrobin
  option httpchk GET /
  http-check expect status 200
  server mon01 mon01:8080 check
  server mon02 mon02:8080 check
  server mon03 mon03:8080 check

You can now point your browser to the URL/IP of your HAProxy and use your Ceph dashboard.

In case a Mgr machine fails the health checks of HAProxy will make sure it fails over to on of the other Mgr daemons.

Placement Groups with Ceph Luminous stay in activating state

Placement Groups stuck in activating

When migrating from FileStore with BlueStore with Ceph Luminuous you might run into the problem that certain Placement Groups stay stuck in the activating state.

44    activating+undersized+degraded+remapped

PG Overdose

This is a side-effect of the new PG overdose protection in Ceph Luminous.

Too many PGs on your OSDs can cause serious performance or availability problems.

You can see the amount of Placement Groups per OSD using this command:

$ ceph osd df

Increase Max PG per OSD

The default value is a maximum of 200 PGs per OSD and you should stay below that! However, if you are hit by PGs in the activating state you can set this configuration value:

[global]
mon_max_pg_per_osd = 500

Then restart the OSDs and MONs which are serving the affected by this.

Usually you shouldn’t run into this, but if this hits you in the middle of a migration or upgrade this might save you.

Quick overview of Ceph version running on OSDs

When checking a Ceph cluster it’s useful to know which versions you OSDs in the cluster are running.

There is a very simple on-line command to do this:

ceph osd metadata|jq '.[].ceph_version'|sort|uniq -c

Running this on a cluster which is currently being upgraded to Jewel to Luminous it shows:

     10 "ceph version 10.2.6 (656b5b63ed7c43bd014bcafd81b001959d5f089f)"
   1670 "ceph version 10.2.7 (50e863e0f4bc8f4b9e31156de690d765af245185)"
    426 "ceph version 10.2.9 (2ee413f77150c0f375ff6f10edd6c8f9c7d060d0)"
     66 "ceph version 12.2.1 (3e7492b9ada8bdc9a5cd0feafd42fbca27f9c38e) luminous (stable)"

So 66 OSDs are running Luminous and 2106 OSDs are running Jewel.

Starting with Luminous there is also this command:

ceph features

This shows us all daemon and client versions in the cluster:

{
    "mon": {
        "group": {
            "features": "0x1ffddff8eea4fffb",
            "release": "luminous",
            "num": 5
        }
    },
    "osd": {
        "group": {
            "features": "0x7fddff8ee84bffb",
            "release": "jewel",
            "num": 426
        },
        "group": {
            "features": "0x1ffddff8eea4fffb",
            "release": "luminous",
            "num": 66
        }
    },
    "client": {
        "group": {
            "features": "0x7fddff8ee84bffb",
            "release": "jewel",
            "num": 357
        },
        "group": {
            "features": "0x1ffddff8eea4fffb",
            "release": "luminous",
            "num": 7
        }
    }
}

Using the new dashboard in ceph-mgr

The upcoming Ceph Luminous (12.2.0) release features the new ceph-mgr daemon which has a few default plugins. One of these plugins is a dashboard to give you a graphical overview of your cluster.

Enabling Module

To enable the dashboard you have to enable the module in your /etc/ceph/ceph.conf on all machines running the ceph-mgr daemon. These are usually your Monitors.

Add this to the configuration:

[mgr]
mgr_modules = dashboard

Don’t restart your ceph-mgr daemon yet. More configuration changes have to be made first.

Setting server address and port

A server address and optionally a port have to be configured as a config-key.

By setting the value to :: the dashboard will be available on all IPv4 and IPv6 addresses on port 7000 (default):

ceph config-key put mgr/dashboard/server_addr ::

Restart daemons

Now restart all ceph-mgr daemons on your hosts:

systemctl restart ceph-mgr@

Accessing the dashboard

The default port is 7000, so now go to the IP-Address of the active ceph-mgr and open the see the dashboard.

You can find the active ceph-mgr in the ceph status:

root@alpha:~# ceph -s
  cluster:
    id:     30d838cd-955f-42e5-bddb-5609e1c880f8
    health: HEALTH_OK
 
  services:
    mon: 3 daemons, quorum alpha,bravo,charlie
    mgr: charlie(active), standbys: alpha, bravo
    osd: 3 osds: 3 up, 3 in
 
  data:
    pools:   1 pools, 64 pgs
    objects: 0 objects, 0 bytes
    usage:   3173 MB used, 27243 MB / 30416 MB avail
    pgs:     64 active+clean
 
root@alpha:~#

In this case charlie is the active mgr which in my case has IPv6 Address 2001:db8::102.

Point your browser to: http://[2001:db8::102]:7000 and you will see the dashboard.

Do not use SMR disks with Ceph

Many new disks like the Seagate He8 disks are using a technique called Shingled Magnetic Recording to increase capacity.

As these disks offer a very low price per Gigabyte they seem interesting to use in a Ceph cluster.

Performance

Due to the nature of SMR these disks are very, very, very bad when it comes to Random Write performance. Random I/O is something that Ceph does a lot on the backing disks.

This results in disks spiking to 100% utilization very quickly causing all kinds of trouble with OSDS going down and committing suicide.

Do NOT use them

The solution is very simple. Do not use SMR disks in Ceph but stick to the traditional PMR disks in your Ceph cluster.

In the future we might see SMR support in the new BlueStore of Ceph, but at this moment no work has been done, so don’t expect anything soon.

Testing Ceph BlueStore with the Kraken release

Ceph version Kraken (11.2.0) has been released and the Release Notes tell us that the new BlueStore backend for the OSDs is now available.

BlueStore

The current backend for the OSDs is the FileStore which mainly uses the XFS filesystem to store it’s data. To overcome several limitations of XFS and POSIX in general the BlueStore backend was developed.

It will provide more performance (mainly writes), data safety due to checksumming and compression.

Users are encouraged to test BlueStore starting with the Kraken release for non-production and non-critical data sets and report back to the community.

Deploying with BlueStore

To deploy OSDs with BlueStore you can use the ceph-deploy by using the –bluestore flag.

I created a simple test cluster with three machines: alpha, bravo and charlie.

Each machine will be running a ceph-mon and ceph-osd proces.

This is the sequence of ceph-deploy commands I used to deploy the cluster

ceph-deploy new alpha bravo charlie
ceph-deploy mon create alpha bravo charlie

Now, edit the ceph.conf file in the current directory and add:

[osd]
enable_experimental_unrecoverable_data_corrupting_features = bluestore

With this setting we allow the use of BlueStore and we can now deploy our OSDs:

ceph-deploy --overwrite-conf osd create --bluestore alpha:sdb bravo:sdb charlie:sdb

Running BlueStore

This tiny cluster how runs three OSDs with BlueStore:

root@alpha:~# ceph -s
    cluster c824e460-2f09-4994-8b2f-108aedc52d19
     health HEALTH_OK
     monmap e2: 3 mons at {alpha=[2001:db8::100]:6789/0,bravo=[2001:db8::101]:6789/0,charlie=[2001:db8::102]:6789/0}
            election epoch 14, quorum 0,1,2 alpha,bravo,charlie
        mgr active: charlie standbys: alpha, bravo
     osdmap e14: 3 osds: 3 up, 3 in
            flags sortbitwise,require_jewel_osds,require_kraken_osds
      pgmap v24: 64 pgs, 1 pools, 0 bytes data, 0 objects
            43356 kB used, 30374 MB / 30416 MB avail
                  64 active+clean
root@alpha:~#
root@alpha:~# ceph osd tree
ID WEIGHT  TYPE NAME        UP/DOWN REWEIGHT PRIMARY-AFFINITY 
-1 0.02907 root default                                       
-2 0.00969     host alpha                                     
 0 0.00969         osd.0         up  1.00000          1.00000 
-3 0.00969     host bravo                                     
 1 0.00969         osd.1         up  1.00000          1.00000 
-4 0.00969     host charlie                                   
 2 0.00969         osd.2         up  1.00000          1.00000 
root@alpha:~#

On alpha I see that osd.0 only has a small partition for a bit of configuration and the rest is used by BlueStore.

root@alpha:~# df -h /var/lib/ceph/osd/ceph-0
Filesystem      Size  Used Avail Use% Mounted on
/dev/sdb1        97M  5.4M   92M   6% /var/lib/ceph/osd/ceph-0
root@alpha:~# lsblk 
NAME   MAJ:MIN RM  SIZE RO TYPE MOUNTPOINT
sda      8:0    0    8G  0 disk 
├─sda1   8:1    0  7.5G  0 part /
├─sda2   8:2    0    1K  0 part 
└─sda5   8:5    0  510M  0 part [SWAP]
sdb      8:16   0   10G  0 disk 
├─sdb1   8:17   0  100M  0 part /var/lib/ceph/osd/ceph-0
└─sdb2   8:18   0  9.9G  0 part 
sdc      8:32   0   10G  0 disk 
root@alpha:~# cat /var/lib/ceph/osd/ceph-0/type
bluestore
root@alpha:~#

The OSDs should work just like OSDs running FileStore, but they should perform better.

Running headless VirtualBox inside Nested KVM

For the Ceph training at 42on I use VirtualBox to build Virtual Machines. This is because they work under MacOS, Windows and Linux.

For the internal Git at 42on we use Gitlab and I wanted to use Gitlab’s CI to build my Virtual Machines automatically.

As we don’t have any physical hardware at 42on (everything runs in the cloud) I wanted to see if I could run VirtualBox Headless inside a VM with Nested KVM enabled.

Nested KVM

The first thing I checked was if my KVM Virtual Machine actually supported Nested KVM. This can be verified with the kvm-ok command under Ubuntu:

root@glrun01:~# kvm-ok 
INFO: /dev/kvm exists
KVM acceleration can be used
root@glrun01:~#

Now that’s verified I tried to install VirtualBox.

VirtualBox

Installing VirtualBox is straight forward. Just add the repository and install the packages. Don’t forget to reboot afterwards to make sure all kernel modules are loaded and properly installed.

apt-get install virtualbox

VirtualBox Extension Pack

The trick to get everything working properly is to install Oracle’s VirtualBox Extension Pack. It took me a while to figure out that I need to install it manually. It wasn’t done by default after install.

You need to download the pack and install it using the VBoxManage command.

wget http://download.virtualbox.org/virtualbox/5.0.24/Oracle_VM_VirtualBox_Extension_Pack-5.0.24.vbox-extpack
vboxmanage extpack install Oracle_VM_VirtualBox_Extension_Pack-5.0.24.vbox-extpack
vboxmanage list extpacks
vboxmanage setproperty vrdeextpack "Oracle VM VirtualBox Extension Pack"

With that installed and configured I rebooted the machine again just to be sure.

It works!

With that it actually worked. The VirtualBox VMs can now be built inside a Nested KVM machine controlled by Gitlab’s CI 🙂

Chown Ceph OSD data directory using GNU Parallel

Starting with Ceph version Jewel (10.2.X) all daemons (MON and OSD) will run under the privileged user ceph. Prior to Jewel daemons were running under root which is a potential security issue.

This means data has to change ownership before a daemon running the Jewel code can run.

Chown data

As the Release Notes state you will have to chown all your data to ceph:ceph in /var/lib/ceph.

chown -R ceph:ceph /var/lib/ceph

On a system with multiple OSDs this might take a lot of time, using GNU Parallel you can save yourself a lot of time.

Static UID

The ceph User and Group have been assigned static UID and GIDs in the major distributions:

  • Fedora/CentOS/RHEL: 167:167
  • Debian/Ubuntu: 64045/64045

Chown in parallel

Using these commands you can chown the data in /var/lib/ceph much faster.

WARNING: Make sure the OSDs are stopped on the system before you continue!

Now you can run these commands (Ubuntu in this case):

find /var/lib/ceph/osd -maxdepth 1 -mindepth 1 -type d|parallel chown -R 64045:64045
chown 64045:64045 /var/lib/ceph
chown 64045:64045 /var/lib/ceph/*
chown 64045:64045 /var/lib/ceph/bootstrap-*/*

The first command will take the longest. I tested it on a system with 24 OSDs all containing about 800GB of data. That took roughly 20 minutes.