PXE boot over IPv6 with iPXE

For a Ceph project I’m involved in we wanted to figure out if we could PXE-boot our servers over IPv6. In this case we were using SuperMicro 5018A-AR12L servers with a additional Intel X520 10Gbit NIC.

The Ceph cluster in this case will be IPv6 only and user Layer 3 routing between 6 racks and a 180 machines initially (7.2PB raw). No IPv4 in this network present. That’s the goal!

By default these NICs only boot over IPv4, so we had to figure out if we could reconfigure them in a way so that they would PXE-boot over IPv6.

My search brought me to the iPXE project. A PXE-boot project which you can flash into your NICs or chainload using TFTP.

Before I started flashing machines I created a test setup in VirtualBox to see if I could get it working over IPv6.

iPXE and IPv6

By default the ISO you can download from the iPXE website isn’t build with IPv6 support. You have to manually compile iPXE with v6 support.

git clone git://git.ipxe.org/ipxe.git
cd ipxe/src
nano config/general.h

Now change:

#undef NET_PROTO_IPV6

To:

#define NET_PROTO_IPV4          /* IPv4 protocol */
#define NET_PROTO_IPV6          /* IPv6 protocol */

Now we can compile iPXE:

make bin/ipxe.iso

VirtualBox

To test this all I set up VirtualBox on my laptop. I created a machine called IPv6Router and a VM called iPXE.

The IPv6Router Instance has two network connections:

  • eth0: NAT
  • eth1: Host-Only Network vboxnet0

The machine iPXE got just one connection:

  • eth0: Host-Only Network vboxnet0

Networking: DHCPv6, Router Advertisements, HTTP and DNS

Before I could use this setup I needed to install a few services and configure the network on this machine.

I choose Ubuntu 14.04 in this case, the Linux distribution I prefer most.

interfaces configuration

First I had to configure eth1

auto eth1
iface eth1 inet6 static
    address 2001:db8::1
    netmask 64

Install packages

Before I could continue I needed a couple of packages on the system. All I needed was available in the Ubuntu repositories. Apt could install them for me quickly.

apt-get install isc-dhcp-server radvd unbound apache2

After the network was configured and the right packages were available I could configure all the services.

DHCPv6

/etc/dhcp/dhcpd6.conf

option dhcp6.user-class code 15 = string;
option dhcp6.bootfile-url code 59 = string;
option dhcp6.client-arch-type code 61 = array of unsigned integer 16;

option dhcp6.name-servers 2001:db8::1;

if exists dhcp6.client-arch-type and
   option dhcp6.client-arch-type = 00:07 {
    option dhcp6.bootfile-url "http://[2001:db8::1]/ipxe.efi";
} else if exists dhcp6.user-class and
          substring(option dhcp6.user-class, 2, 4) = "iPXE" {
    option dhcp6.bootfile-url "http://[2001:db8::1]/ubuntu.cfg";
}

subnet6 2001:db8::/64 {}
service isc-dhcp-server6 restart

radvd

/etc/radvd.conf

interface eth1
{
        MinRtrAdvInterval 5;
        MaxRtrAdvInterval 60;
        AdvSendAdvert on;
        AdvOtherConfigFlag on;
        IgnoreIfMissing off;

        prefix ::/64 {
        };

        RDNSS 2001:db8::1 {
        };
};
service radvd restart

Unbound

/etc/unbound/unbound.conf.d/local.conf

server:
    interface: 0.0.0.0
    interface: ::0
    interface-automatic: yes
    access-control: 127.0.0.1 allow
    access-control: ::1 allow
    access-control: 2001:db8::/32 allow
service unbound restart

Apache webserver

iPXE and the Ubuntu installer I was trying to bootstrap needed a webserver to download files from. I used Apache for that purpose.

Since I also experimented with TFTP in the process I had all my files in /srv/tftp so that’s where I also pointed Apache.

The reason why I choose HTTP over TFTP is just speed. It’s a lot faster and more modern.

/etc/apache2/sites-available/001-preseed.conf

<VirtualHost *:80>
	ServerAdmin webmaster@localhost
	DocumentRoot /srv/tftp

	ErrorLog ${APACHE_LOG_DIR}/error.log
	CustomLog ${APACHE_LOG_DIR}/access.log combined

        <Directory /srv/tftp/>
            Options Indexes FollowSymLinks
            AllowOverride None
            Require all granted
        </Directory>
</VirtualHost>

Now enable this VirtualHost and disable the default one.

a2dissite 000-default
a2ensite 001-preseed

Restart Apache afterwards.

service apache2 restart

So with this configuration I’ve set up the following:

  • DHCPv6
  • IPv6 Router Advertisements
  • DNS resolving for clients
  • Apache for serving files over HTTP

Ubuntu Netboot using iPXE and Preseed

Now that everything is configured we can configure the configuration for iPXE.

Some searching on the internet brought me to help.ubuntu.com which explained how Ubuntu netboot could be used.

It is quite simple, you have to download netboot.tar.gz and extract it.

cd /srv/tftp
wget http://archive.ubuntu.com/ubuntu/dists/trusty-updates/main/installer-amd64/current/images/netboot/netboot.tar.gz
tar xvfz netboot.tar.gz

This will extract a directory ubuntu-installer. It contains all we need to start a network installation.

We can reference to these files in a iPXE configuration file.

/srv/tftp/ubuntu.cfg

#!ipxe

kernel /ubuntu-installer/amd64/linux noapic nolapic acpi=off irqpoll preseed/url=http://[2001:db8::1]/preseed/ubuntu1404.cfg debian-installer=en_US auto locale=en_US kbd-chooser/method=us hostname=alpha fb=false debconf/frontend=noninteractive keyboard-configuration/modelcode=SKIP keyboard-configuration/layout=USA keyboard-configuration/variant=USA console-setup/ask_detect=false netcfg/disable_autoconfig boolean=true netcfg/use_autoconfig boolean=true netcfg/disable_dhcp boolean=true
initrd /ubuntu-installer/amd64/initrd.gz
boot

Here I refer to a preseed file which is used by the Debian/Ubuntu installer. This process is called preseeding.

I had to add some tweaks to make it work over IPv6-only:

d-i netcfg/disable_autoconfig boolean true
d-i netcfg/use_autoconfig boolean true
d-i netcfg/disable_dhcp boolean true
d-i netcfg/dhcpv6_timeout string 10

/srv/tftp/preseed/ubuntu1404.cfg

# Language
d-i debian-installer/language string en
d-i debian-installer/locale string en_US.UTF-8
d-i localechooser/preferred-locale string en_US.UTF-8
d-i localechooser/supported-locales en_US.UTF-8

# Keyboard
d-i console-setup/ask_detect boolean false
d-i keyboard-configuration/layout select USA
d-i keyboard-configuration/variant select USA
d-i keyboard-configuration/modelcode string pc105

# Network
d-i netcfg/disable_autoconfig boolean true
d-i netcfg/use_autoconfig boolean true
d-i netcfg/disable_dhcp boolean true
d-i netcfg/dhcpv6_timeout string 10
d-i netcfg/get_hostname string this-host
d-i netcfg/get_domain string this-host

# Timezone
d-i time/zone string UTC
d-i clock-setup/utc-auto boolean true
d-i clock-setup/utc boolean true
d-i time/zone string Europe/Amsterdam


# Software
d-i debconf debconf/frontend select Noninteractive
d-i pkgsel/install-language-support boolean false
tasksel tasksel/first multiselect standard, ubuntu-server

# Storage
d-i partman-auto/method string regular
d-i partman-auto/disk string /dev/sda
d-i partman-auto/choose_recipe select atomic
d-i partman/confirm_write_new_label boolean true
d-i partman/confirm_nooverwrite boolean true
d-i partman/choose_partition select finish
d-i partman/confirm boolean true

# Mirror
d-i mirror/country string manual
d-i mirror/http/hostname string ubuntu.apt-get.eu
d-i mirror/http/directory string /ubuntu
d-i mirror/http/proxy string

# Users
d-i passwd/root-login boolean true
d-i passwd/make-user boolean false
d-i passwd/root-password password ceph
d-i passwd/root-password-again password ceph
d-i user-setup/encrypt-home boolean false
d-i user-setup/allow-password-weak boolean true

# No language support packages.
d-i pkgsel/install-language-support boolean false

# Additional packages
d-i pkgsel/include string ssh acpid ntp resolvconf

# Security updates
d-i pkgsel/update-policy select unattended-upgrades

# Upgrade
d-i pkgsel/upgrade select full-upgrade

# Update sshd_config to ensure root user is able to login
d-i preseed/late_command string sed -i 's/PermitRootLogin without-password/PermitRootLogin Yes/g' /target/etc/ssh/sshd_config

# Bootloader
d-i grub-installer/only_debian boolean true
d-i finish-install/reboot_in_progress note

Installing Ubuntu

I now started the iPXE Virtual Machine with ipxe.iso attached and it got up and running!

iPXE will boot, obtain a IPv6 address and run the Ubuntu installer. All over IPv6!
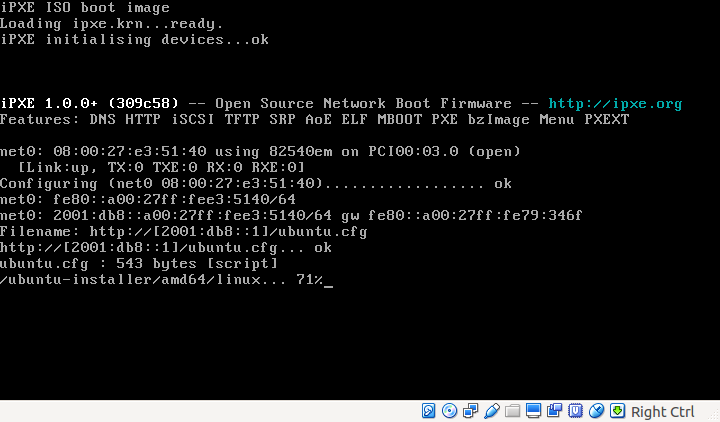
iPXE over IPv6

Using the internet on a IPv6-only network

At home I have native IPv6 via my ISP ZeelandNet since June 2014. Ever since I’ve been using the internet via IPv6 where possible.

Yesterday I thought it was time to create a IPv6-only VLAN + SSID at home and see what parts of the internet I could use while being on a IPv6-only network. No NAT64 or anything, just IPv6.

Linux router

I’m using a Soekris NET6501 with Ubuntu as my router at home. So I created a new VLAN and used that VLAN tag to create a new SSID on my Access Point.

Under Ubuntu I configured:

  • Radvd for Router Advertisements
  • Wide DHCPv6 Server for DNS servers

IPv6-only under iOS 9.1

I have an iPhone 5s and iPad Air 2 both running iOS 9.1 and I thought it was best to use these for testing the IPv6-only network.

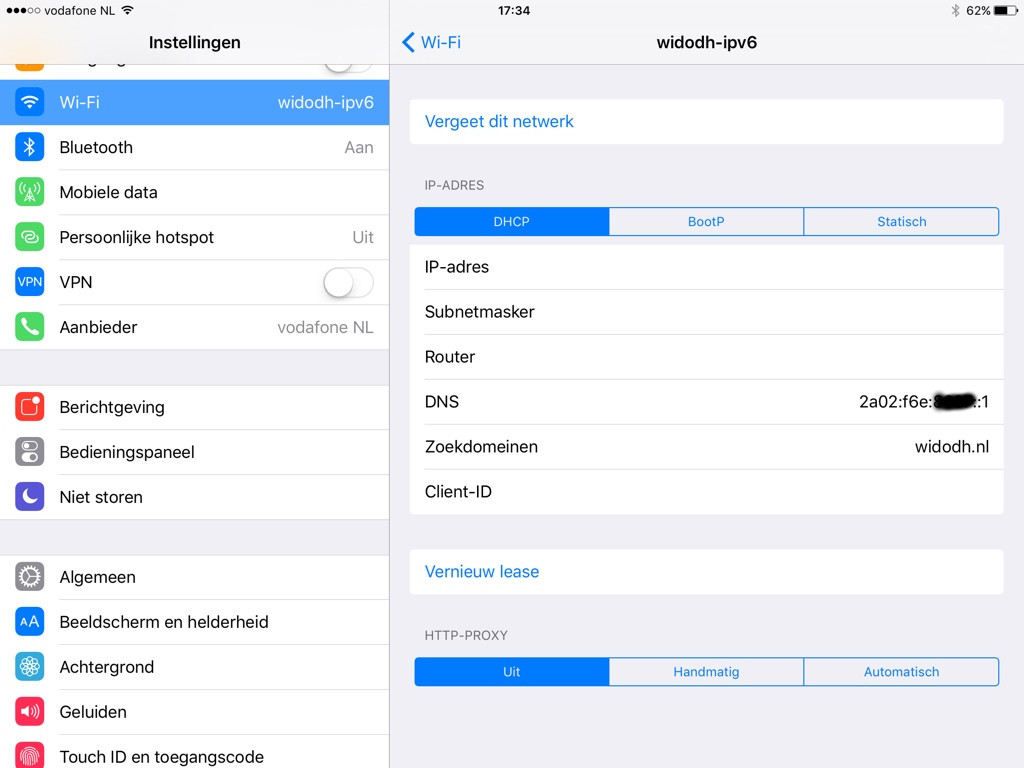
They connected just fine! But the WiFi overview didn’t show any IP-Address. Seems that is still IPv4-only.

iOS 9.1 IPv6-only network

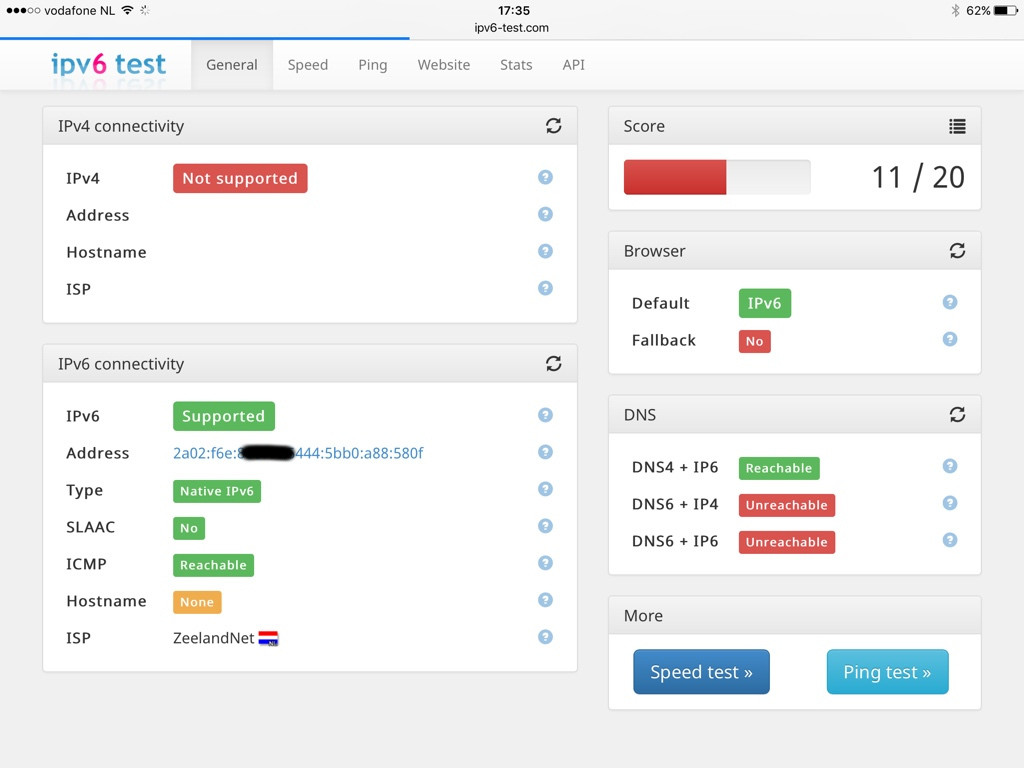
And ipv6-test.com showed that I had IPv6 connectivity only.

IPv6 test iOS 9.1

What works?

You might think that the internet breaks, but I think that already a lot of the large services work. A list of things which work:

  • Facebook / Messenger
  • Google: Search, YouTube, Maps and Gmail
  • NOS (Dutch news
  • Netflix
  • Apple Notifications
  • My own website and E-Mail
  • Various local sites I visit

What does not work?

Well, this could be a very long list. But there are certain services which should be highlighted for not supporting IPv6:

  • Twitter
  • Github
  • Apple App Store
  • Spotify
  • All Dutch Online banking

So yes, the biggest part of the internet does not work over IPv6. But most of the things work for me.

I’ll keep testing the internet using this IPv6-only SSID and I’ll probably keep bugging various admins to turn on IPv6.

Ubuntu and the changing MAC address with bonding

With the ‘new’ style for configuring bonding under Ubuntu your bond device will not always have the same MAC address across reboots.

For example, you configure your bond in the /etc/network/interfaces file:

auto p9p1
iface p9p1 inet manual
        bond-master bond0

auto p10p1
iface p10p1 inet manual
        bond-master bond0

auto bond0
iface bond0 inet manual
        bond-slaves none
        bond-mode 4
        bond-miimon 100
        bond-updelay 5
        bond-downdelay 5

During boot, both interface p9p1 and p10p1 will be hot-plugged under bond0. The first device to be plugged into the bonding device determines which MAC address the bonded device gets.

Due to hardware timing it might be p9p1 OR p10p1 which is the first. This behavior makes the MAC address selection inconsistent between reboots and that might cause problems with:

  • DHCP for IPv4
  • IPv6 with SLAAC (Stateless Auto Configuration)
  • DHCPv6

This has been filed as bug #1288196 with Ubuntu, but no fix from that side so far.

The solutions for now:

auto p9p1
iface p9p1 inet manual
        bond-master bond0

auto p10p1
iface p10p1 inet manual
        pre-up sleep 5
        bond-master bond0

This makes sure p10p1 always comes online 5 seconds after p9p1.

But you can also set a static MAC address for the bonding device:

auto bond0
iface bond0 inet manual
        hwaddress fe:80:12:04:6d:6f
        bond-slaves none
        bond-mode 4
        bond-miimon 100
        bond-updelay 5
        bond-downdelay 5

Choose what you prefer or works best in your situation.

Using the Link-Local Address of IPv6

Link Local

One of the things not know to people is the functionality a Link-Local Address with IPv6 provides.

You might have seen them on your Linux (or any other) system. For example, on my Linux system:

wido@desktop:~$ ip addr show dev eth1
3: eth1:  mtu 1500 qdisc pfifo_fast state UP qlen 1000
    link/ether 52:54:8f:9f:af:62 brd ff:ff:ff:ff:ff:ff
    inet 10.0.199.15/16 brd 10.0.255.255 scope global eth1
       valid_lft forever preferred_lft forever
    inet6 fe80::5054:8fff:fe9f:af62/64 scope link 
       valid_lft forever preferred_lft forever
wido@desktop:~$

As you can see, my Link-Local Address in this case is fe80::5054:8fff:fe9f:af62. What can I do with it?

What is it used for?

With IPv6 the Link-Local Address is used for multiple purposes:

  • Finding Routers using a Router Solicitation
  • Performing Duplicate Address Detection
  • Finding Neighbors

The Link-Local is however a fully functional address which you can use for multiple things.

Using Link-Local

Here at the office my colleague has a desktop and his Link-Local Address is fe80::821f:2ff:fed6:5f08.

So can I ping the address?

wido@wido-desktop:~$ ping6 fe80::821f:2ff:fed6:5f08
connect: Invalid argument
wido@wido-desktop:~$

No, that doesn’t seem to work. Or does it?

wido@wido-desktop:~$ ping6 -I eth0 -c 2 fe80::821f:2ff:fed6:5f08
PING fe80::821f:2ff:fed6:5f08(fe80::821f:2ff:fed6:5f08) from fe80::c23f:d5ff:fe68:2808 eth0: 56 data bytes
64 bytes from fe80::821f:2ff:fed6:5f08: icmp_seq=1 ttl=64 time=0.566 ms
64 bytes from fe80::821f:2ff:fed6:5f08: icmp_seq=2 ttl=64 time=0.612 ms

--- fe80::821f:2ff:fed6:5f08 ping statistics ---
2 packets transmitted, 2 received, 0% packet loss, time 999ms
rtt min/avg/max/mdev = 0.566/0.589/0.612/0.023 ms
wido@wido-desktop:~$

So when I specify the interface I can ping his desktop!

You can also specify the interface this way: fe80::821f:2ff:fed6:5f08%eth0

wido@wido-desktop:~$ ping6 -c 2 fe80::821f:2ff:fed6:5f08%eth0
PING fe80::821f:2ff:fed6:5f08%eth0(fe80::821f:2ff:fed6:5f08) 56 data bytes
64 bytes from fe80::821f:2ff:fed6:5f08: icmp_seq=1 ttl=64 time=0.539 ms
64 bytes from fe80::821f:2ff:fed6:5f08: icmp_seq=2 ttl=64 time=0.481 ms

--- fe80::821f:2ff:fed6:5f08%eth0 ping statistics ---
2 packets transmitted, 2 received, 0% packet loss, time 999ms
rtt min/avg/max/mdev = 0.481/0.510/0.539/0.029 ms
wido@wido-desktop:~$

So can I SSH to it or do anything else with it?

wido@wido-desktop:~$ ssh fe80::821f:2ff:fed6:5f08%eth0
The authenticity of host 'fe80::821f:2ff:fed6:5f08%eth0 (fe80::821f:2ff:fed6:5f08%eth0)' can't be established.
ECDSA key fingerprint is d8:d7:d0:bd:3c:6a:18:31:e5:26:b1:13:96:a8:e1:89.
Are you sure you want to continue connecting (yes/no)? yes
Warning: Permanently added 'fe80::821f:2ff:fed6:5f08%eth0' (ECDSA) to the list of known hosts.
wido@fe80::821f:2ff:fed6:5f08%eth0's password: 

wido@wido-desktop:~$

Indeed, I can! I can also telnet to the address:

wido@wido-desktop:~$ telnet fe80::821f:2ff:fed6:5f08%eth0 22
Trying fe80::821f:2ff:fed6:5f08%eth0...
Connected to fe80::821f:2ff:fed6:5f08%eth0.
Escape character is '^]'.
SSH-2.0-OpenSSH_6.9
^]quit

telnet> quit
Connection closed.
wido@wido-desktop:~$

It is a functional address which you can use on your local network.

Security

Even if you think IPv6 is disabled on your system because you haven’t configured it, it isn’t.

Should you disable IPv6 then? No! Learn to work with it. IPv4 space is running out very quickly, so disabling it is not a wise thing to do.

Just make sure your firewall policies for both IPv4 and IPv6 are up to date. I’ve seen many systems where IPv6 isn’t firewalled at all, which makes them open to anybody on the local network.

Link-Local Addresses are not routed over the internet, so somebody has to gain access to the local Layer 2 LAN before it can connect via Link-Local, but still, keep it in mind.

Ceph with a cluster and public network on IPv6

I’m a big fan of Ceph and IPv6, so I always try to deploy Ceph over IPv6 when possible. Ceph is the future, just like IPv6 is. Why implement legacy?

Recently I did a deployment of Ceph with a public and cluster network running over IPv6. It has a small catch, so I let me explain the cluster and public network first.

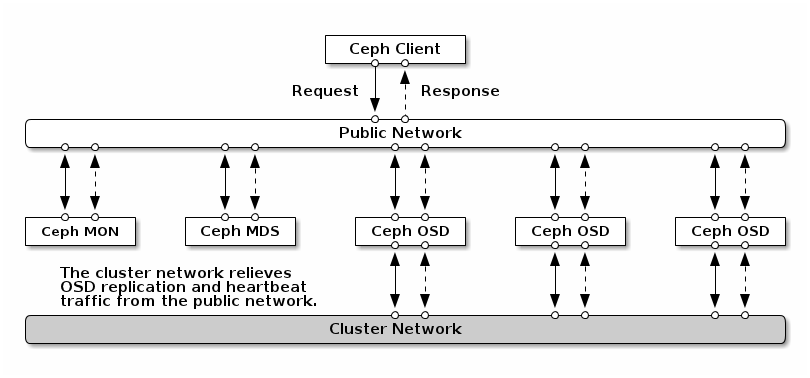
Ceph cluster and public network

This image comes from the Ceph documentation and shows the two types of network:

  • Public network for clients and monitors
  • Cluster network for inter-OSD communication (Replication and recovery)

If you want to run your Ceph cluster over IPv6 you have a couple of settings to make:

[global]
ms_bind_ipv6 = true
mon_host = [2a00:f10:XX:XX::XX]:6789, [2a00:f10:XX:XX::XY]:6789, [2a00:f10:XX:XX::YY]:6789

As you can see, you have to write the IPv6 address enclosed by [ and ]

When configuring the cluster and/or public network in the ceph.conf you should however not use them:

[global]
public_network = 2a00:f10:XX:XX:XX::/64
cluster_network = 2a00:f10:XX:XX:XY::/64

When that is set correctly it should all be working fine and your Ceph cluster will be running over IPv6 with different networks!

Yealink SIP-T20P on a IPv6-only network

At PCextreme we are looking into replacing all our current Cisco, Linksys and Polycom IP phones with new phones. The old phones are worn out and have to be replaced.

We have two demands:

  • IPv6 support
  • TLS support

After some searching I found out that neither Cisco or Polycom support IPv6 in their phones with SIP, so they we off the list.

More searching led us to Yealink and we ended up ordering a SIP-T20P.

A couple of days later I created a IPv6-only VLAN on our XS4All VDSL2 connection to I was sure there was NO IPv4 available for the phone.

It took some time to figure it out, but using the T20 over IPv6 is fairly easy.

  • Start the phone
  • Go to the Advanced Network Settings (password: admin)
  • Set the network type to IPv6

The T20 (Firmware 7.72.0.75) does NOT support DHCPv6 (The T4xx models do), it relies on Router Advertisements. We had to manually enter the auto provisiong URL (over HTTP) and afterwards the phone provisioned itself.

If we choose to go for Yealink it will probably be the T4x models since they support DHCPv6 and we want the auto provisioning to be fully automatic.

Deploying Ceph over IPv6

I like to deploy Ceph clusters over IPv6. I actually think that’s the way forward. IPv4 is legacy just like iSCSI and NFS are.

Last week I was at a customer deploying a new Ceph cluster and they wanted to deploy with IPv6! Most deployment I did with IPv6 were done manually and not with ceph-deploy, but when trying to deploy with ceph-deploy over IPv6 I ran into some issues.

Before going into that I want to make something clear. With Ceph you choose either IPv4 OR IPv6. There is NO dual-stack support. So the whole cluster (including clients) communicates over IPv6 or over IPv4. Switching afterwards is not possible. So that’s why I urge people to deploy with IPv6 since you probably want to have your cluster running for a long time.

All package repos (including the Ceph ones) have IPv6 enabled, so in my opinion there is no good reason to prefer IPv4 with a Ceph deployment when IPv6 is available. I even think it’s easier in large deployment due to the Router Advertisements in IPv6.

Having that said it’s time to go back to the ceph-deploy issue.

In ceph.conf you have to enclose IPv6 addresses for monitors with a [ and ]. This is what ceph-deploy did wrong:

[global]
mon_host = 2a00:f10:X:X::X,2a00:f10:X:X::Y,2a00:f10:X:X::Z

While it should have been:

[global]
mon_host = [2a00:f10:X:X::X],[2a00:f10:X:X::Y],[2a00:f10:X:X::Z]
ms_bind_ipv6 = true

The ms_bind_ipv6 setting tells the Messenger inside Ceph to bind on IPv6. It’s important that you set that setting on all hosts in the Ceph cluster, otherwise things will go wrong badly. Heartbeats and such will not work.

I wrote a patch for ceph-deploy which fixes it. It writes the ‘mon_host’ setting correctly and also adds the ‘ms_bind_ipv6’ setting when IPv6 is used for the monitors.

Cisco 887VA on a XS4All VDSL connection

I’m going to write the rest of this post in Dutch, since the ISP I’m going to talk about is dutch.

But, for the international visitors: I had troubles getting our brand new Cisco 887VA-SEC-K9 VDSL modem working on a VDSL connection from XS4All (Dutch ISP). It took me about 8 hours in to figure out that ATM was no longer used..


Afgelopen week werd onze ADSL2+ verbinding op kantoor om gezet naar een VDSL verbinding. Vanaf ons kantoor liggen er enkele IPSec tunnels naar een Cisco ASA5510 in het datacenter. Bij de ADSL2+ verbinding hadden we een SpeedTouch ADSL2+ modem in bridge met daar achter een Cisco ASA5505 die de PPP deed.

Bij de upgrade naar VDSL besloten we om net zoals bij de SDSL verbinding die we hebben een Cisco 880 series router te pakken. Lekker makkelijk je modem + router in één en ook direct onder iOS je IPSec tunnels configureren.

Ik kreeg echter onder geen enkele mogelijkheid de Cisco 887VA werkend op de VDSL verbinding. De geleverde Fritz!Box van XS4All werkte prima, maar bij de 887 bleef de interface “ATM0” maar “down”.

XS4All zou de verbinding in de loop van de dag upgraden naar VDSL, dus ik had in de ochtend de Cisco er al tussen geprikt die toen vrolijk ADSL2+ deed. Nadat XS4All in de ochtend de verbinding naar VDSL omzette stopte alles met werken. ATM0 bleef maar down.

Uren gingen voorbij in waarin ik diverse firmwares geprobeerd heb, allerlei ATM settings, DSL modes, noem het maar op, tót ik een blogpost tegen kwam waar iemand aanhaalde dat er geen ATM meer gebruikt wordt bij VDSL, maar het een native Layer 2 verbinding is. Je moet alleen het VLAN nummer weten.

Waar ik het VLAN nummer gevonden heb weet ik niet meer, maar dit is op het KPN netwerk VLAN nummer 6.

Het duurde toen niet lang voordat ik de verbinding werkend had.

De relevante configuratie:

interface Dialer0
 ip address negotiated
 ip nat outside
 ip virtual-reassembly in
 encapsulation ppp
 dialer pool 1
 dialer idle-timeout 0
 dialer-group 1
 ipv6 address autoconfig default
 ipv6 enable
 ipv6 nd ra interval 30
 ipv6 dhcp client pd xs4all-ipv6 rapid-commit
 ipv6 mld query-interval 60
 ipv6 virtual-reassembly in
 ppp authentication pap callin
 ppp pap sent-username USERNAME@xs4all.nl password 0 PASSWORD
 no cdp enable
 crypto map vpn
!
interface Ethernet0
 no ip address
!
interface Ethernet0.6
 encapsulation dot1Q 6
 pppoe enable group global
 pppoe-client dial-pool-number 1
!
interface ATM0
 no ip address
 shutdown
 no atm ilmi-keepalive
!
interface Vlan1
 ip address 192.168.X.1 255.255.255.0
 ip nat inside
 ip virtual-reassembly in
 ipv6 address 2001:980:XXXX::1/64
 ipv6 enable
 ipv6 nd other-config-flag
 ipv6 nd ra interval 30
 ipv6 dhcp server
 ipv6 mld query-interval 60
!
access-list 100 permit ip 192.168.X.0 0.0.0.255 any
ip nat inside source route-map nonat interface Dialer0 overload
ip route 0.0.0.0 0.0.0.0 Dialer0
ipv6 route ::/0 Dialer0
dialer-list 1 protocol ip permit
no cdp run
!
route-map nonat permit 10
 match ip address 100

De VDSL verbinding trained op 33Mbit down en 3.4Mbit up, dit zie je op een 887VA in met:

show controllers vDSL 0

Onderaan de output zie je vervolgens:

Firmware	Source		File Name (version)
--------	------		-------------------
VDSL		embedded   	VDSL_LINUX_DEV_01212008 (1)

Modem FW  Version:	110331_1212-4.02L.03.A2pv6C032b.d23f
Modem PHY Version:	A2pv6C032b.d23f
Vender Version:		


 		  DS Channel1	  DS Channel0	US Channel1	  US Channel0
Speed (kbps):	          0	       33021	         0	        3432
SRA Previous Speed:       0	           0	         0	           0
Previous Speed:	          0	           0	         0	           0
Reed-Solomon EC:          0	       79025	         0	           0
CRC Errors:	          0	           0	         0	           0
Header Errors:	          0	           0	         0	           0
Interleave (ms):       0.00	       12.00	      0.00	        4.00
Actual INP:	       0.00	        5.00	      0.00	        2.00

Met deze configuratie werkt de VDSL verbinding van XS4All prima met zowel IPv4 als IPv6 (Het is 2012!).

Het is belangrijk om te weten dat je de 887VA-SEC-K9 nodig hebt om IPv6 werkend te krijgen! De standaard 887VA-K9 doet GEEN IPv6.

Overigens zou het wel handig zijn als XS4All de basis VDSL configuratie parameters op hun website zet. Ookal leveren ze (logisch!) geen support op andere modems zijn de parameters wel handig om te weten.

Canon MP495 supports IPv6!

While we are nearing the end of the IPv4 pool, a lot of consumer electronics (even Enterprise routers) do not support IPv6.

Today I bought a new printer to use at home. It had to be a printer which would work over WiFi, after some time at the local store I choose the Canon Pixma MP495, a simple printer, just what I needed.

After configuring it (which I had to do via Windows), I browsed to the IP of the printer and saw that it supported IPv6! (Even IPsec) Wow, that is something you don’t see often.

Haven’t tested it with my Ubuntu 10.04 laptop yet, but it is nice to see manufacturers start implementing IPv6 in ordinary products!