Installing the socket of my Open EVSE

While the shed in my backyard is still under constructing I started installing the Type 2 socket on the outer wall on the side of my parking spot.

For my EVSE I’m using the Open EVSE project. Although we use a different connector in Europe, the signaling is the same as with the J1772 connector. One other advantage is that the European connector has support for 3-phase power.

My shed has a outer and inner wall with the main supports in between them, I’m trying to run most cabling inside the wall for the aesthetics. For the socket it was also the easiest way.

A couple of pictures of what I did so far (still took me 5 hours though! Those stiff cables don’t make it any easier!).


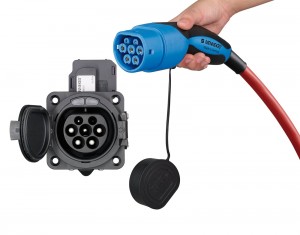
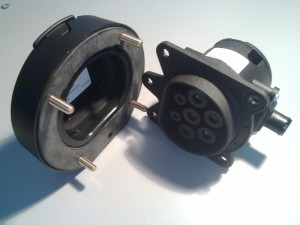
This is the Type 2 socket for installation in a wall. This picture is without the interlocking actuator. The actuator is used for locking the connector in the socket while charging. It’s to prevent you from taking out a connector which might be carrying 22kW of power, that would give some fireworks!


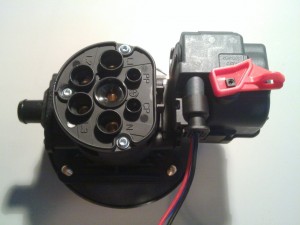
This is the socket with the actuator installed on top of it. It’s a very simple 12V motor which pushes a pin into the socket and locking the connector in place.

I haven’t found a way yet to control this with the Open EVSE project, but I’m positive I’ll find a way to do so.

Locking is done by putting 12V on it for 300ms and unlocking is done by simply reversing the poles. Any suggestions how to do this with Open EVSE are welcome!


This now had to be installed in the outer wall of my shed. This wall is 11mm thick while the connector is build for 9mm at max. It took some power tools to get about 4mm off that wall!


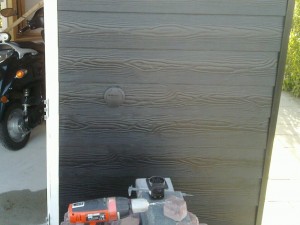
This is how it looks on the outer wall after installation. You can see the actual socket still lying there, but the outer cap has been installed.

The socket itself is very well build by Mennekes. Rubbers everywhere to prevent water from coming in, but it also has water drainage output on the bottom. Should somebody plug in a connector full of water the excess water can flow out of the socket.

It’s a pretty expensive socket (EUR 300,00) but they did their job of creating a descent one!


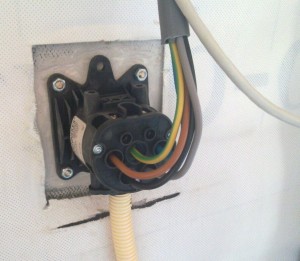
This picture shows the installed socket from the back with the main power lines connected.

WARNING: These cables are NOT energized! The power flow is controlled by the EVSE with a relais. Take note of that should you consider installing your own EVSE!

The PP (Proximity Pilot) and CP (Control Pilot) pins are not connected yet, you however see the CAT6 cable already there. I’m using that cable for the CP and PP pins as well as for controlling the actuator.

The power cable is a 5G6 cable. This means 5 wires of 6mm2 each. My goal is to have this EVSE installation be able to deliver 3-phase 32A (22kW). 4mm2 cabling would maybe have done the job, but safety first! It also means less voltage drop, so more kW to the car!

The flexible PVC hose at the bottom is water drainage from the socket, should water enter the socket it can flow out of the socket through there.


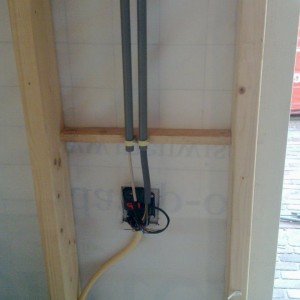
This is how it all looks after installation with the actuator installed.

One PVC pipe carries the the main power cable while the other carries the CAT6 cable for controlling the actuator and connecting the PP and CP pin.

The pipes run through the structure towards the main power panel (yet to be installed) where I’ll also install the Open EVSE.

Between the outer and inner wall there will be insulation, but I have to prevent this from making contact with the socket. I still have build something for that around the socket, I want to make sure the insulation doesn’t catch fire for some reason. (Although I don’t know if it actually burns).

It’s better to be safe then sorry in this case. 22kW of power will flow through here, that is something not to be taken lightly, that is some serious amount of power!


If you want to order this socket yourself contact EV-Box (Netherlands), they can help you with that.

These are the parts I ordered (Mennekes part numbers):

  • 30012: Fixing ring with hinged lid IP44
  • 31016: Type 2 socket 32A with actuator
  • 30019: Actuator connector with 3 wires of 1m each

When I finish my EVSE I’ll post a full list of components I used.

Now it’s back to my shed for doing some more installation of other electronics like lighting.

Quassel IRC, never miss anything on IRC!

I was one of those guys who had irssi running inside a screen on a remote Linux box somewhere. It works just fine, but I always forgot to open the SSH session so I missed a lot of IRC conversations. Private messages were a problem as well, most of the times it was a couple of days later before I noticed somebody had actually sent me a PM…

It was time to change my IRC client, with the preference to always be online.

A short search lead me to the website of Quassel IRC, a distributed IRC server/client. Exactly what I was looking for! You just install the “core” on a remote Linux box and use the Linux, Windows, Mac OSX or Android client to participate on IRC.

The core has been running on a Ubuntu 10.04 machine for about one week now and it works like a charm. My IRC conversations are secured by SSL and I never miss a PM or when somebody tags me!

Integration of the client goes well on Ubuntu 12.04 with Unity, it integrates seamlessly with Unity and notifies me whenever I’m tagged or I receive a PM.

Looking for me on IRC? Find me on OFTC @ wido where I hang out in #ceph. Or find me on Freenode @ widodh in #cloudstack

Building my own EVSE


While I’m waiting for my Tesla Model S I also bought a new house. In December 6th 2011 I received the keys and ever since I’ve been working on the electrical infrastructure to prepare everything for the 3-phase charging station (EVSE) which should go into the garage.

I modified my fistribution panel to have a dedicated 3x32A connection to my garage where I can install my EVSE. The purpose is not only to charge the future Model S, but also the Roadster of my colleague and other EV’s which might visit me.

But then, which EVSE do you buy? I’ve been looking around and a EVSE capable of 3x32A costs about EUR 2000,00! It’s nothing more then a CFGI, a fuse and a controller, so I figured that could be done for less.

After some searching I found the Open EVSE project. I was sold right away! What’s cooler then building your own EVSE with Open Source software!?

I ordered the Open EVSE kit with the Advanced Power Supply and got it last week. Right now I’m waiting for my 63A relais (I like it beefy) and some other components like the Type 2 socket for in the outer-wall of my garage.


The Model S won’t fit in the garage, so I’m going to install the Type 2 socket in the outer-wall of the garage. All the EVSE components can be inside, that will make it very clean. Just a Type 2 socket where you plug in your EV and it starts charging! Couldn’t be easier.


To my garage I’m running a 5G6 cable. That’s five wires of 6mm2 each. This cable will be capable of doing 3x32A which should recharge the 85kWh battery in a little bit over 4 hours.

My main fuses are 40A, so when I’m charging with 3x32A I can’t turn on my oven or use my electrical cooking. Open EVSE however supports dynamically changing the current.

In my distribution panel I have a kWh meter with a M-Bus exit over which I can read out the current going through my main fuses. I’ve made a nice web page where I display this information, but the main goal is to have the EVSE read out this data and adjust the current based on what other appliances in my house are using.

This way I’ll never blow my main fuses and I’ll still be able to use 32A at the EVSE when available. Something like my little smart grid!

As I’m still waiting for a couple of components I’m not going to post anything yet about which I’m using. I promise, I’ll add a Wiki on the Open EVSE page about how I build my 3-phase EVSE with Open EVSE!

That’s it for now, keep tuned for more information!

Now it’s back to waiting… Not only for the components, but also for the Model S!

Cisco 887VA on a XS4All VDSL connection

I’m going to write the rest of this post in Dutch, since the ISP I’m going to talk about is dutch.

But, for the international visitors: I had troubles getting our brand new Cisco 887VA-SEC-K9 VDSL modem working on a VDSL connection from XS4All (Dutch ISP). It took me about 8 hours in to figure out that ATM was no longer used..


Afgelopen week werd onze ADSL2+ verbinding op kantoor om gezet naar een VDSL verbinding. Vanaf ons kantoor liggen er enkele IPSec tunnels naar een Cisco ASA5510 in het datacenter. Bij de ADSL2+ verbinding hadden we een SpeedTouch ADSL2+ modem in bridge met daar achter een Cisco ASA5505 die de PPP deed.

Bij de upgrade naar VDSL besloten we om net zoals bij de SDSL verbinding die we hebben een Cisco 880 series router te pakken. Lekker makkelijk je modem + router in één en ook direct onder iOS je IPSec tunnels configureren.

Ik kreeg echter onder geen enkele mogelijkheid de Cisco 887VA werkend op de VDSL verbinding. De geleverde Fritz!Box van XS4All werkte prima, maar bij de 887 bleef de interface “ATM0” maar “down”.

XS4All zou de verbinding in de loop van de dag upgraden naar VDSL, dus ik had in de ochtend de Cisco er al tussen geprikt die toen vrolijk ADSL2+ deed. Nadat XS4All in de ochtend de verbinding naar VDSL omzette stopte alles met werken. ATM0 bleef maar down.

Uren gingen voorbij in waarin ik diverse firmwares geprobeerd heb, allerlei ATM settings, DSL modes, noem het maar op, tót ik een blogpost tegen kwam waar iemand aanhaalde dat er geen ATM meer gebruikt wordt bij VDSL, maar het een native Layer 2 verbinding is. Je moet alleen het VLAN nummer weten.

Waar ik het VLAN nummer gevonden heb weet ik niet meer, maar dit is op het KPN netwerk VLAN nummer 6.

Het duurde toen niet lang voordat ik de verbinding werkend had.

De relevante configuratie:

interface Dialer0
 ip address negotiated
 ip nat outside
 ip virtual-reassembly in
 encapsulation ppp
 dialer pool 1
 dialer idle-timeout 0
 dialer-group 1
 ipv6 address autoconfig default
 ipv6 enable
 ipv6 nd ra interval 30
 ipv6 dhcp client pd xs4all-ipv6 rapid-commit
 ipv6 mld query-interval 60
 ipv6 virtual-reassembly in
 ppp authentication pap callin
 ppp pap sent-username USERNAME@xs4all.nl password 0 PASSWORD
 no cdp enable
 crypto map vpn
!
interface Ethernet0
 no ip address
!
interface Ethernet0.6
 encapsulation dot1Q 6
 pppoe enable group global
 pppoe-client dial-pool-number 1
!
interface ATM0
 no ip address
 shutdown
 no atm ilmi-keepalive
!
interface Vlan1
 ip address 192.168.X.1 255.255.255.0
 ip nat inside
 ip virtual-reassembly in
 ipv6 address 2001:980:XXXX::1/64
 ipv6 enable
 ipv6 nd other-config-flag
 ipv6 nd ra interval 30
 ipv6 dhcp server
 ipv6 mld query-interval 60
!
access-list 100 permit ip 192.168.X.0 0.0.0.255 any
ip nat inside source route-map nonat interface Dialer0 overload
ip route 0.0.0.0 0.0.0.0 Dialer0
ipv6 route ::/0 Dialer0
dialer-list 1 protocol ip permit
no cdp run
!
route-map nonat permit 10
 match ip address 100

De VDSL verbinding trained op 33Mbit down en 3.4Mbit up, dit zie je op een 887VA in met:

show controllers vDSL 0

Onderaan de output zie je vervolgens:

Firmware	Source		File Name (version)
--------	------		-------------------
VDSL		embedded   	VDSL_LINUX_DEV_01212008 (1)

Modem FW  Version:	110331_1212-4.02L.03.A2pv6C032b.d23f
Modem PHY Version:	A2pv6C032b.d23f
Vender Version:		


 		  DS Channel1	  DS Channel0	US Channel1	  US Channel0
Speed (kbps):	          0	       33021	         0	        3432
SRA Previous Speed:       0	           0	         0	           0
Previous Speed:	          0	           0	         0	           0
Reed-Solomon EC:          0	       79025	         0	           0
CRC Errors:	          0	           0	         0	           0
Header Errors:	          0	           0	         0	           0
Interleave (ms):       0.00	       12.00	      0.00	        4.00
Actual INP:	       0.00	        5.00	      0.00	        2.00

Met deze configuratie werkt de VDSL verbinding van XS4All prima met zowel IPv4 als IPv6 (Het is 2012!).

Het is belangrijk om te weten dat je de 887VA-SEC-K9 nodig hebt om IPv6 werkend te krijgen! De standaard 887VA-K9 doet GEEN IPv6.

Overigens zou het wel handig zijn als XS4All de basis VDSL configuratie parameters op hun website zet. Ookal leveren ze (logisch!) geen support op andere modems zijn de parameters wel handig om te weten.

The Model S will support 3-phase charging!

I’ve wrote a letter to Tesla, wrote a blogpost about it and discussed it on the Tesla Motors Club forum and it seems it has paid off!

Tesla Motors just announced that the Model S will support 3-phase charging in Europe!

On Twitter they tweeted:

Tesla’s Model S in Europe will be capable of three phase charging.

That is great news for all future Model S owners in Europe!

Now it’s back again to waiting for the Model S to be parked at my house.

3-phase and CHAdeMO charging for the Model S?

The biggest issue with Electric Vehicles (EV’s) is charging. How do I charge my car within a reasonable time frame? Charging within 1 hour is possible, but you need a lot of power to do so. That is not available on all locations and requires special chargers.

Almost two years ago I made a reservation for a Tesla Model S, the car which I think is the best EV to come to the market.

In the summer of 2011 I was invited to a ‘reservation holder only event‘ at the Tesla factory in Fremont California. I went there and saw the Model S for the first time: Wow…. I was blown away, what a beauty.

EV’s however are new and not everything is technically the way you want it to be.

What is 3-phase charging and why would you want it?

Timely charging is the biggest issue with EV’s. With 3-phase charging you could charge your EV 3 times faster, since Europe has a 3-phase power grid.

I live in Europe (The Netherlands) and  unlike the USA were are limited to ~32A per phase. In the USA you can get a 100 Amp installation in your house. Amps and Volts is all that counts when you want to charge an EV.

With a 100 Amp connection in the USA, you get 20kW of power. (100A * 208V =~ 20kW). The biggest battery of a Model S is 85kWh (Kilowatt hour). 85 kWh / 20kW = 4.25 hour of charging (not taking any losses into account).

Like mentioned, in Europe we have a 3-phase power grid and we are limited to 32A per phase in residential areas (Rules are complex!). 32A at 230V = 7.3kW.

The 85kWh battery of a Model S would take almost 12 hours (85 / 7.3) to charge.

Here comes the 3-phase power into play. We can get 3 times 32A in our hose at 400 Volts. (See the Wikipedia page). This calculation is a bit more complex: 400 * 32 * SQ(3) =~ 20kW. We also get 20kW of power in our residential areas, but it’s delivered to us spread out over 3-phases instead of one.

The bottom-line is: Without 3-phase charging it will take three times longer to charge a Model S in Europe then in the USA. That’s why I want 3-phase charging for the Model S.

When I made my reservation the Tesla website stated that the Model S could charge from 110V, 220V and 480V. From that moment I assumed the Model S would support 3-phase charging, but then I went to the event at the factory in Fremont.
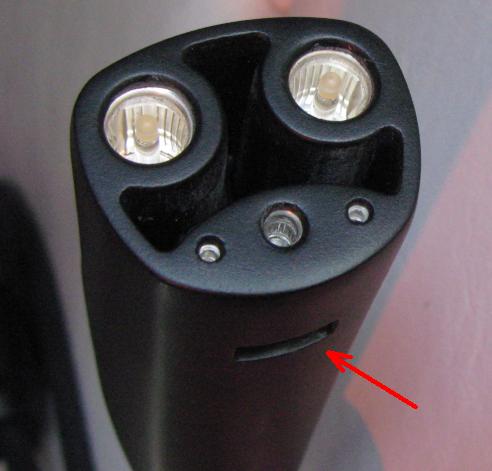


This picture shows the new charging connector of the Model S. Tesla designed a new connector which could handle AC (low to medium (20kW)) power and DC (high >50kW)) power over the same pin layout. This results in a very sleek connector. A great connector if you look at it from a designers perspective.

The connector is however lacking a 2nd and 3rd connector for 3-phase charging. This connector design only has:

  • A ground (bottom middle)
  • A proximity and pilot connection (bottom left and right)
  • A Phase connection (top left or right)
  • A neutral connection (top left or right)

In order to support 3-phase power the connector should have two more ‘big’ connectors.

I asked a Tesla employee if the Model S could charge from 3-phases and he said “No, it won’t” I felt really disappointed. I had been waiting on the Model S for such a long time already (18 months), living with the assumption (since the website stated 480V charging) that it would support 3-phase charging.


The employee told me that Tesla focused on Quick/Fast/Super-charging a Model S with high power DC (500V, ~200A, 90kW, 45 min) instead of the slower charging. The Model S would also be able to travel such long distances that you could do almost all your driving without charging. I argued he was wrong, but it was quite busy at the event, so I didn’t get into a in-depth discussion with him.

Although the event at the Tesla factory was great, the news about the lack of 3-phase charging gave a real bad taste.

In the car back to the hotel I started brainstorming with my colleague (the Roadster owner) about how we could convince Tesla otherwise. As a Roadster owner in Europe he’s also quite disappointed about the Roadsters limitation to 7kW (32A @ 230V) charging (8 hours) in Europe. He however accepted it since the Roadster is a car for pioneers, early adopters or tech freaks, however you want to call them.

If you by a base Model S you get one on-board 10kW AC charger, but if you pay $1500,00 you get a second 10kW charger which runs parallel with the first charger, giving you 20kW AC charging.

Wait a minute? 20kW AC charging? That is exactly what we want in Europe! In the US the chargers run parallel on 1-phase, as Europeans we want the 20kW spread out over 3-phases. So what is the point? Tesla clearly sees that 20kW AC charging is useful in the US, why not in Europe?
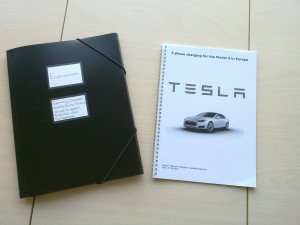
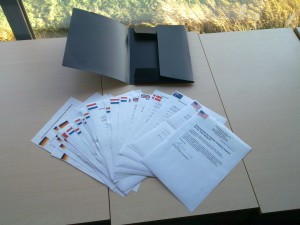
To get back to the brainstorming: We came up with the idea to write a letter to Tesla and start collection signatures from people who agreed with me. So I did, I wrote a letter to Tesla together with 39 hand written signatures.

On the right two pictures of how this looked.

On November 4th 2011 I sent this package to the Tesla HQ in Palo Alto, CA, USA and I started waiting…


After a month of waiting for just a “Thank you for your letter” I also sent the letter to the Tesla EU HQ in London and posted a Tweet. That is when I got a “Thank you” from Tesla, but nothing conclusive. I never expected Tesla to reply within a month with a answer that they would or wouldn’t support 3-phase charging.

I completely understand that such decisions might have a big impact and involve a lot of people, so these kind of things take time.

However, is implementing 3-phase support that hard? I think it’s not. The biggest obstacle I think is the connector (see above) that Tesla designed. It’s missing the necessary connections for L2 (2nd phase) and L3 (3rd phase), so they would have to redesign that connector. They could also add a second charging port on the car and support the IEC 62192-2-2 connector natively without any adapters?
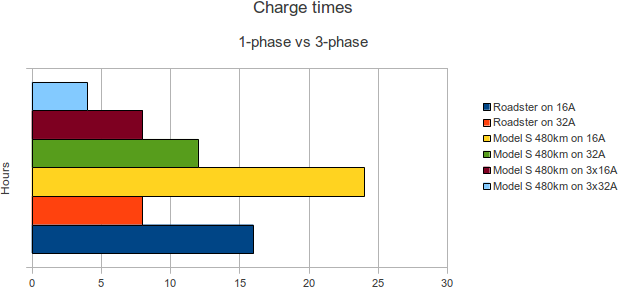
 

3-phase charging would drastically improve the usage of the Model S. On a 3x16A (10kW) connection you could charge a Model S with it’s 85kWh battery in about 8 hours. A Nissan Leaf also charges in 8 hours, but a full charge of a Leaf gets you 160km, a full Model S takes you up to 480km.

A 3x32A connection (20kW) could charge a Model S in a bit over 4 hours.

I made a graph to display the various charging times for a Model S and a Roadster. You get the picture why 3-phase charging is really needed for the Model S!


Without 3-phase charging you wouldn’t even be able to charge your Model S overnight! How are you supposed to charge the Model S if you get back home later in the evening and want to leave the next morning? A full charge could take over 24 hours!

Most (bigger) hotels in Europe also have a 3-phase connection available somewhere in the parking lot, if not, it is trivial to get such a connection installed. With just a single-phase socket you can’t charge your Model S overnight (see the chart above).

That is why I emphasized this to Tesla: “European’s don’t want 3-phase charging, they need 3-phase charging!”

The faster you can charge your EV, the better. It makes the car more practical, simple as that.

The final decision is at Tesla, but I think that supporting 3-phase charging is trivial and vital for Tesla if they want to be successful in Europe. In my letter to Tesla I showed them how many 3-phase charging stations are available in Europe. The current estimate is that over 2.500 (~1300 in Holland alone!) of these charging stations are installed in Northern Europe and they are being installed on a daily basis. (Amsterdam is installing at least one every week).

We just saw the release of the Pricing & Options of the US Model S, so I’m not expecting a answer from Tesla really soon. I however have good hope that Tesla will implement 3-phase charging for the Model S. My hope is that they will reveal it at the Geneva Motor Show in March 2012.
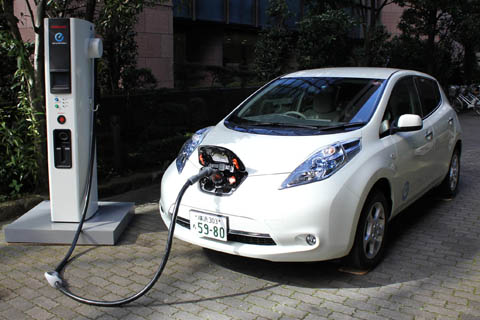


Something else which has been bothering me is the DC (fast-charging) charging Tesla will be using for the Model S. They say it will be DC charging at 500V and can top up your Model S in 45 minutes. They call it “Supercharging”.

Around the world (especially in Europe and Japan) fast-chargers are being installed which are compliant to the CHAdeMO protocol.

CHAdeMO is a fast-charge protocol which delivers up to 50kW of power. If we take a look again at the calculations above: 85kWh / 50kW = 1.7 hours for a full charge.

The Nissan Leaf is one of the first cars to support CHAdeMO fast-charging. A CHAdeMO station can recharge the 24kWh battery of a Leaf in 30 minutes.

Yes, the 50kW a CHAdeMO charger delivers is 60% of the 90kW Tesla is intending to use, but still, 50kW is better then nothing.

Tesla claims that they will be installing their “Super chargers” throughout the US and even Europe, concrete plans are however lacking.

The CHAdeMO chargers are being rolled out today. Nissan recently said that they will donate 400 chargers in Europe. 400 chargers!? That is great! If the Model S could take advantage of these chargers you could travel even further.

CHAdeMO seems to be winning in Europe and Japan as it comes to fast-charging. I’m not sure about the US, but it seems it’s getting traction there as well. In 2012 there will be hundreds or more then a thousand of these chargers throughout Europe. It would be a shame if the Model S can’t charge there.

BP (British Petroleum) has started installing CHAdeMO chargers at their stations along highways in the Netherlands, but incentives like those are being initiated all over Europe. In 2011 the Norwegian energy company Ishasvkraft announced that they will be installing CHAdeMO chargers throughout Norway. Lysi Energy is doing the same in Norway.

On the Tesla Motors Club forum I recently started a thread on CHAdeMO charging for the Model S. We can be almost a 100% sure that the Model S won’t natively support CHAdeMO charging, but there is always the possibility of an adapter. Tesla did not reveal any plans for such an adapter, but there is hope.


My message to Tesla is that they should make the Model S the best EV on the planet and crush all competition. I’m blown away by the Model S and can’t wait to receive mine. It would however be a shame if the car would be limiting me by not letting me take advantage of the available power provided by 3-phase and CHAdeMO charging stations.

The specifications of the Model S are great, no doubt about that. Just make sure that I as a driver can take full advantage of all the charging possibilities which are available. That would make me (and I think a lot with me) a very, very, very happy customer!


Magento one page checkout keeps redirecting back to the shopping cart

A few friends of mine run a Magento webshop (1.3) and they had the problem that customers would be redirected back to the shopping cart after filling in their personal information.

I tried the same, but my order would go through. I was kind of lost, why did it always work for me but it wouldn’t for other customers?

After some hours of searching I tried to enter my Gmail address instead of my personal address and that failed. I got redirected back as well.

A report showed up in var/report with a warning from the Zend Framework core saying that the gmail address could not be validated.

Some Googling brought me to the magento forums.

The bug is indeed in lib/Zend/Validate/Hostname.php on line 329

Replace:

if (Zend_Loader::isReadable($classFile)) { 

With:

if (file_exists($classFile) && Zend_Loader::isReadable($classFile)) { 

And you should be up and running again!

I haven’t debugged this further to find out what the root cause is, but I’d thought I’d share my solution.

So, I went to the Tesla Model S beta event

Somewhere in August I got a invitation of Tesla to come over to the factory in Fremont California and see the Model S in person.

As a reservation holder of a Model S I simply could not refuse that invitation! Lucky me I still had some business to do in California and I had a paintball tournament there, a bit of travelling through the USA and I could attend the event, yay!

I did not know what to expect, but I expected something big. Tesla is not investing in any form of promotion of their Model S, but they seem to solely rely on the product promoting itself and using modern techniques like Facebook and Twitter. I saw myself as a ‘messiah’ (Ok, that is dramatized!) for Tesla, they would rely on us to overload the world with Tweets and messages with Facebook. Tempting and convincing other people to also make a reservation for the Model S.

My colleague (The Roadster owner) and I stayed in San Francisco to check out the area but also to be close to Fremont!

Driving towards the factory we did not know what to expect. How big is the factory? How many Model S’es will there be? How long wil the test drive be? (I knew that I would not be driving myself).

Arriving at the factory is impressive, it’s HUGE! The first thing you see is the big T-E-S-L-A sign on the outer wall.

The Tesla factory in Fremont

We parked the car and walked to the entry, have to say, that was the longest walk ever over a parking lot!

Once inside the first thing we saw was a clay model of the Model S, one half brown, the other one silver.

A clay model of the Model S

Seeing that model shows you how big the S is. At first Tesla said it would be the size of a BMW 5-series, well, it’s more like a 7-series!

Further down in the factory there was the ‘exploded body’ of the Model S and a chassis with battery and drive-train in it. This gave a good impression of the storage capacity the S has, but also how small the drivetrain actually is. I’ve seen it on multiple pictures, but seeing in for real is something different. A real piece of modern engineering!

Me at the exploded Model S
The Model S chassis

Standing at the chassis I turned around and saw the final assembly, a smooth white factory hall with all these red machines, really in Tesla style!

Final assembly of the Model S

From there one we walked over to the tour check-in, here we got a 90 minute tour around the still work in progress factory. Stamping, painting, plastic moulding and more, really cool to see the birth place of your future piece of modern engineering!


I was so impressed that I sometimes forgot to take pictures! But there are many pictures of this great event floating around on the internet, for example the Picasa album of Ben Goodwin.

Being done with the factory tour it was time for the speech of Elon Musk! He came driving on stage in the red Model S with a total of 8 persons + luggage in it! Have to say, one person was hidden in the “frunk” and in the back jumpseats were two kids!

Elon seemed to be a bit overwhelmed about the presence of so much (about 2.000) future Model S owners. He gave a quick demonstration of the Model S and gave a short talk, which both seemed to be completely improvised and not studied. I liked that, no standard talk, but something that came to mind the moment he was on stage! He even forgot the announcement of the Model S sport! George Blankenship had to call everybody back to get the announcement out. 4.5 sec from 0 – 96 km/h, wauw!

After Elon’s talk it was time to head outside to the area where the rides were being given. We had a slot between 22:00 and 22:30, but it was barely 21:00 at that time, so we had some time to grab a bit, drink a beer and just watch the three S’es driving around. I preferred the white one and that was exactly the on I got my ride in!

Two beers and some chats later it was time for our test drive! I called shotgun on the front seat, but one of the two persons in front of me was Elon’s son, so no need for that. But another car pulled up early, so I eventually got into the middle backseat of the white one. No problem! More than enough space and a great view on the interior and that MASSIVE 17″ central touch screen!

The ride itself was short, to short for me, but I get why. They had only 3 cars and 2.000 attendees to satisfy. I’d like to see it different, but I understand the how and why.

We did a short slalom and a acceleration demonstration on the straight. With 5 persons in the car it didn’t take long to reach 73mph before we had to slow down. No, it’s not as fast as a Roadster, but definitely faster than any other sedan I’ve ever driving! (Which are quite a few descent cars).

After the test-ride we exited the area through a tent where a demo of the central screens functions was being displayed and we saw the new charging connector and “UMC” for the Model S.

Tesla choose to design a new connector which was able to handle both 20kW AC charging as well as 90kW DC charging over the same pins. As a European I asked about the 3-phase support for the Model S and I got a disappointing answer, it’s not present.. I had a (and really good!) discussion with some Tesla employees about this matter. Well, it seemed we disagreed on that. So I started a petition to convince Tesla otherwise.

My final conclusion about the Model S? Full of gadgets, smooth and gorgeous! For me this is how automotive transportation should be. I’ve been hating the in-car systems for the last few years. They always to lacked features and we waaaaaaay behind on what is possible. I’ve driving Audi, Mercedes, BMW and Toyota, but all their systems seemed like they were build in 2000! The Model S however is cutting edge!

I didn’t have the time to play with the system, but from Elon’s demonstration and the other things I saw that night it proofed to me that the Model S will not only be a EV, but it will be my new mobile office! More than enough space, the world at your fingers through the 3G (maybe 4G) connectivity of the car and all that in a luxurious and spacious vehicle.

Of course, there still is work to do for Tesla. But hey, the vehicles were called “betas” for a reason. I work in IT and know what the words “Alpha” and “Beta” mean. As soon as they start using “RC” we can start judging on the finished touches!

The event itself was well prepared and organized. More than enough snack (good ones!) and drinks available and enough Tesla staff to bother will the dozens of questions I had.

I can’t wait any more! I feel like a little kid who wishes at the end of his birthday that he can sleep for a year, so it’s his birthday again the next day 😉

I don’t want to sound like a fanboy (but I guess I do…), but Tesla is really showing some awesome work here. The Model S is simply more than a car, it’s a experience.


For some more pictures of the event check out the already mentioned Picasa album of Ben Goodwin or check out the Tesla Motors Club forum. The last one contains much, much, much more information gathered at the event, as well more pictures and videos of the event.

Failover with Nexenta, NFS and the RSF-1 plugin

The title might seem a bit cryptic, but this post is about a High Available Nexenta cluster with the RSF-1 we are deploying.

While we are waiting for the moment where we can start using Ceph we are implementing new storage for our hosting clusters. Our current Linux machines with LVM and XFS are not up to the task anymore.

After some testing and discussing we chose to use Nexenta. What Nexenta is and how awesome ZFS is can be found on other places on the net, I’m not going to discuss that here.

I wanted to publish our findings about the HA plugin and NFS.

In short, we have two headends connected with two SAS JBOD’s. The RSF-1 plugin makes sure the ZPOOL is imported on one headend at the time. If one headend fails, the plugin automatically fails the pool over to the other headend.

The plugin provides one HA IP which is shared between the headends, you probably get the point.

We’ve been doing some testing and noticed that when we mount NFS (v3) over TCP the failover takes a staggering 6 minutes! Well, the failover doesn’t take 6 minutes, but that’s the time it takes for the TCP connections to recover.

When mounting over UDP the service is continued in 50 seconds, so that’s a big difference!

Some testing showed that this is due to the following kernel settings:

net.ipv4.tcp_retries1 = 3
net.ipv4.tcp_retries2 = 15

This page explains what those two values actually control.

We’ve been experimenting with those values and lowering retries1 to 1 gave us the same recovery times as with UDP, but sometimes the recovery would still take 6 minutes..

For now I advise to use NFS with UDP (which gives better performance anyway), but if you need to use TCP for some reason try fiddling with these values.

Distributed storage under Linux, is it there yet?

When it comes down to storage under Linux you have a lot of great options if you are looking for local storage, but what if you have so much data that local storage is not really an option? And what if you need multiple servers accessing the data? You’ll probably take NFS or iSCSI with a clustered filesystem like GFS or OCFS2.

When using NFS or iSCSI it will come down to one, two or maybe three servers storing your data, where one will have a primary role for 99.99% of the time. That is still a Single Point-of-Failure (SPoF).

Although this worked (and still is) fine, we are running into limitations. We want to store more and more data, we want to expand without downtime and we want expansion to go smoothly. Doing all that under Linux now is a ……. Let’s say: Challenge.

Energy costs are also rising, if you like it or not, it does influence the work of a system administrator. We were used to having a Active/Passive setup, but that doubles your energy consumption! In large environments that could mean a lot of money. Do we still want that? I don’t think so.

Distributed storage is what we need, no central brain, no passive nodes, but a fully distributed and fault tolerant filesystem where every node is active and it has to scale easily without any disruption in service.

I think it’s nearly there and they call it Ceph!

Ceph is a distributed file system build on top of RADOS, a scalable and distributed object store. This object store simply stores objects in pools (which some people might refer to as “buckets”). It’s this distributed object store which is the basis of the Ceph filesystem.

RADOS works with Object Store Daemons (OSD). These OSDs are a daemon which have a data directory (btrfs) where they store their objects and some basic information about the cluster. Typically a data directory of a OSD is a one hard disk formatted with btrfs.

Every pool has a replication size property, this tells RADOS how many copies of an object you want to store. If you choose 3 every object you store on that pool will be stored on three different OSDs. This provides data safety and availability, loosing one (or more) OSDs will not lead to data loss nor unavailability.

Data placement in RADOS is done by CRUSH. With CRUSH you can strategically place your objects (and it’s replica’s) in different rooms, racks, rows and servers. One might want to place the second replica on a separate power feed then the primary replica.

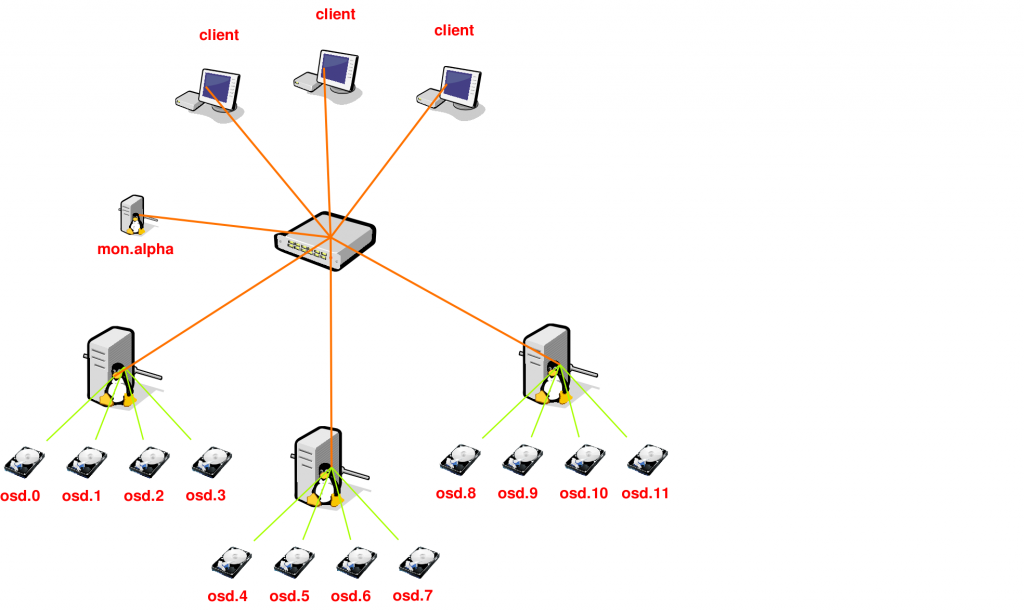
A small RADOS cluster could look like this:

This is a small RADOS cluster, three machines with 4 disks each and one OSD per disk. The monitor is there to inform the clients about the cluster state. Although this setup has one monitor, these can be made redundant by simple adding more (odd number is preferable).

With this post I don’t want to tell you everything about RADOS and the internal working, all this information is available on the Ceph website.

What I do want to tell you is how my experiences are with Ceph at this point and where it’s heading.

I started testing Ceph about 1.5 years ago, I stumbled on it when reading the changelog of 2.6.34, that was the first kernel where the Ceph kernel client was included.

I’m always on a quest to find a better solution for our storage, right now we are using Linux boxes with NFS, but that is really starting to hurt in many ways.

Where did Ceph get in the past 18 months? Far! I started testing when version 0.18 just got out, right now we are at 0.31!

I started testing the various components of Ceph, started on a small number of virtual machines, but currently I have two clusters running, a “semi-production” where I’m running various virtual machines with RBD and Qemu-KVM. My second cluster is a 74TB cluster with 10 machines, each having 4 2TB disks.

Filesystem            Size  Used Avail Use% Mounted on
[2a00:f10:113:1:230:48ff:fed3:b086]:/   74T  13T   61T  17% /mnt/ceph

As you can see, I’m running my cluster over IPv6. Ceph does not support dual-stack, you will have to choose between IPv4 or IPv6, where I prefer the last one.

But you are probably wondering how stable or production ready it is? That question is hard to answer. My small cluster where I run the KVM Virtual Machines (through Qem-KVM with RBD) has only 6 OSDs and a capacity of 600GB. It has been running for about 4 months now without any issues, but I have to be honest, I didn’t stress it either. I didn’t kill any machines nor did hardware fail. It should be able to handle those crashes, but I haven’t stressed that cluster.

The story is different with my big cluster. In total it’s 15 machines, 10 machines hosting a total of 40 OSDs, the rest are monitors, meta data servers and clients. It started running about 3 months ago and since I’ve seen numerous crashes. I also chose to use the WD Green 2TB disks in my cluster, that was not the best decision. Right now I have a 12% failure rate of these disks. While the failure of those disks is not a good thing, it is a good test for Ceph!

Some disk failures caused some serious problems causing the cluster to start bouncing around and never recovering from that.. But, about 2 days ago I noticed two other disks failing and the cluster fully recovered from it while a rsync was writing data to it. So, it seems to be improving!

During my further testing I have stumbled upon a lot of things. My cluster is build with Atom CPU’s, but those seem to be a bit underpowered for the work. Recovery is heavy for OSDs, so whenever something goes wrong in the cluster I see the CPU’s starting to spike towards the 100%. This is something that is being addressed.

Data placement goes in Placement Group’s, aka PGs. The more data or OSDs you add to the cluster, the more PGs you’ll get. The more PGs you have, the more memory your OSDs start to consume. My OSDs have 4GB (Atom limitation) each. Recovery is not only CPU hungry, but it will also eat your memory. Although the use of tcmalloc reduced the memory usage, OSDs sometimes use a lot of memory.

To come to some sort of a conclusion. Are we there yet? Short answer: No. Long answer: No again, but we will get there. Although Ceph still has a long way to go, it’s on the right path. I think that Ceph will become the distributed storage solution under Linux, but it will take some time. Patience is the key here!

The last thing I wanted to address is the fact that testing is needed! Bugs don’t reveal themselves you have to hunt them down. If you have spare hardware and time, do test and report!