When we talk about IP protocols and IPv6 in this particular case we think about routing over the internet. But what many do not know is that IPv6 is already playing a major role in all kinds of systems.
In this post I’m not going to explain IPv6 in detail, for many things I’ll link to external pages.
Ad-Hoc networking using Link-Local
IPv6 has a great feature where each host on a network will generate a Link Local Address (LL) which is mandatory according to the protocol.
The great thing about LL is that it allows hosts to establish communication without the need of DHCP or anything else. Just plug in a host on a Layer 2 Ethernet network and they can start communicating right away.
fe80::5054:ff:fe98:aaee is an example of a IPv6 LL address and using this address it can search for (via multicast) and communicate with other hosts in the network.
Examples of systems using IPv6 LL are Matter and Combined Charging System (CCS).
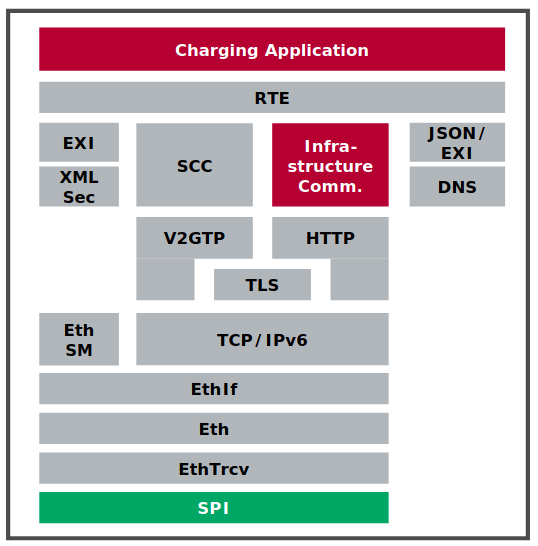
Combined Charging System (CCS)
CCS is a standard for (fast charging) electric vehicles. Some years ago I stumbled upon multiple documents showing that CCS would be using a combination of PLC, IPv6, TCP/IP, UDP, HTTP, TLS and many other very common protocols for communication.
Using PowerLine Communication (PLC) the vehicle and charger will establish a Layer 2 Ethernet network over which they will communicate using IPv6 LL.
I was not able to find the exact details of the IPv6 part of the CCS standard, but it is very interesting to see that IPv6 is being used for something like charging electric vehicles.
Kudos to the people behind CCS and for using IPv6 for this!
In my opinion it’s a no-brainer to use IPv6 for such functionality as the LL addressing allow you to create networks very quickly and in a reliable manner.
You can also use a very well documented protocol and the many tools for IPv6.
Now I would like to run Wireshark on such a link!
If you have more information about this, please contact me!