For a Ceph project I’m involved in we wanted to figure out if we could PXE-boot our servers over IPv6. In this case we were using SuperMicro 5018A-AR12L servers with a additional Intel X520 10Gbit NIC.
The Ceph cluster in this case will be IPv6 only and user Layer 3 routing between 6 racks and a 180 machines initially (7.2PB raw). No IPv4 in this network present. That’s the goal!
By default these NICs only boot over IPv4, so we had to figure out if we could reconfigure them in a way so that they would PXE-boot over IPv6.
My search brought me to the iPXE project. A PXE-boot project which you can flash into your NICs or chainload using TFTP.
Before I started flashing machines I created a test setup in VirtualBox to see if I could get it working over IPv6.
iPXE and IPv6
By default the ISO you can download from the iPXE website isn’t build with IPv6 support. You have to manually compile iPXE with v6 support.
git clone git://git.ipxe.org/ipxe.git
cd ipxe/src
nano config/general.h
Now change:
#undef NET_PROTO_IPV6
To:
#define NET_PROTO_IPV4          /* IPv4 protocol */
#define NET_PROTO_IPV6          /* IPv6 protocol */
Now we can compile iPXE:
make bin/ipxe.iso
VirtualBox
To test this all I set up VirtualBox on my laptop. I created a machine called IPv6Router and a VM called iPXE.
The IPv6Router Instance has two network connections:
- eth0: NAT
- eth1: Host-Only Network vboxnet0
The machine iPXE got just one connection:
- eth0: Host-Only Network vboxnet0
Networking: DHCPv6, Router Advertisements, HTTP and DNS
Before I could use this setup I needed to install a few services and configure the network on this machine.
I choose Ubuntu 14.04 in this case, the Linux distribution I prefer most.
interfaces configuration
First I had to configure eth1
auto eth1
iface eth1 inet6 static
    address 2001:db8::1
    netmask 64
Install packages
Before I could continue I needed a couple of packages on the system. All I needed was available in the Ubuntu repositories. Apt could install them for me quickly.
apt-get install isc-dhcp-server radvd unbound apache2
After the network was configured and the right packages were available I could configure all the services.
DHCPv6
/etc/dhcp/dhcpd6.conf
option dhcp6.user-class code 15 = string;
option dhcp6.bootfile-url code 59 = string;
option dhcp6.client-arch-type code 61 = array of unsigned integer 16;

option dhcp6.name-servers 2001:db8::1;

if exists dhcp6.client-arch-type and
   option dhcp6.client-arch-type = 00:07 {
    option dhcp6.bootfile-url "http://[2001:db8::1]/ipxe.efi";
} else if exists dhcp6.user-class and
          substring(option dhcp6.user-class, 2, 4) = "iPXE" {
    option dhcp6.bootfile-url "http://[2001:db8::1]/ubuntu.cfg";
}

subnet6 2001:db8::/64 {}
service isc-dhcp-server6 restart
radvd
/etc/radvd.conf
interface eth1
{
        MinRtrAdvInterval 5;
        MaxRtrAdvInterval 60;
        AdvSendAdvert on;
        AdvOtherConfigFlag on;
        IgnoreIfMissing off;

        prefix ::/64 {
        };

        RDNSS 2001:db8::1 {
        };
};
service radvd restart
Unbound
/etc/unbound/unbound.conf.d/local.conf
server:
    interface: 0.0.0.0
    interface: ::0
    interface-automatic: yes
    access-control: 127.0.0.1 allow
    access-control: ::1 allow
    access-control: 2001:db8::/32 allow
service unbound restart
Apache webserver
iPXE and the Ubuntu installer I was trying to bootstrap needed a webserver to download files from. I used Apache for that purpose.
Since I also experimented with TFTP in the process I had all my files in /srv/tftp so that’s where I also pointed Apache.
The reason why I choose HTTP over TFTP is just speed. It’s a lot faster and more modern.
/etc/apache2/sites-available/001-preseed.conf
<VirtualHost *:80>
	ServerAdmin webmaster@localhost
	DocumentRoot /srv/tftp

	ErrorLog ${APACHE_LOG_DIR}/error.log
	CustomLog ${APACHE_LOG_DIR}/access.log combined

        <Directory /srv/tftp/>
            Options Indexes FollowSymLinks
            AllowOverride None
            Require all granted
        </Directory>
</VirtualHost>
Now enable this VirtualHost and disable the default one.
a2dissite 000-default
a2ensite 001-preseed
Restart Apache afterwards.
service apache2 restart
So with this configuration I’ve set up the following:
- DHCPv6
- IPv6 Router Advertisements
- DNS resolving for clients
- Apache for serving files over HTTP
Ubuntu Netboot using iPXE and Preseed
Now that everything is configured we can configure the configuration for iPXE.
Some searching on the internet brought me to help.ubuntu.com which explained how Ubuntu netboot could be used.
It is quite simple, you have to download netboot.tar.gz and extract it.
cd /srv/tftp
wget http://archive.ubuntu.com/ubuntu/dists/trusty-updates/main/installer-amd64/current/images/netboot/netboot.tar.gz
tar xvfz netboot.tar.gz
This will extract a directory ubuntu-installer. It contains all we need to start a network installation.
We can reference to these files in a iPXE configuration file.
/srv/tftp/ubuntu.cfg
#!ipxe

kernel /ubuntu-installer/amd64/linux noapic nolapic acpi=off irqpoll preseed/url=http://[2001:db8::1]/preseed/ubuntu1404.cfg debian-installer=en_US auto locale=en_US kbd-chooser/method=us hostname=alpha fb=false debconf/frontend=noninteractive keyboard-configuration/modelcode=SKIP keyboard-configuration/layout=USA keyboard-configuration/variant=USA console-setup/ask_detect=false netcfg/disable_autoconfig boolean=true netcfg/use_autoconfig boolean=true netcfg/disable_dhcp boolean=true
initrd /ubuntu-installer/amd64/initrd.gz
boot
Here I refer to a preseed file which is used by the Debian/Ubuntu installer. This process is called preseeding.
I had to add some tweaks to make it work over IPv6-only:
d-i netcfg/disable_autoconfig boolean true
d-i netcfg/use_autoconfig boolean true
d-i netcfg/disable_dhcp boolean true
d-i netcfg/dhcpv6_timeout string 10
/srv/tftp/preseed/ubuntu1404.cfg
# Language
d-i debian-installer/language string en
d-i debian-installer/locale string en_US.UTF-8
d-i localechooser/preferred-locale string en_US.UTF-8
d-i localechooser/supported-locales en_US.UTF-8

# Keyboard
d-i console-setup/ask_detect boolean false
d-i keyboard-configuration/layout select USA
d-i keyboard-configuration/variant select USA
d-i keyboard-configuration/modelcode string pc105

# Network
d-i netcfg/disable_autoconfig boolean true
d-i netcfg/use_autoconfig boolean true
d-i netcfg/disable_dhcp boolean true
d-i netcfg/dhcpv6_timeout string 10
d-i netcfg/get_hostname string this-host
d-i netcfg/get_domain string this-host

# Timezone
d-i time/zone string UTC
d-i clock-setup/utc-auto boolean true
d-i clock-setup/utc boolean true
d-i time/zone string Europe/Amsterdam


# Software
d-i debconf debconf/frontend select Noninteractive
d-i pkgsel/install-language-support boolean false
tasksel tasksel/first multiselect standard, ubuntu-server

# Storage
d-i partman-auto/method string regular
d-i partman-auto/disk string /dev/sda
d-i partman-auto/choose_recipe select atomic
d-i partman/confirm_write_new_label boolean true
d-i partman/confirm_nooverwrite boolean true
d-i partman/choose_partition select finish
d-i partman/confirm boolean true

# Mirror
d-i mirror/country string manual
d-i mirror/http/hostname string ubuntu.apt-get.eu
d-i mirror/http/directory string /ubuntu
d-i mirror/http/proxy string

# Users
d-i passwd/root-login boolean true
d-i passwd/make-user boolean false
d-i passwd/root-password password ceph
d-i passwd/root-password-again password ceph
d-i user-setup/encrypt-home boolean false
d-i user-setup/allow-password-weak boolean true

# No language support packages.
d-i pkgsel/install-language-support boolean false

# Additional packages
d-i pkgsel/include string ssh acpid ntp resolvconf

# Security updates
d-i pkgsel/update-policy select unattended-upgrades

# Upgrade
d-i pkgsel/upgrade select full-upgrade

# Update sshd_config to ensure root user is able to login
d-i preseed/late_command string sed -i 's/PermitRootLogin without-password/PermitRootLogin Yes/g' /target/etc/ssh/sshd_config

# Bootloader
d-i grub-installer/only_debian boolean true
d-i finish-install/reboot_in_progress note
Installing Ubuntu
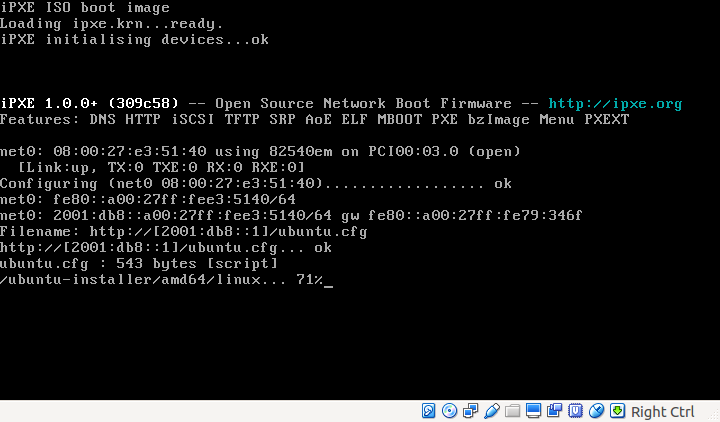
I now started the iPXE Virtual Machine with ipxe.iso attached and it got up and running!
iPXE will boot, obtain a IPv6 address and run the Ubuntu installer. All over IPv6!