The Ceph Trafficlight

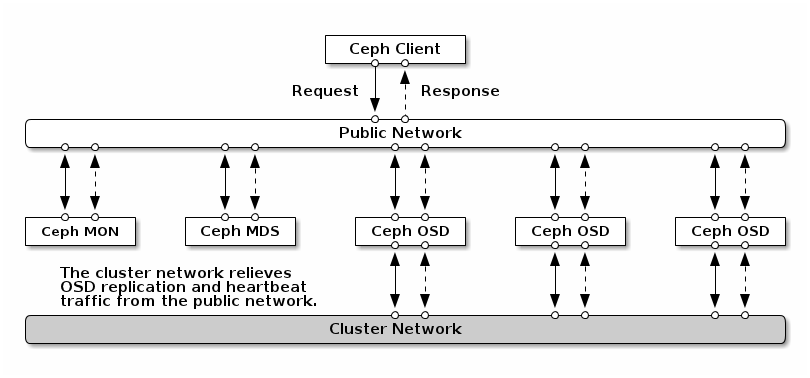
At PCextreme we have a 700TB Ceph cluster which is used behind our public cloud Aurora Compute which runs Apache CloudStack.

Ceph health

One of the things we monitor of the Ceph cluster is it’s health. This can be OK, WARN or ERR. It speaks for itself that you always want to see OK, but things do go wrong. Disks fail, machines die, kernel panics happen. Stuff goes wrong.

I thought it was a cool idea to buy a used real traffic light which I could install at the office. OK would be green, WARN would be orange/amber and ERR would be red.

2nd hand Trafficlight

Some searching on the internet brought me to trafficlightshop.com. They sell used (Dutch) traffic lights. I bought a Vialis 2230 (The largest on the picture below).

Vialis trafficlight overview

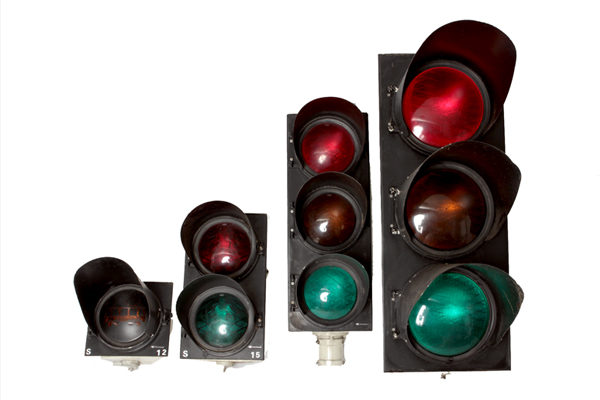
For EUR 75,00 I got my hands on a original trafficlight!

Controlling the lights

When I got the trafficlight it was already equipped with LED lights which work on 230V. A 30cm cable (cut off) was sticking out with 4 wires in it:

  • Blue: Neutral
  • Green: Phase/Positive for Green
  • Yellow: Phase/Positive for Orange/Amber
  • Red: Phase/Positive for Red

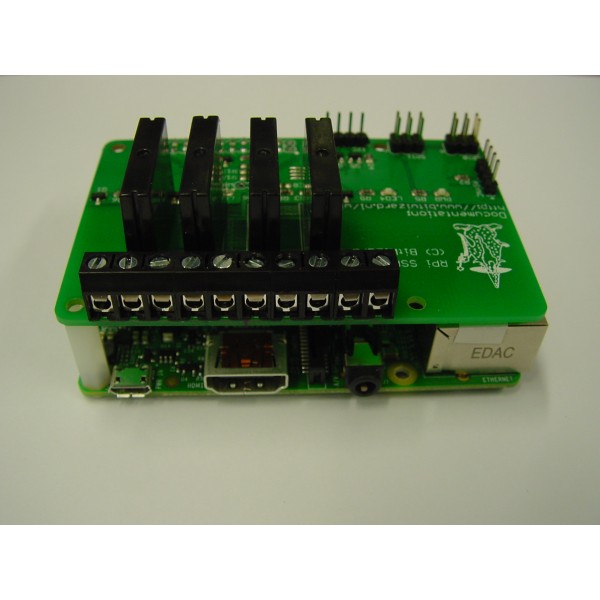
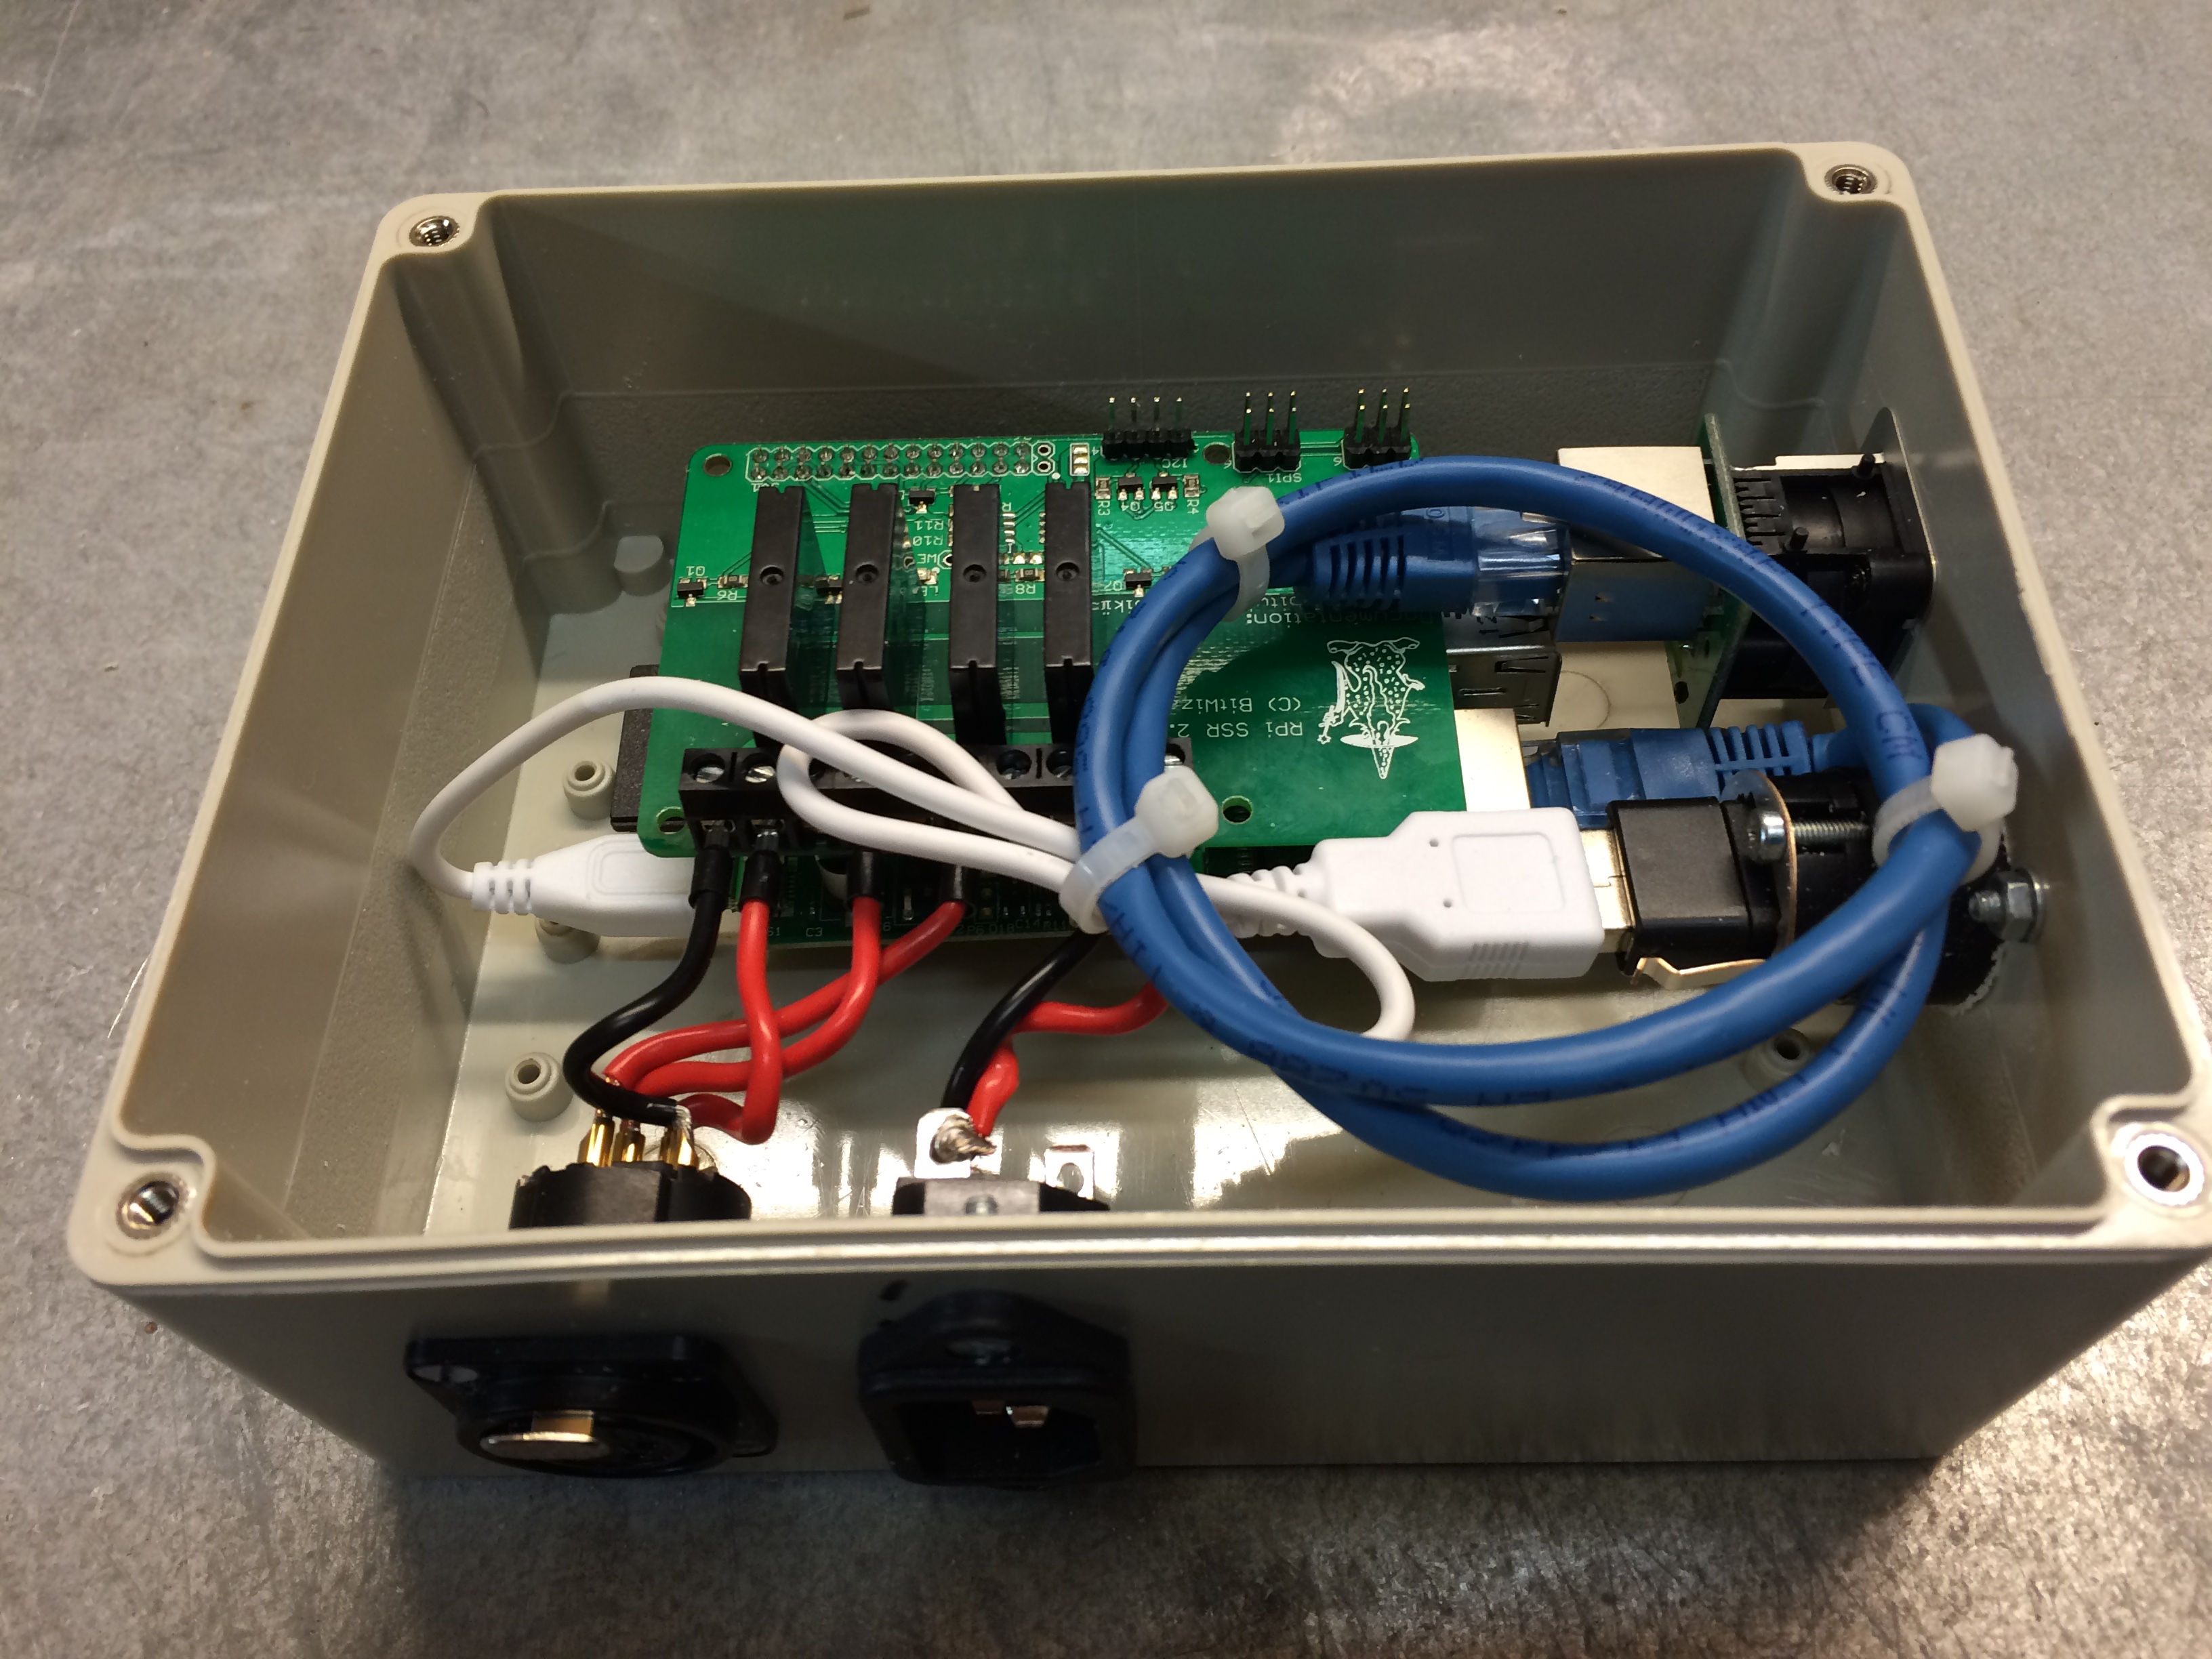
It was easy. All I had to do was buy a add-on board for a Raspberry Pi so I could control the lights.
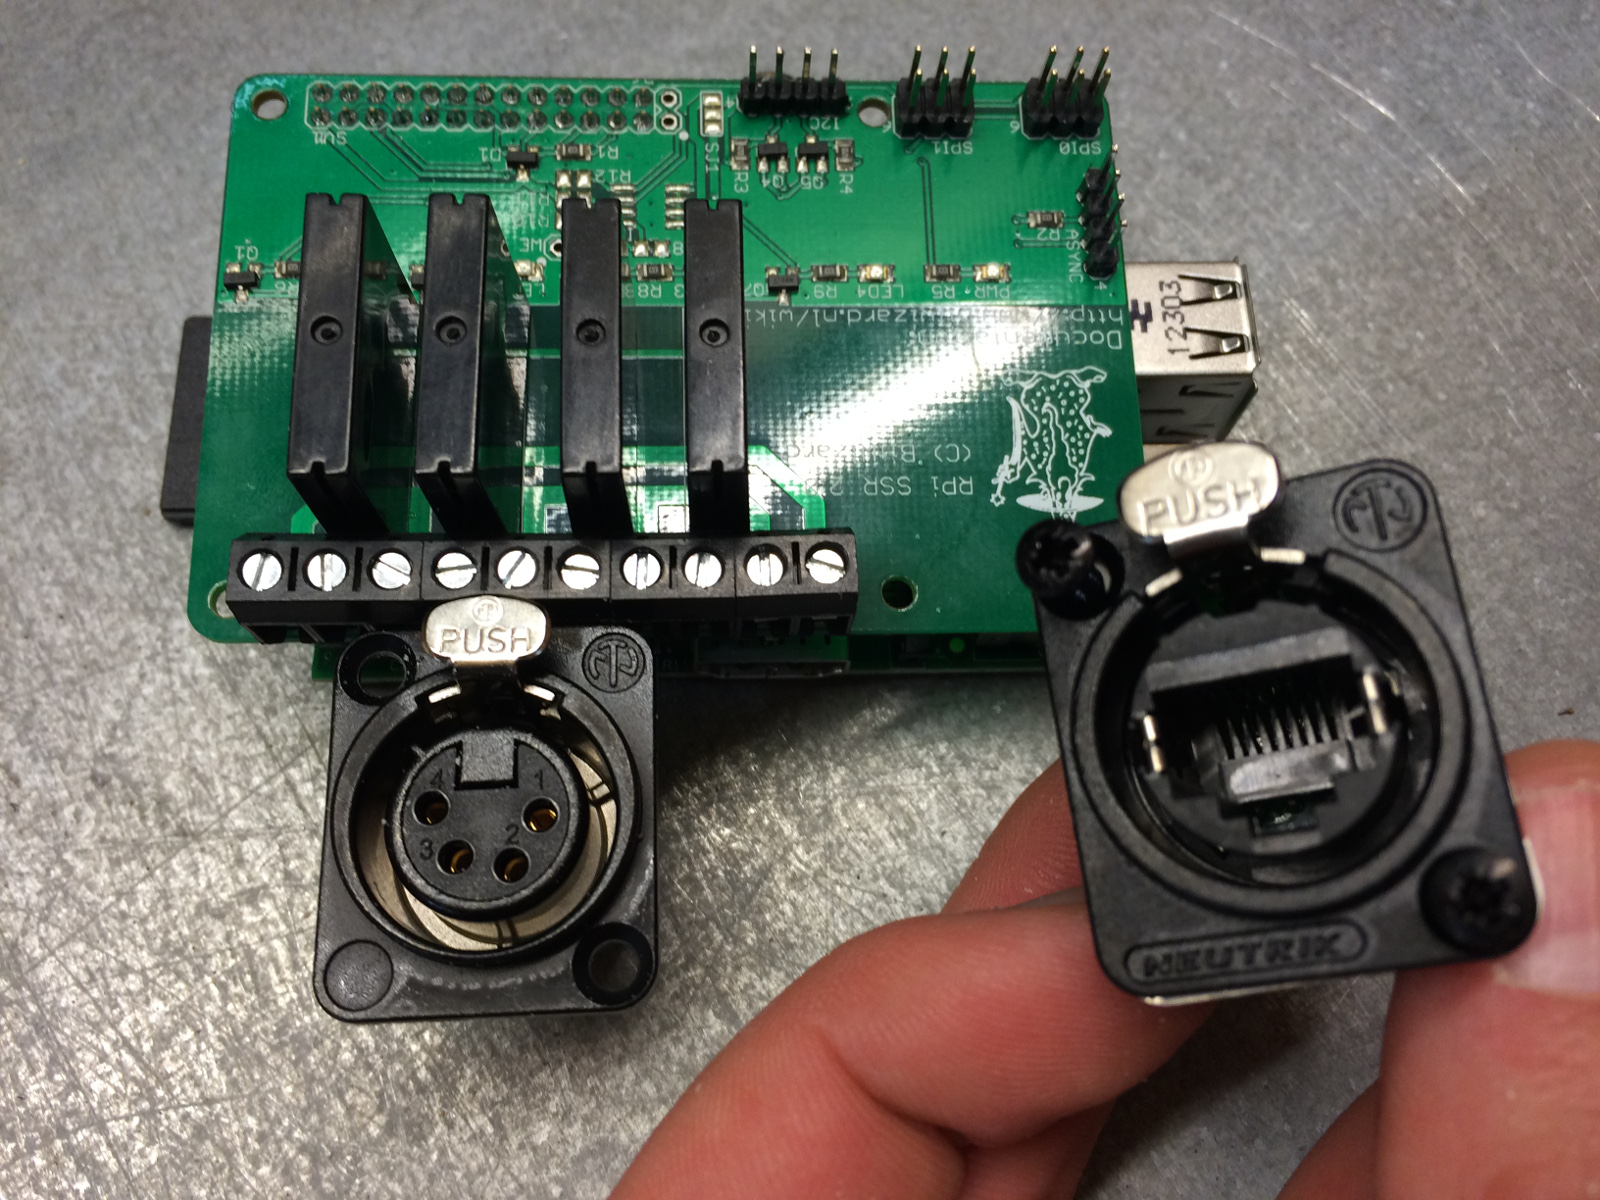
Solid State Relay

My search for a add-on board brought me to BitWizard.nl, they make all kinds of add-on boards for the Raspberry Pi.

One of them is a SSR (Solid State Relay) board which has 4 outputs. Their wiki explained that it was very simple to control the Relays using Python.

Solid State Relay board

A quick test at my desk at home brought be to a working setup.
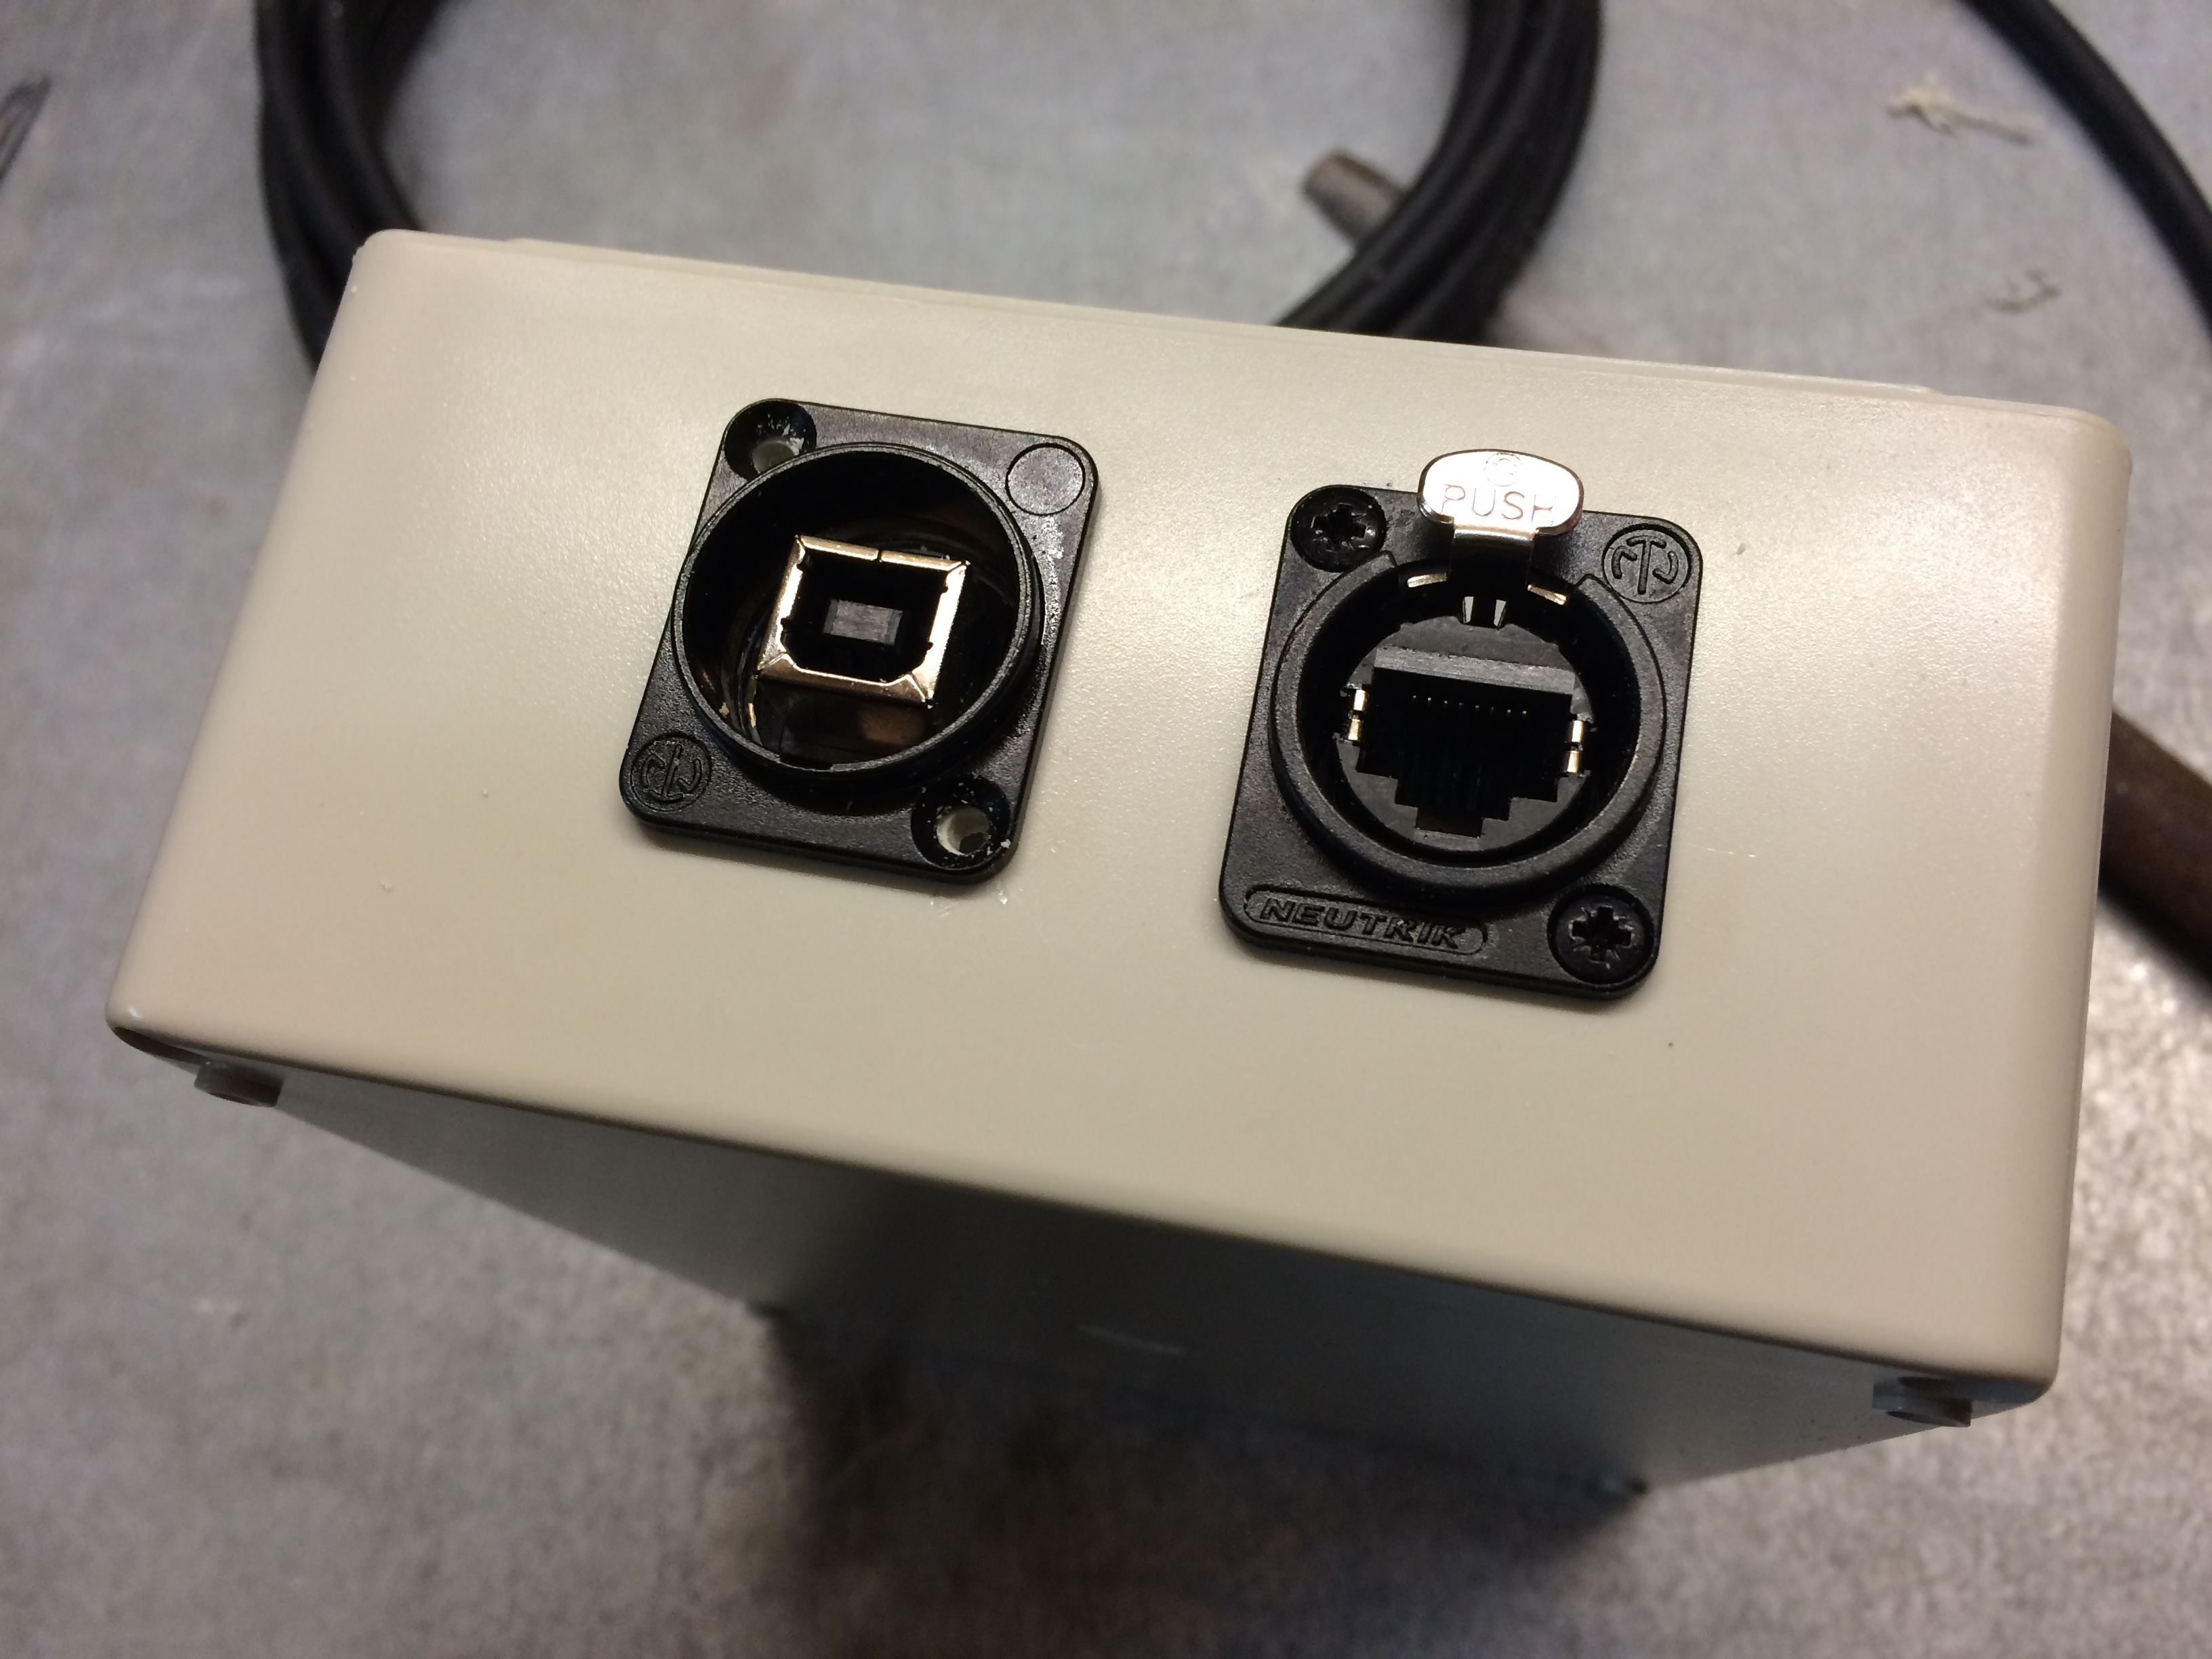
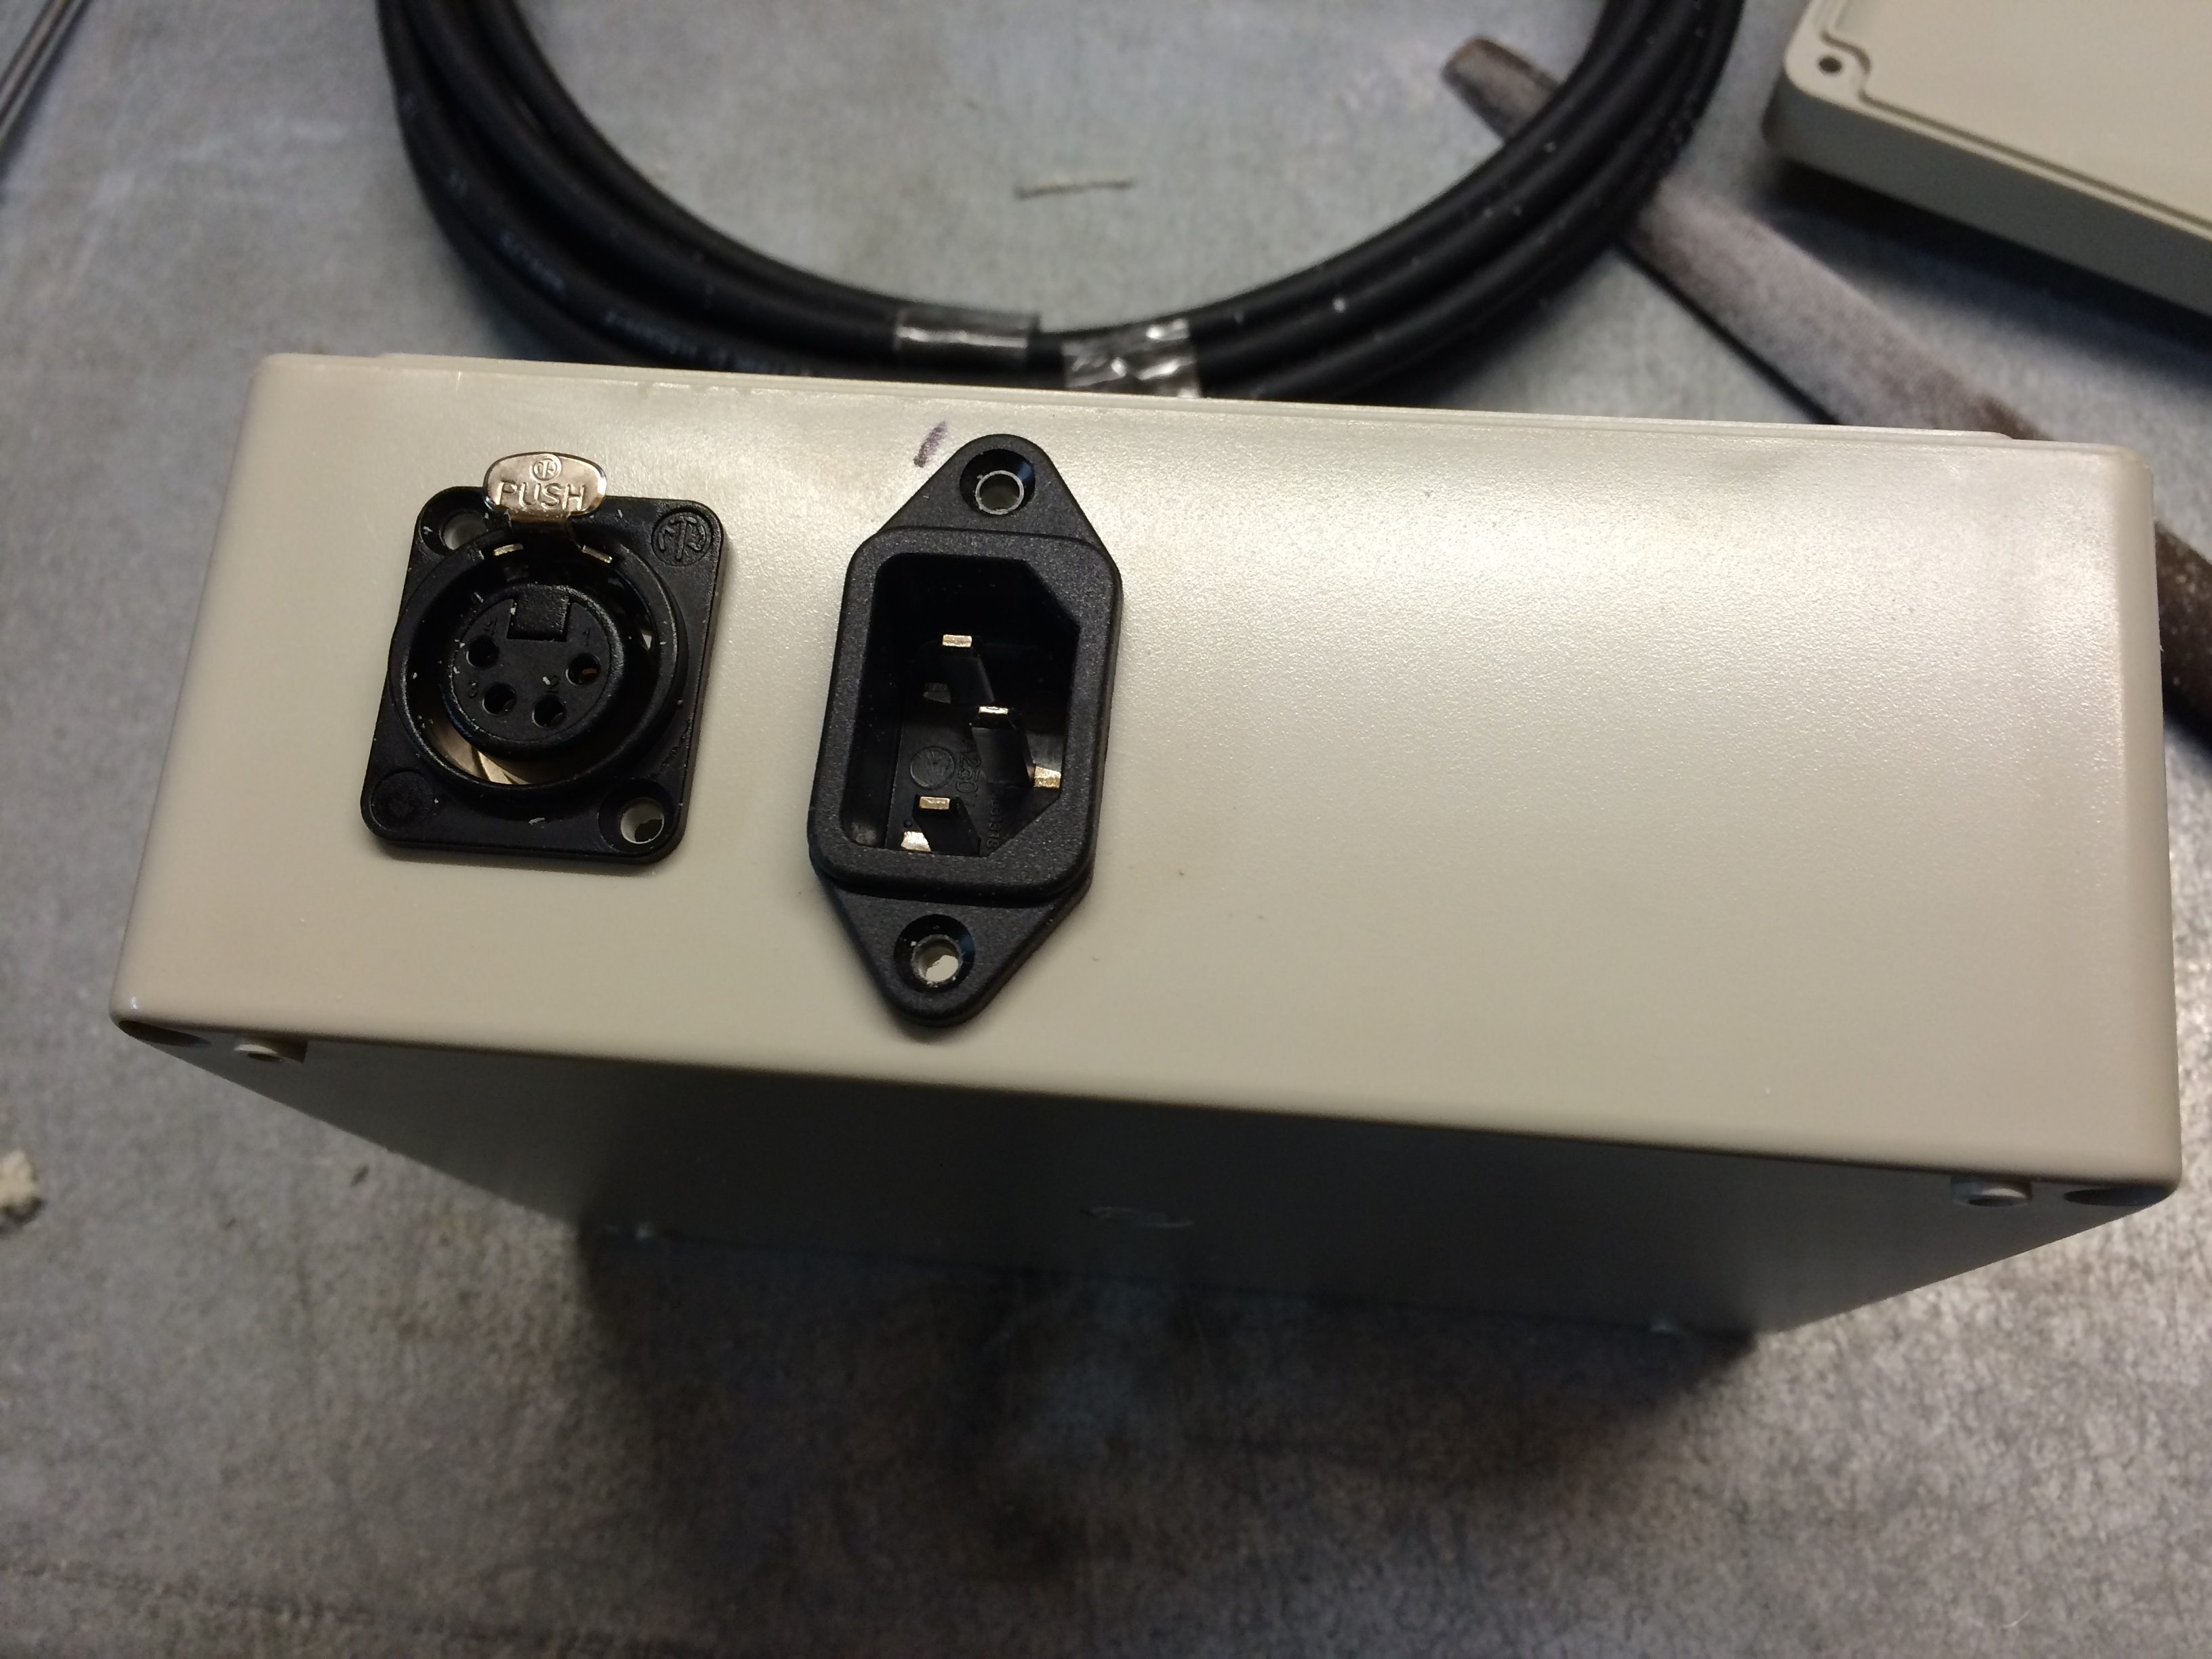
Addition components

After writing the code which controls the light it was time to buy some housing where I could install it in.

At Conrad I found the things I needed. A housing, some connectors and some cabling. A overview of my order:

Conrad order

This was needed since I would install it at the office and it needed to be safe. You don’t want somebody to get shocked by 230V. That’s kind of dangerous.

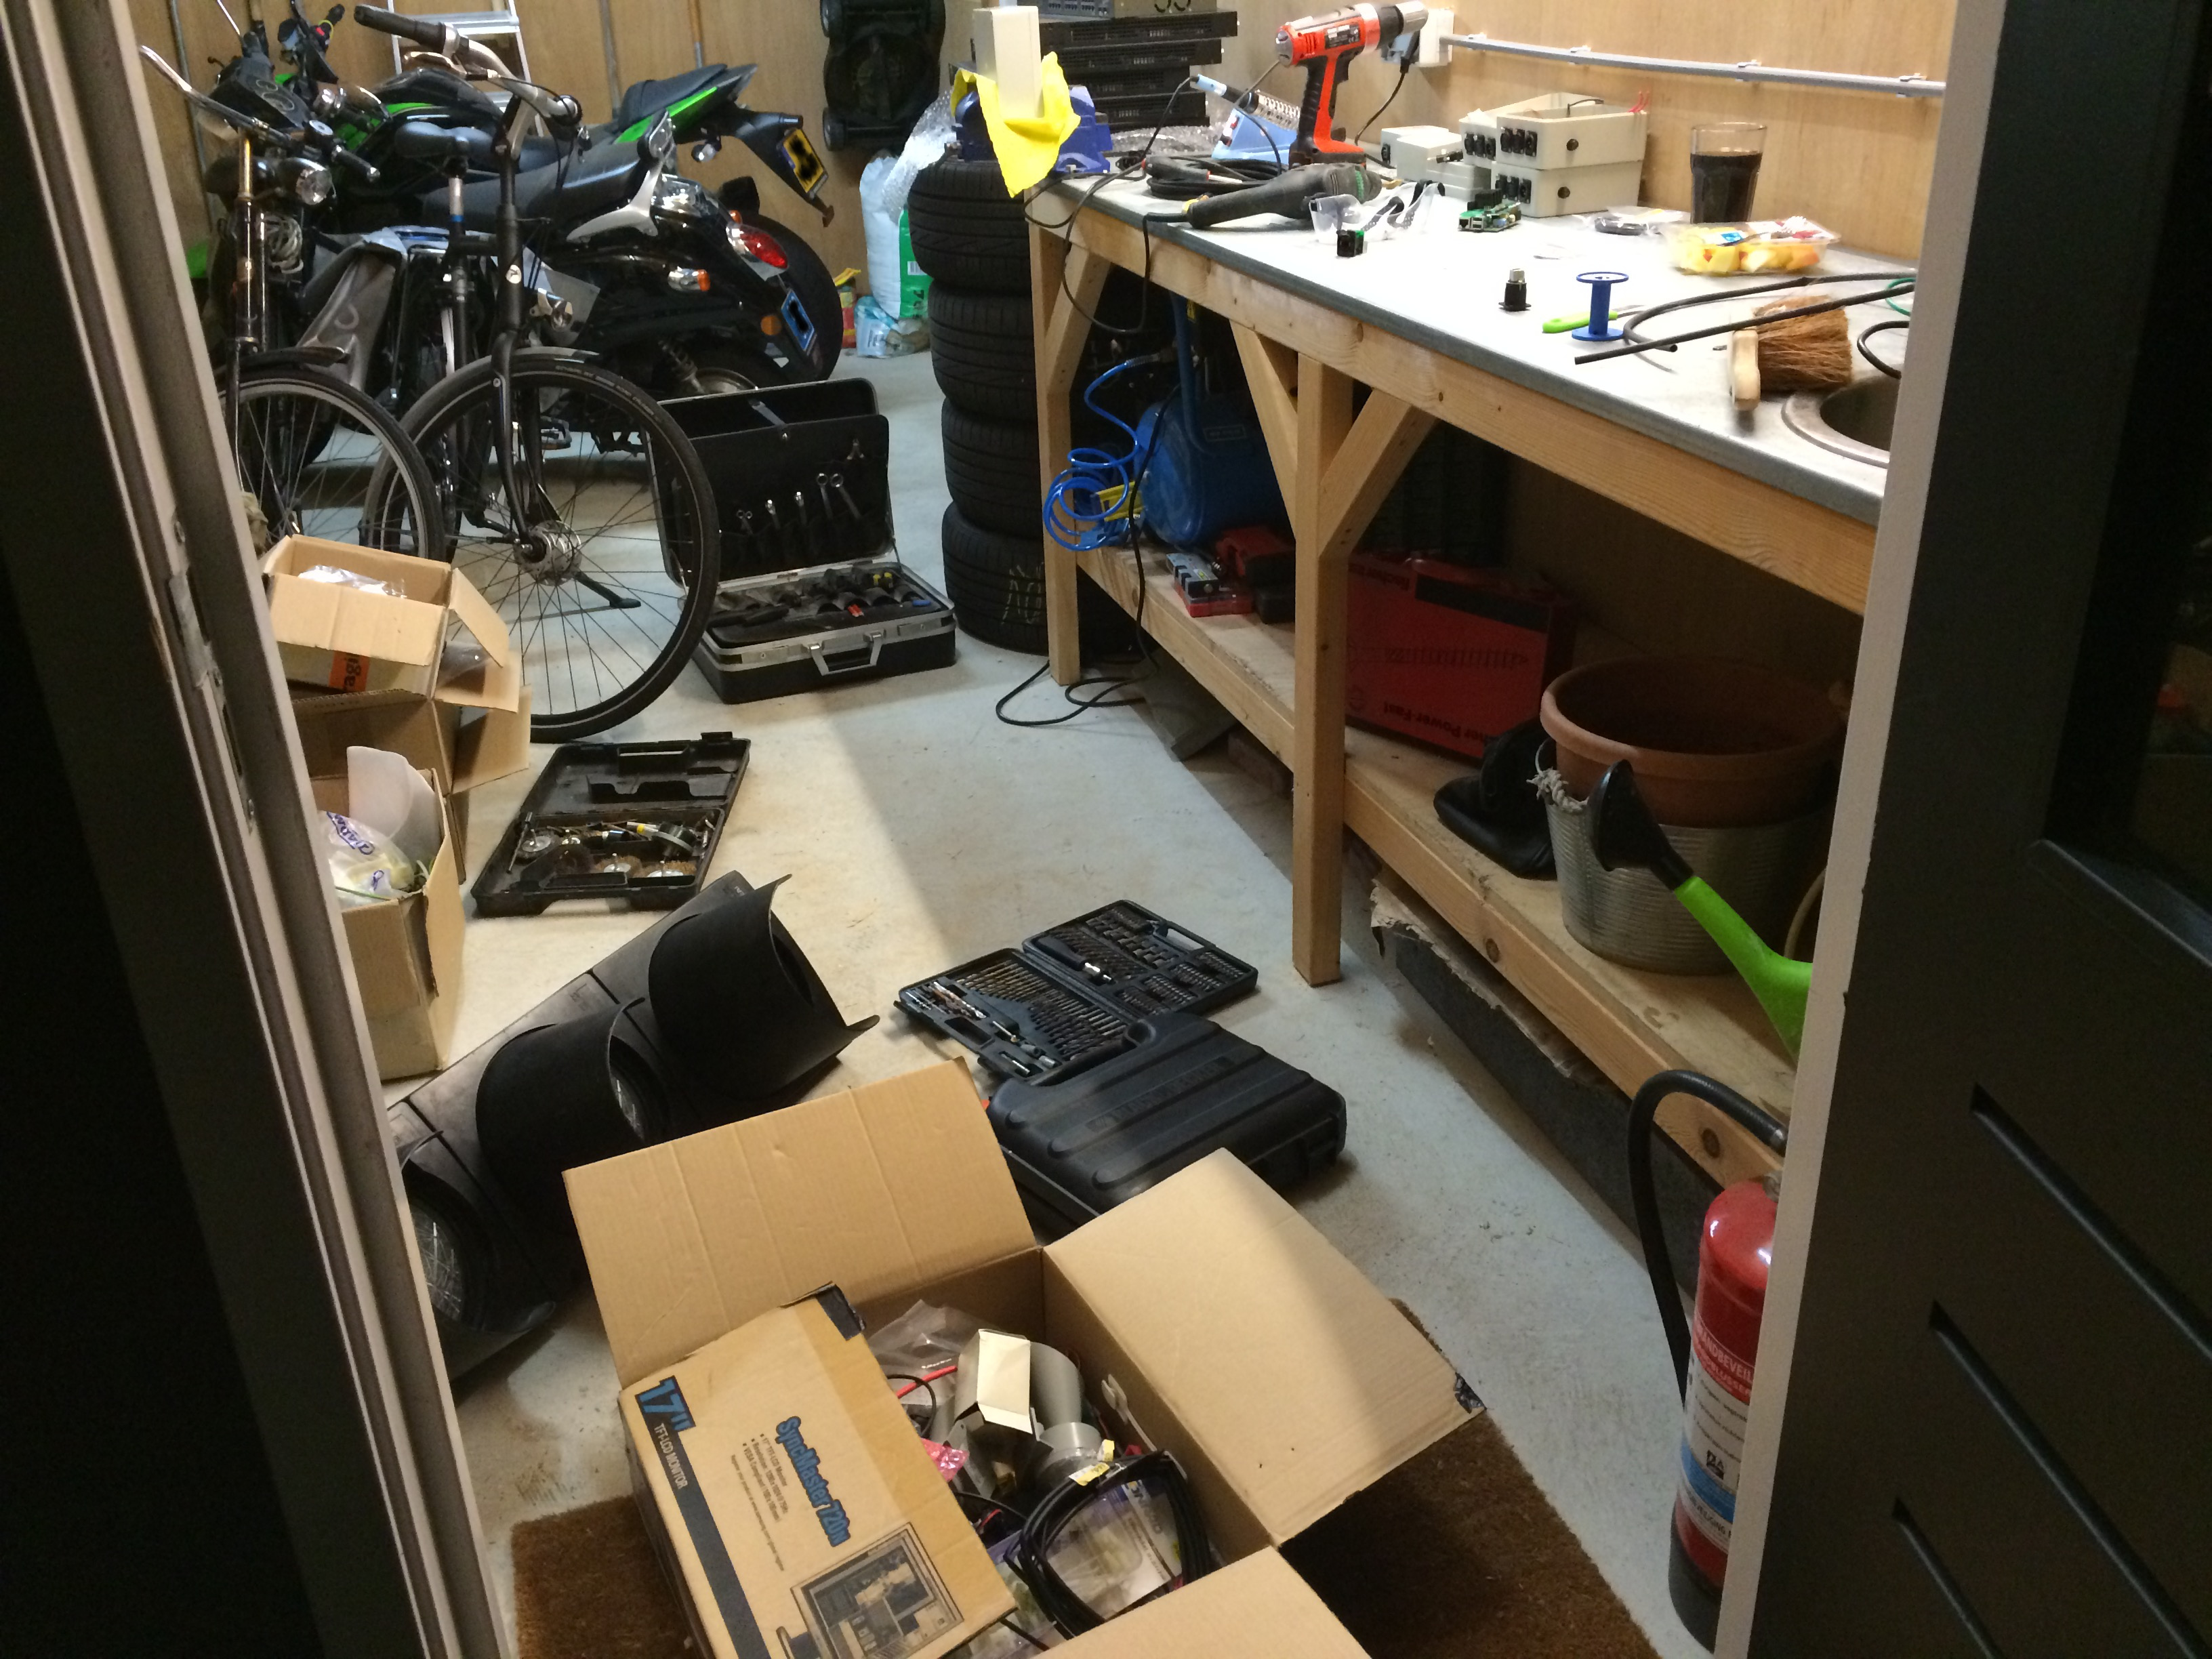
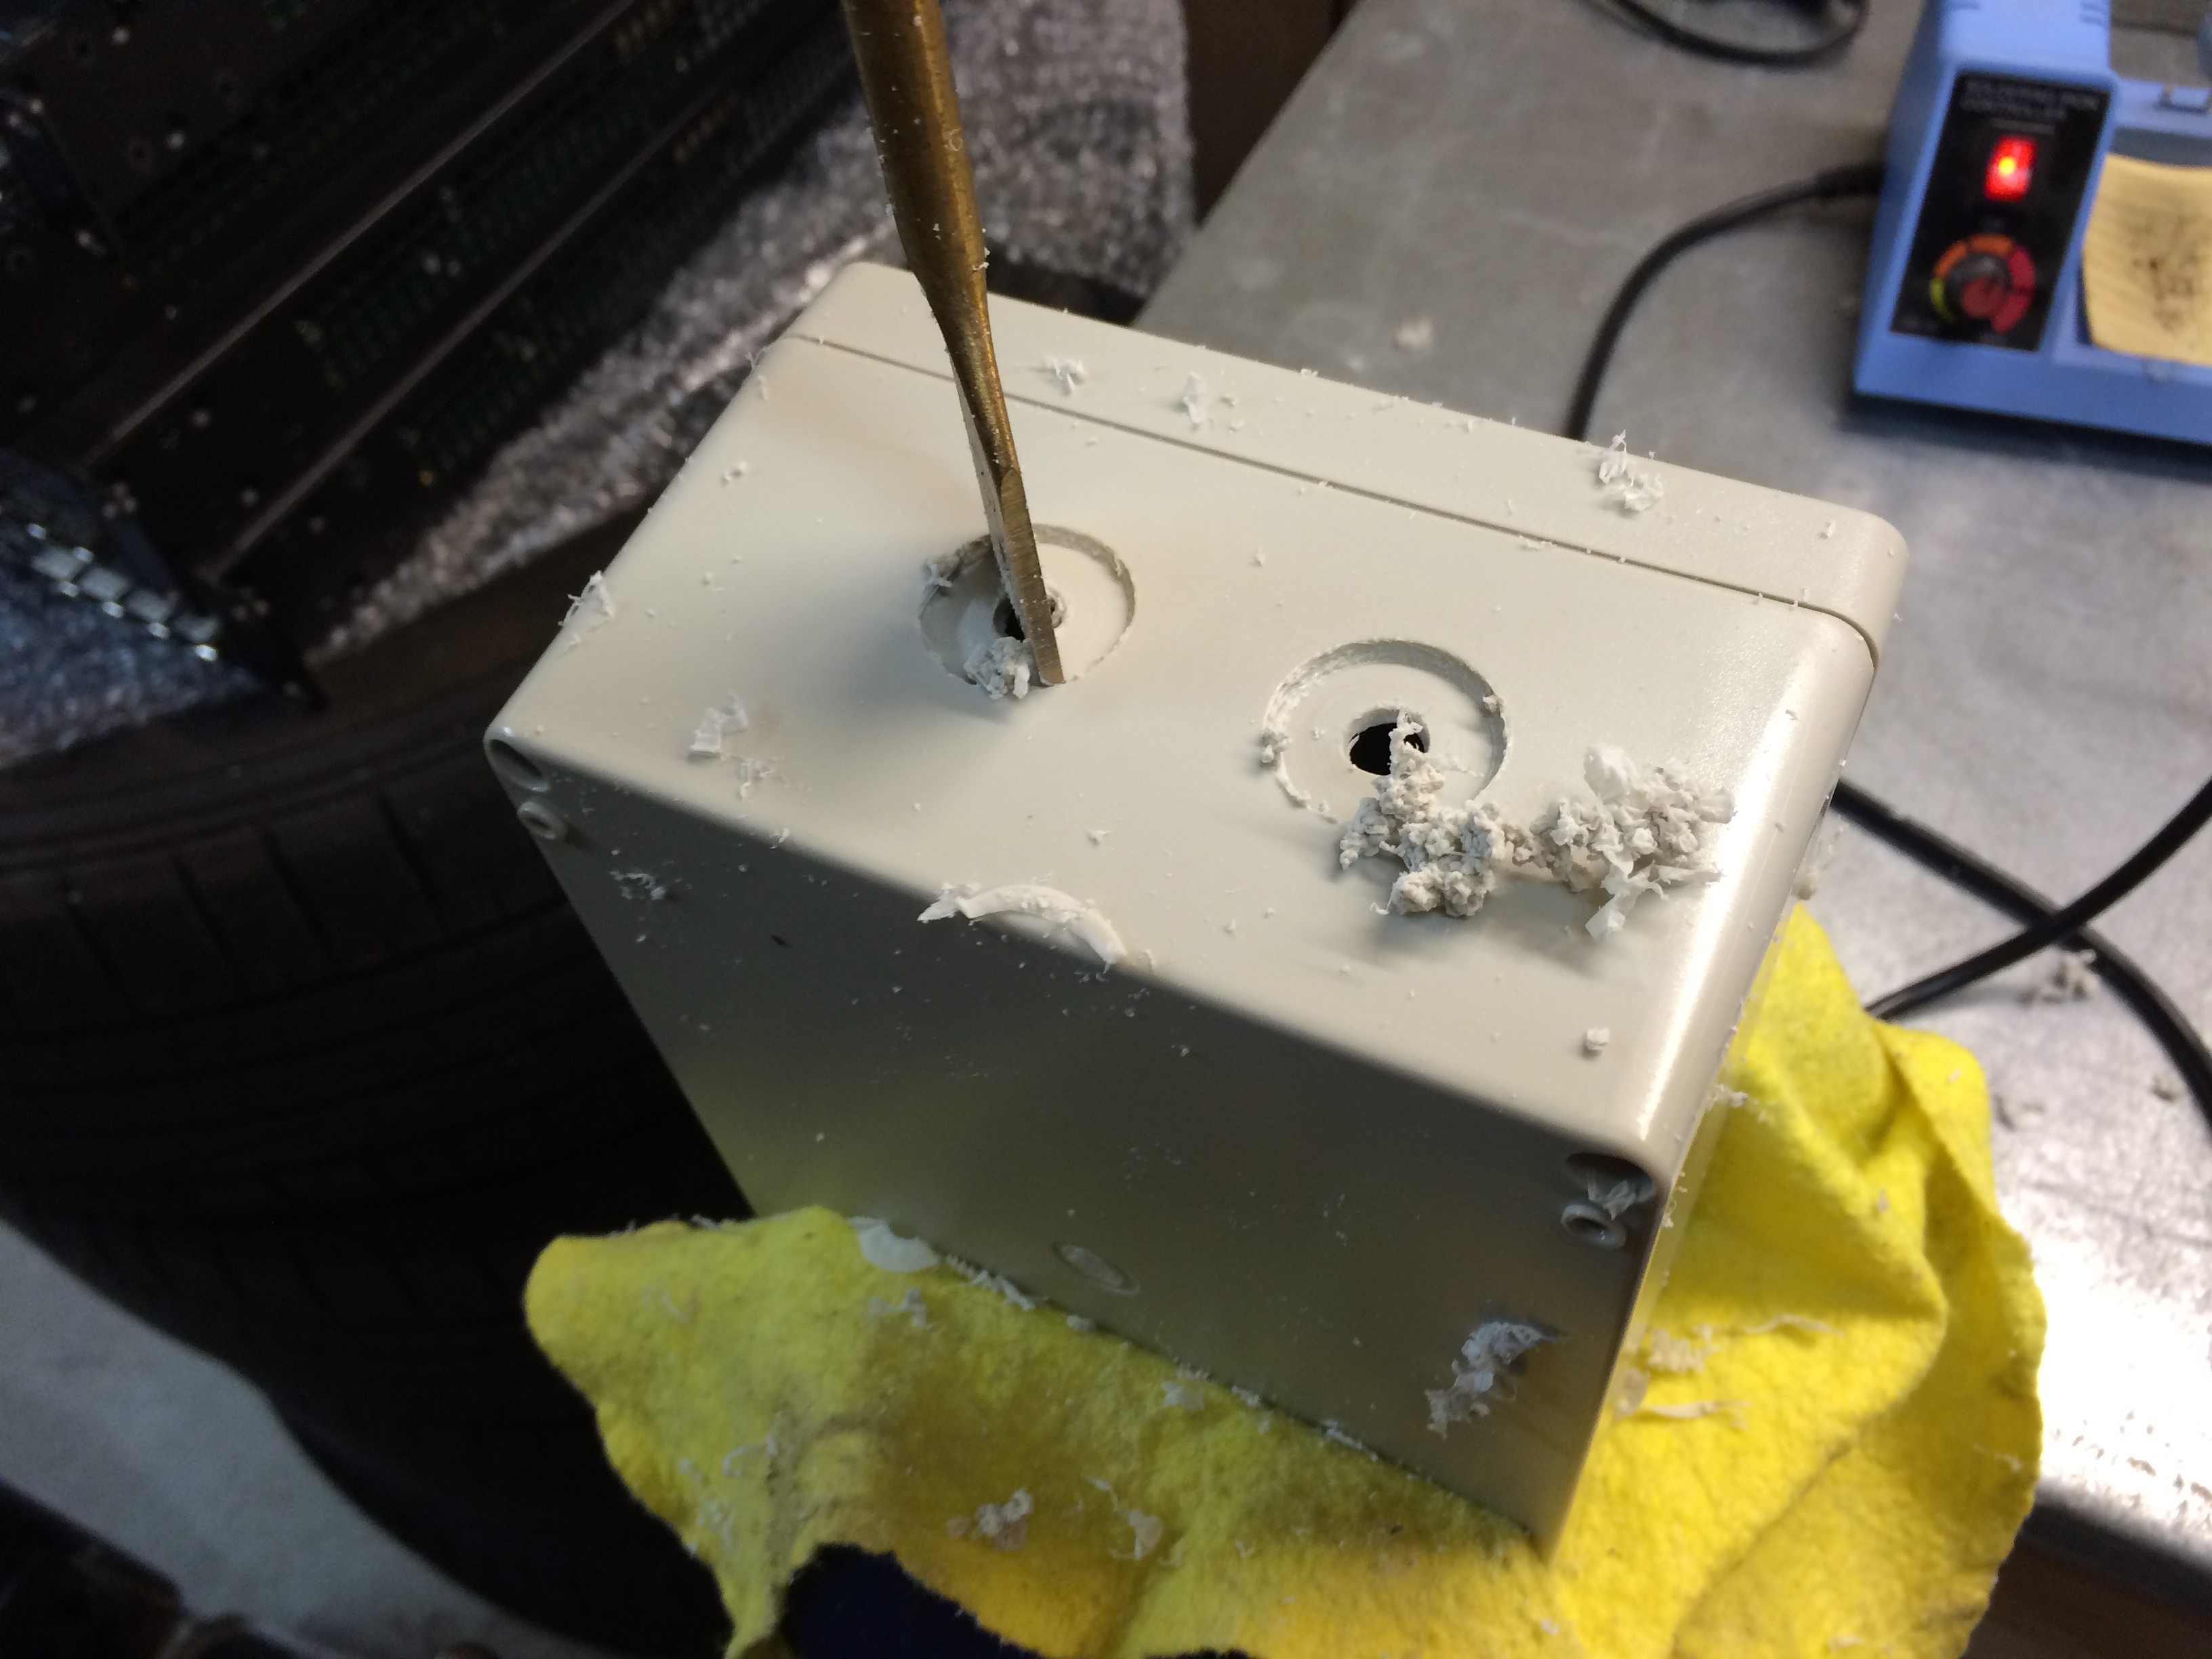
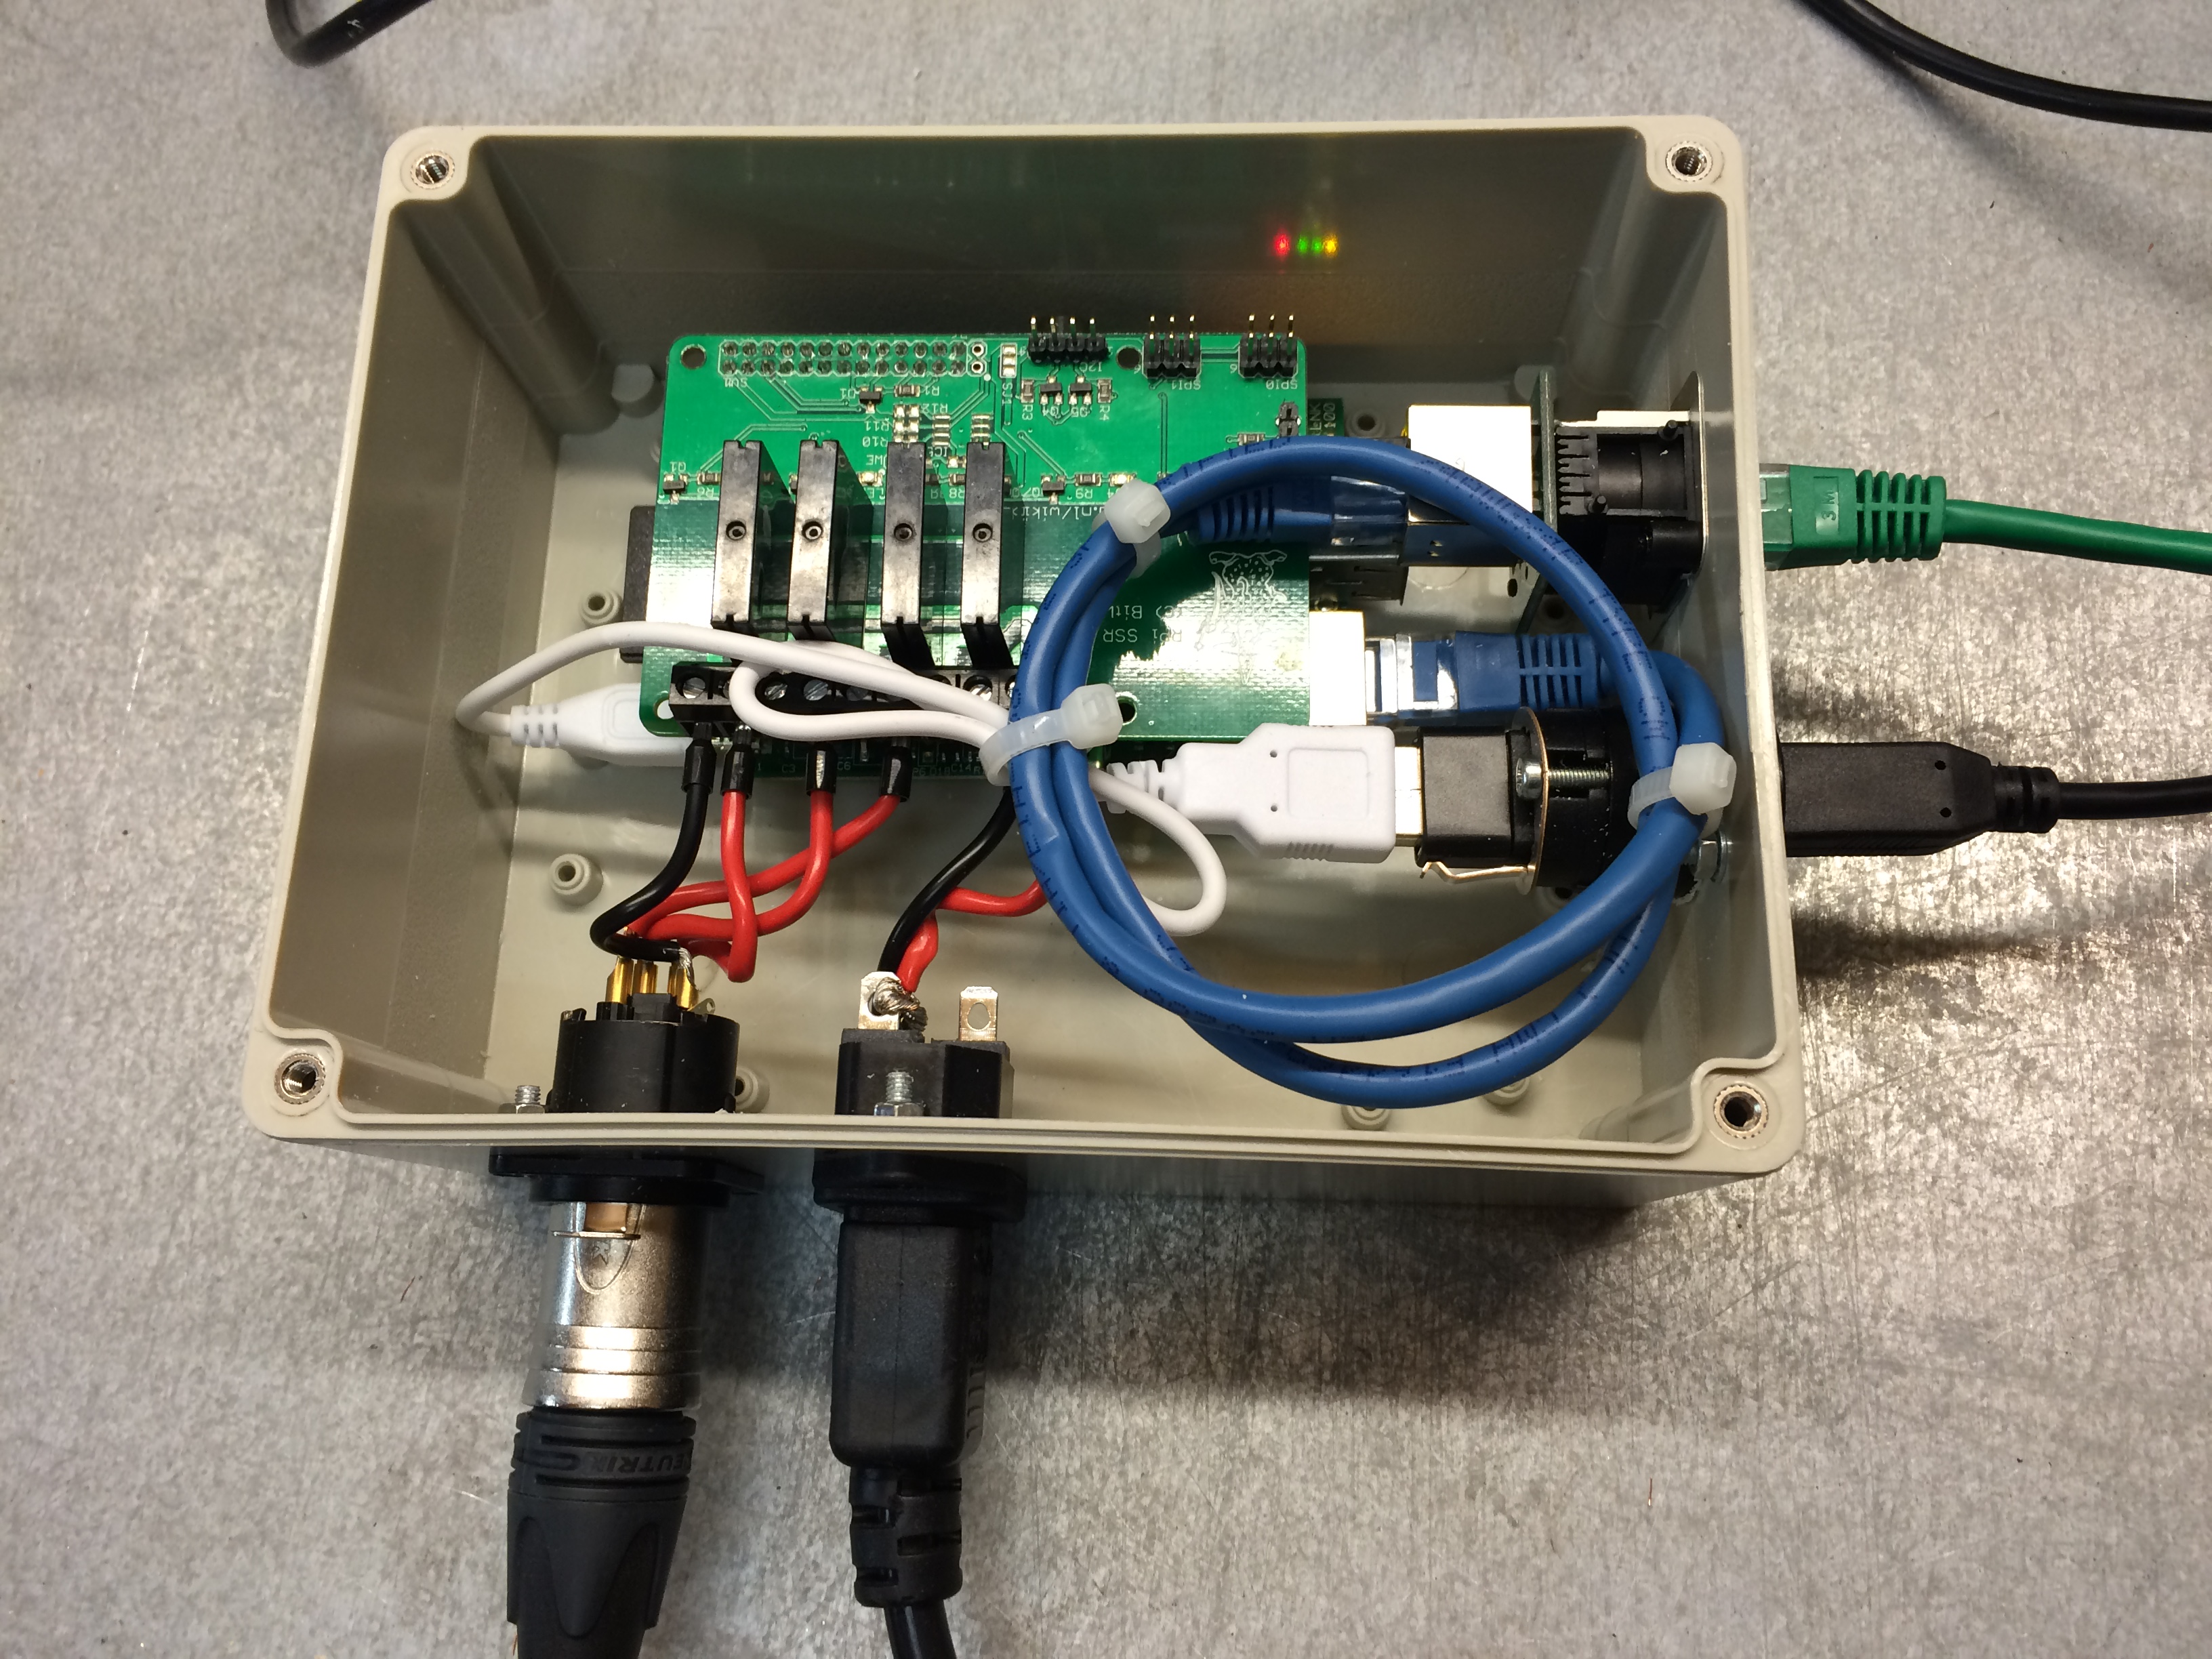
Bringing it together

It was time to start drilling and soldering! In my shed it looked like this:

My shed

And a few more pictures of building it. Took me about 3 hours to complete.
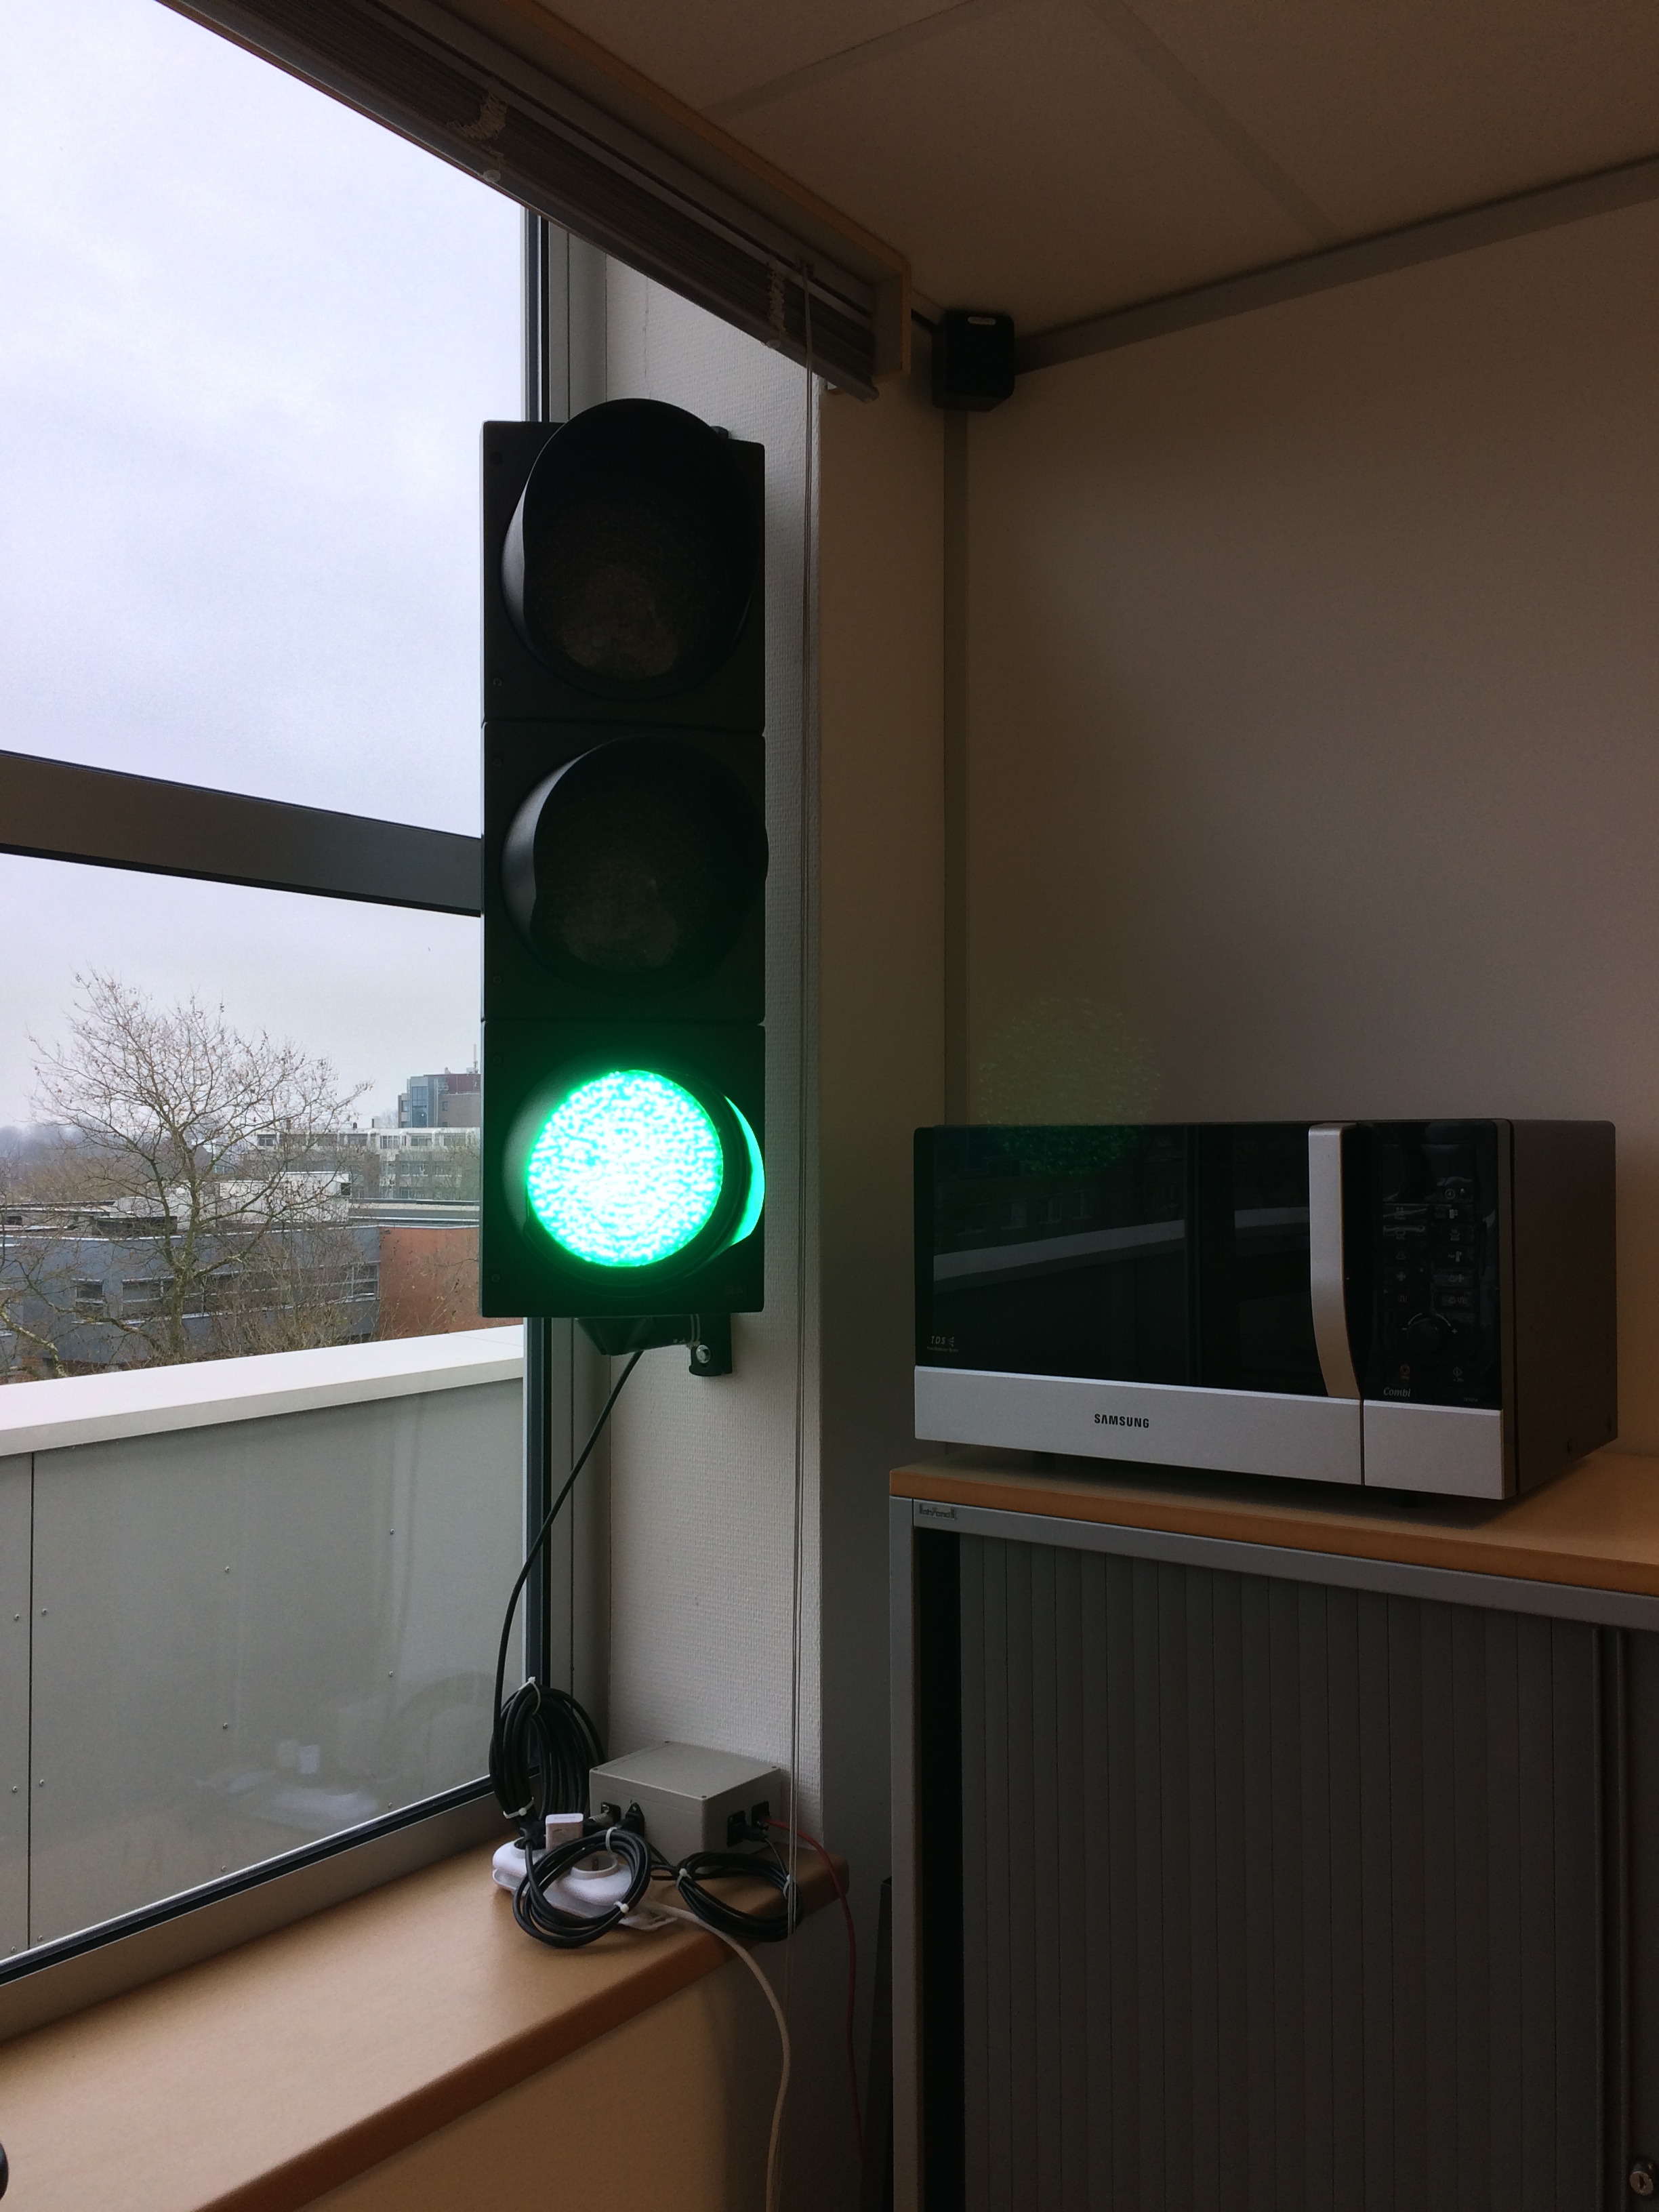
ssr-board-and-connector

drilling-holes

connectors-installed-1

connectors-installed-2

box-installed

box-installed-with-cables

At the office

The next day it was time to install it at the office! Some drilling and the result:

Health OK: Green

light-on-green

Health WARN: Amber/Orange

light-on-orange

Health ERR: Red

No picture! We can trigger a WARN state in Ceph without service interruptions, but not a ERR state.

The code

The Python code I wrote is all on Github. It’s just some Python code which polls our Ceph dashboard every second. If the status changes it also changes the traffic light.

Ceph Monitors are laggy or clock might be skewed

This weekend I got to investigate a Ceph cluster which had issues where the Monitors were constantly performing new elections.

After some investigation on of the three monitors was eating 100% CPU on a single core and kept printing this in the logs:

mon.charlie@2(peon).paxos(paxos updating c 106399655..106400232) lease_expire from mon.0 [2a00:XXX:121:XXX::6789:1]:6789/0 is 2.380296 seconds in the past; mons are probably laggy (or possibly clocks are too skewed)

Digging further I found that the LevelDB store in /var/lib/ceph/mon/X/store.db was 2.5GB in size.

Compact on Start

You can tell the monitor to compact the LevelDB database on start. Add the following to your ceph.conf:

[mon]
mon compact on start = true

Now restart the monitor and it will compact the LevelDB database.

The CPU usage now dropped and the monitors were happy again.

Protecting your Ceph pools against removal or property changes

One of the dangers of Ceph was that by accident you could remove a multi TerraByte pool and loose all the data. Although the CLI tools asked you for conformation, librados and all it’s bindings did not.

Imagine explaining that you just removed a 200TB pool from your storage system due to a typo in your Python code…

So I suggested that we came up with a mechanism to prevent pools from being deleted from a Ceph cluster. And Sage quickly came up with something!

Hammer v0.94

Ceph version 0.94 aka ‘Hammer’ came out a couple of weeks ago and it has a some fancy features which prevent you from removing a pool by accident or on purpose.

Monitors denying pool removal

A new configuration setting for the monitors has been introduced:

mon_allow_pool_delete = false

If you add that to the ceph.conf ([mon] section) and restart your MONs you will not be able to remove any pool from your Ceph cluster. Not via the CLI or directly via librados. The Monitors will simply refuse it:

root@admin:~# ceph osd pool delete rbd rbd --yes-i-really-really-mean-it
Error EPERM: pool deletion is disabled; you must first set the mon_allow_pool_delete config option to true before you can destroy a pool
root@admin:~#
root@admin:~# rados rmpool rbd rbd --yes-i-really-really-mean-it
pool rbd does not exist
error 1: (1) Operation not permitted
root@admin:~#

This is a cluster-wide configuration setting and can only be changed by restarting your Monitors. A good way to prevent anybody from removing a pool by accident or on purpose.

Pool flags

A different way to achieve this is by setting the new nodelete flag on a pool. Setting this flag prevents the pool from being removed.

Next to this flag a couple of other flags were introduced:

  • nodelete
  • nosizechange
  • nopgchange

The flags speak for themselves. If you set these flags those operations are no longer allowed:

root@admin:~# ceph osd pool set rbd nosizechange true
set pool 0 nosizechange to true
root@admin:~# ceph osd pool set rbd size 5
Error EPERM: pool size change is disabled; you must unset nosizechange flag for the pool first
root@admin:~#

I’m not allowed to change the size (aka replication level/setting) for the pool ‘rbd’ while that flag is set.

Applying all flags

To apply these flags quickly to all your pools, simply execute these three one-liners:

$ for pool in $(rados lspools); do ceph osd pool set $pool nosizechange true; done
$ for pool in $(rados lspools); do ceph osd pool set $pool nopgchange true; done
$ for pool in $(rados lspools); do ceph osd pool set $pool nodelete true; done

Your Ceph cluster just became a lot safer! No data loss or downtime due to fat fingers anymore 🙂

Rebuilding libvirt under CentOS 7.1 with RBD storage pool support

If you want to use CentOS 7.1 for your hypervisors with Apache CloudStack and Ceph’s RBD as Primary Storage you need to rebuild libvirt.

CloudStack requires libvirt to be built with RBD storage pool support. It uses libvirt to manage RBD volumes. By default libvirt under CentOS is not built with this support. (On Ubuntu it is btw).

Rebuilding from source

First we need to install a couple of packages:

$ yum install -y rpm-build gcc make ceph-devel

Now we need to download the sRPM:

$ wget http://vault.centos.org/centos/7.1.1503/os/Source/SPackages/libvirt-1.2.8-16.el7.src.rpm

Create a rpmbuild directory:

$ mkdir /root/rpmbuild

Now edit /root/.rpmmacros so that it contains:

%_topdir    /root/rpmbuild

Install the sRPM:

$ rpm -i libvirt-1.2.8-16.el7.src.rpm

Open the /root/rpmbuild/SPECS/libvirt.spec file and look for:

%else
    %define with_storage_rbd      0
%endif

Change this to:

%else
    %define with_storage_rbd      1
%endif

Now build the RPM:

$ cd /root/rpmbuild
$ rpmbuild -ba SPECS/libvirt.spec

After a couple of minutes you should have RPMs with RBD storage pool support enabled!

NFS-Ganesha with libcephfs on Ubuntu 14.04

This week I’m testing a lot with CephFS and one of the things I never tried was re-exporting CephFS using NFS-Ganesha and libcephfs.

NFS-Ganesha is a NFS server which runs in userspace. It has multiple backends (FSALs) it can use and libcephfs is one of them.

libcephfs is a userspace library which you can use to access CephFS. It is written in C/C++ and has Java and Python bindings. NFS-Ganesha however links to the native C++ bindings.

Running NFS-Ganesha on Ubuntu 14.04 is not plug and play, it involves manual compiling which I’ll explain below.

I tested this using:

  • Ubuntu 14.04.1
  • Ceph 0.89
  • NFS-Ganesha 2.1

Building NFS-Ganesha

It starts with installing a couple of packages:

apt-get install git-core cmake build-essential portmap libcephfs-dev bison 
flex libkrb5-dev libtirpc1

We then clone the Git repository:

cd /usr/src
git clone https://github.com/nfs-ganesha/nfs-ganesha.git
cd nfs-ganesha
git checkout -b V2.1-stable origin/V2.1-stable
git submodule update --init

Now we have the sources we can build it:

mkdir build
cd build
cmake ../src
make
make install

NFS-Ganesha uses DBus and we have to copy a DBus profile:

cp ../src/scripts/ganeshactl/org.ganesha.nfsd.conf /etc/dbus-1/system.d/

Configuring the NFS export

Now we can create our NFS-Ganesha configuration:

nano /usr/local/etc/ganesha.conf

Add the following:

EXPORT
{
    Export_ID = 1;
    Path = "/";
    Pseudo = "/";
    Access_Type = RW;
    NFS_Protocols = "3";
    Squash = No_Root_Squash;
    Transport_Protocols = TCP;
    SecType = "none";

    FSAL {
        Name = CEPH;
    }
}

With this configuration we say that we want to export (Path) “/” of our CephFS filesystem as “/” (Pseudo) from our NFS server.

Configuring Ceph

To run NFS-Ganesha you have to make sure that CephFS is up and running and that the server where you are going to run Ganesha on can access the Ceph cluster.

Make sure your ceph.conf and ceph.client.admin.keyring file are both present in /etc/ceph and run:

ceph -s

If that works you can start NFS-Ganesha

Starting NFS-Ganesha

Now Ceph is working we can start the NFS server:

ganesha.nfsd -f /usr/local/etc/ganesha.conf -L /tmp/ganesha.log -N NIV_DEBUG -d

This makes the NFS server log with a DEBUG profile. It gives you a lot of insight on what’s happing. You probably want to disable this when it all works.

Mounting NFS

On a NFS client we can now mount the NFS filesystem which is actually our CephFS:

mkdir /mnt/cephfs-nfs
mount -o rw,noatime 1.2.3.4:/ /mnt/cephfs-nfs

Replace 1.2.3.4 with the hostname/IP-Address of the server running NFS-Ganesha.

You should now have a NFS mount which shows you your CephFS filesystem! This way legacy clients can access the most awesome filesystem.

Ceph with a cluster and public network on IPv6

I’m a big fan of Ceph and IPv6, so I always try to deploy Ceph over IPv6 when possible. Ceph is the future, just like IPv6 is. Why implement legacy?

Recently I did a deployment of Ceph with a public and cluster network running over IPv6. It has a small catch, so I let me explain the cluster and public network first.

Ceph cluster and public network

This image comes from the Ceph documentation and shows the two types of network:

  • Public network for clients and monitors
  • Cluster network for inter-OSD communication (Replication and recovery)

If you want to run your Ceph cluster over IPv6 you have a couple of settings to make:

[global]
ms_bind_ipv6 = true
mon_host = [2a00:f10:XX:XX::XX]:6789, [2a00:f10:XX:XX::XY]:6789, [2a00:f10:XX:XX::YY]:6789

As you can see, you have to write the IPv6 address enclosed by [ and ]

When configuring the cluster and/or public network in the ceph.conf you should however not use them:

[global]
public_network = 2a00:f10:XX:XX:XX::/64
cluster_network = 2a00:f10:XX:XX:XY::/64

When that is set correctly it should all be working fine and your Ceph cluster will be running over IPv6 with different networks!

PowerDNS backend for a global RADOS Gateway namespace

At my hosting company PCextreme we are building a cloud offering based on Ceph and CloudStack. We call our cloud services Aurora.

Our cloud services are composed out of two components: Compute and Objects.

For our Aurora Objects service we use the RADOS Gateway from Ceph and we are using the Federated Config to create multiple regions.

At this moment we have one region o.auroraobjects.eu but we soon want to expand to multiple regions.

One of the things we/I wanted is a global namespace for all our regions: o.auroraobjects.com.

By design the RADOS Gateway will return a HTTP-redirect when you connect to the ‘wrong’ region for a specific bucket, but a HTTP-redirect causes extra TCP packets going over the wire causing additional and unneeded latency.

So I came up with the idea of using a custom PowerDNS backend to direct bucket traffic on DNS level.

Imagine having a bucket ceph in the region ‘eu’ and the global namespace o.auroraobjects.com.

Using my custom backend the PowerDNS server will respond with a CNAME pointing the user towards the right hostname:

wido@wido-laptop:~$ host ceph.o.auroraobjects.com ns1.auroraobjects.com
Using domain server:
Name: ns1.auroraobjects.com
Address: 2a00:f10:121:400:48c:2ff:fe00:e6b#53
Aliases: 

ceph.o.auroraobjects.com is an alias for ceph.o.auroraobjects.eu.
wido@wido-laptop:~$

As you can see it responded with a CNAME pointing towards ceph.o.auroraobjects.eu.

This allows us to create multiple regions (eu, us, asia, etc) but keep one global namespace to make it easy to consume for our end-users.

Users can create a bucket in the region they like, but they never have to worry about wich hostname to use. We take care of that.

This PowerDNS backend is in the Ceph master branch and can be installed as a WSGI application behind Apache.

I’ve put a small txt file online to show you:

As you can see, both URLs show you the same object.

Deploying the backend for PowerDNS is fairly simply, I recommend you read the README, but here are a few config snippets.

Apache VirtualHost


	ServerAdmin webmaster@localhost

	DocumentRoot /var/www
	
		Options FollowSymLinks
		AllowOverride None
	
	
		Options Indexes FollowSymLinks MultiViews
		AllowOverride None
		Order allow,deny
		allow from all
	

	ErrorLog ${APACHE_LOG_DIR}/error.log
	LogLevel warn
	CustomLog ${APACHE_LOG_DIR}/access.log combined

	WSGIScriptAlias / /var/www/pdns-backend-rgw.py

PowerDNS configuration

local-address=0.0.0.0
local-ipv6=::

cache-ttl=60
default-ttl=60
query-cache-ttl=60

launch=remote
remote-connection-string=http:url=http://localhost/dns

Note: You have to compile PowerDNS manually with –with-modules=remote –enable-remotebackend-http

Don’t forget to put a rgw-pdns.conf in /etc/ceph with the correct configuration.

This is still a work-in-progress on my side and I’ll probably make some commits in the coming months, but feedback is much appreciated!

Deploying Ceph over IPv6

I like to deploy Ceph clusters over IPv6. I actually think that’s the way forward. IPv4 is legacy just like iSCSI and NFS are.

Last week I was at a customer deploying a new Ceph cluster and they wanted to deploy with IPv6! Most deployment I did with IPv6 were done manually and not with ceph-deploy, but when trying to deploy with ceph-deploy over IPv6 I ran into some issues.

Before going into that I want to make something clear. With Ceph you choose either IPv4 OR IPv6. There is NO dual-stack support. So the whole cluster (including clients) communicates over IPv6 or over IPv4. Switching afterwards is not possible. So that’s why I urge people to deploy with IPv6 since you probably want to have your cluster running for a long time.

All package repos (including the Ceph ones) have IPv6 enabled, so in my opinion there is no good reason to prefer IPv4 with a Ceph deployment when IPv6 is available. I even think it’s easier in large deployment due to the Router Advertisements in IPv6.

Having that said it’s time to go back to the ceph-deploy issue.

In ceph.conf you have to enclose IPv6 addresses for monitors with a [ and ]. This is what ceph-deploy did wrong:

[global]
mon_host = 2a00:f10:X:X::X,2a00:f10:X:X::Y,2a00:f10:X:X::Z

While it should have been:

[global]
mon_host = [2a00:f10:X:X::X],[2a00:f10:X:X::Y],[2a00:f10:X:X::Z]
ms_bind_ipv6 = true

The ms_bind_ipv6 setting tells the Messenger inside Ceph to bind on IPv6. It’s important that you set that setting on all hosts in the Ceph cluster, otherwise things will go wrong badly. Heartbeats and such will not work.

I wrote a patch for ceph-deploy which fixes it. It writes the ‘mon_host’ setting correctly and also adds the ‘ms_bind_ipv6’ setting when IPv6 is used for the monitors.

Calculating RADOS objects for RBD images

Ceph’s RBD (RADOS Block Device) is just a thin wrapper on top of RADOS, the object store of Ceph.

It stripes (by default) over 4MB objects in RADOS. It’s very simple to calculate which RADOS object corresponds with which sector on your RBD image/block device.

First you have to find out the block device’s object prefix name and the stripe size:

ceph@daisy:~$ sudo rbd info test
rbd image 'test':
	size 128 MB in 32 objects
	order 22 (4096 KB objects)
	block_name_prefix: rb.0.1066.2ae8944a
	format: 1
ceph@daisy:~$

In this case the stripe size is 4MB (order 2^22) and the object name prefix is rb.0.1066.2ae8944a

With one line of Perl we can calculate the object name in RADOS:

perl -e 'printf "BLOCK_NAME_PREFIX.%012x\n", ((SECTOR_OFFSET * 512) / (4 * 1024 * 1024))'

Let’s say that we want the object for sector 1 of our block device:

perl -e 'printf "rb.0.1066.2ae8944a.%012x\n", ((0 * 512) / (4 * 1024 * 1024))'

This tells us that we need to fetch object rb.0.1066.2ae8944a.000000000000 from RADOS. This can be done using the ‘rados’ command:

sudo rados -p rbd get rb.0.1066.2ae8944a.000000000000 rb.0.1066.2ae8944a.000000000000

Voila, you just fetched 4MB of your drive. Might be useful if you want to do some data recovery or such.

SQL connection error after upgrade to CloudStack 4.3.0

I just upgraded a small cluster of mine from CloudStack 4.2.1 to 4.3.0 and after installing the packages on my Ubuntu system the management server wouldn’t start due to a SQL error:

2014-03-25 20:52:13,643 INFO  [c.c.u.d.T.Transaction] (main:null) Is Data Base High Availiability enabled? Ans : false
2014-03-25 20:52:13,736 ERROR [c.c.u.d.Merovingian2] (main:null) Unable to get a new db connection
java.sql.SQLException: No suitable driver found for jdbc:mysql://localhost:3306/cloud?autoReconnect=true&prepStmtCacheSize=517&cachePrepStmts=true
	at java.sql.DriverManager.getConnection(DriverManager.java:635)
	at java.sql.DriverManager.getConnection(DriverManager.java:195)

I quickly remembered a licensing issue around JDBC which delayed 4.3.0 and I was right. The management server was missing the right JAR/package for the SQL connection.

A quick apt-get install fixed it:

$ sudo apt-get install libmysql-java

This should have been a dependency of the ‘cloudstack-management’ package, but that somehow slipped through. I already applied a patch in the master branch and I’ll make sure it gets into 4.3.1 and 4.4.0.

So if you are running Ubuntu and are upgrading to CloudStack 4.3.0 and run into this issue, simply install the package and it’s fixed.