Many Ceph storage environments out there are deployed using a L2 underlay.
This means that the Ceph servers (MON, OSD, etc) are connected using LACP/Bonding to a pair of switches. On their ‘bond0’ device (example) they are assigned an IPv4/IPv6 address and this is used for connectivity between the Ceph nodes and the Ceph clients.
Although this works fine, I try to avoid L2 as much as possible in datacenter deployments. L2 scales up to a certain point, but it has it’s limitations. Modern Top-of-Rack (ToR) switches can easily route traffic and wire-speed. This used to be a limitation of switches in the past. When designing environments I prefer using a L3 approach.
This blogpost is there to show you the rough concept. It’s NOT a copy and paste tutorial. You will need to adapt it to your situation.
Network setup and BGP configuration
Using Juniper QFX5100 switches and Frrouting on the Ceph nodes I’ve established BGP sessions between the ToR and Ceph nodes according to the diagram below.
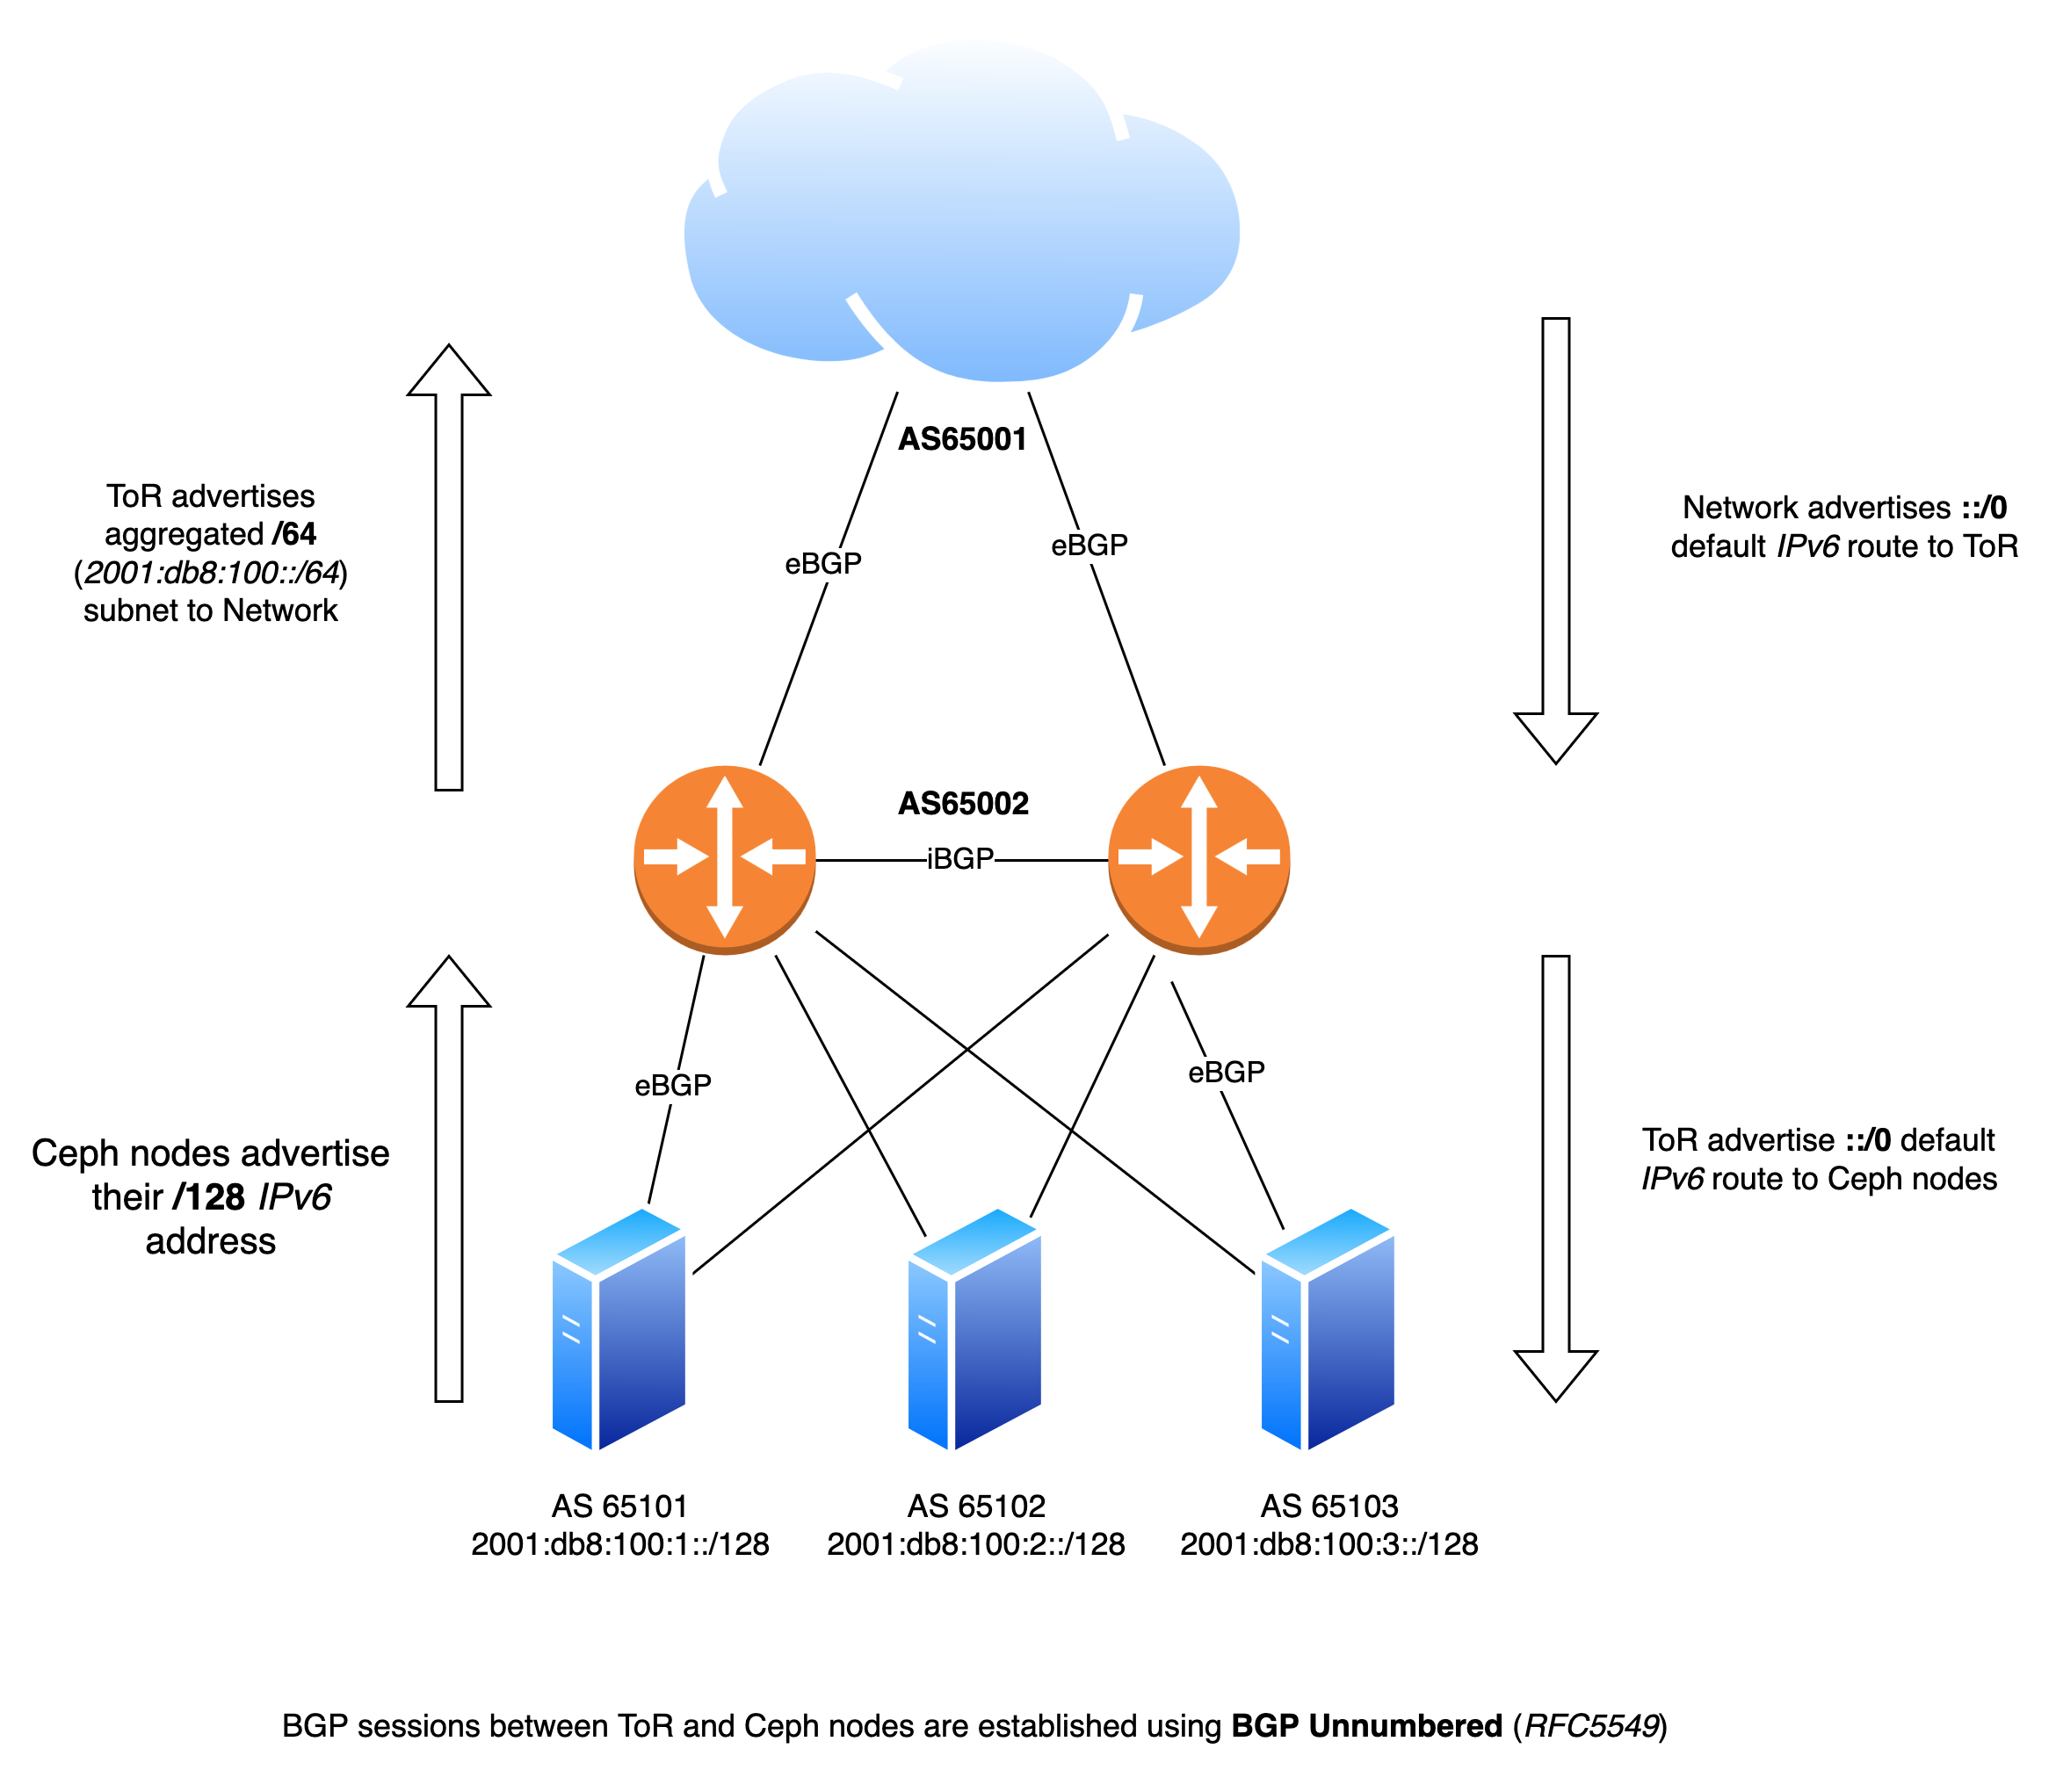
Each nodes has two independent BGP sessions with the Top-of-Rack in it’s rack. Via these BGP sessions they advertise their local IPv6 /128 address. Via the same sessions they receive a default ::/0 IPv6 route.
ceph01# sh bgp summary

IPv6 Unicast Summary (VRF default):
BGP router identifier 1.2.3.4, local AS number 65101 vrf-id 0
BGP table version 10875
RIB entries 511, using 96 KiB of memory
Peers 2, using 1448 KiB of memory
Peer groups 1, using 64 bytes of memory

Neighbor        V    AS   MsgRcvd   MsgSent   TblVer  InQ OutQ  Up/Down State/PfxRcd   PfxSnt Desc
enp196s0f0np0   4 65002    487385    353917        0    0    0 3d18h17m            1        1 N/A
enp196s0f1np1   4 65002    558998    411452        0    0    0 01:38:55            1        1 N/A

Total number of neighbors 2
ceph01#
Here we see two BGP sessions active over both NICs of the Ceph node. We can also see that a default IPv6 route is received via BGP.
ceph01# sh ipv6 route ::/0
Routing entry for ::/0
  Known via "bgp", distance 20, metric 0
  Last update 01:42:00 ago
    fe80::e29:efff:fed7:4719, via enp196s0f0np0, weight 1
    fe80::7686:e2ff:fe7c:a19e, via enp196s0f1np1, weight 1

ceph01#
The Frrouting configuration ( /etc/frr/frr.conf ) is fairly simple:
frr defaults traditional
hostname ceph01
log syslog informational
no ip forwarding
no ipv6 forwarding
service integrated-vtysh-config
!
interface enp196s0f0np0
 no ipv6 nd suppress-ra
exit
!
interface enp196s0f1np1
 no ipv6 nd suppress-ra
exit
!
interface lo
 ipv6 address 2001:db8:100:1::/128
exit
!
router bgp 65101
 bgp router-id 1.2.3.4
 no bgp ebgp-requires-policy
 no bgp default ipv4-unicast
 no bgp network import-check
 neighbor upstream peer-group
 neighbor upstream remote-as external
 neighbor enp196s0f0np0 interface peer-group upstream
 neighbor enp196s0f1np1 interface peer-group upstream
 !
 address-family ipv6 unicast
  redistribute connected
  neighbor upstream activate
 exit-address-family
exit
!
end
On the Juniper switches a configuration was defined for the BGP Unnumbered (RFC5549) configuration as well. This blogpost explains very well on how BGP Unnumbered works on JunOS, I am not going to repeat it. I will highlight a couple of pieces of configuration.
root@tor01# show interfaces xe-0/0/1
description ceph01;
unit 0 {
    mtu 9216;
    family inet6;
}

root@tor01# show protocols router-advertisement
interface xe-0/0/1.0;
root@tor01# show | compare
[edit]
+ policy-options {
+ as-list bgp_unnumbered_as_list members 65101-65199;
+ }
[edit protocols]
+ bgp {
+ group ceph {
+ family inet6 {
+ unicast;
+ }
+ multipath;
+ export default-v6;
+ import ceph-loopback;
+ dynamic-neighbor bgp_unnumbered {
+ peer-auto-discovery {
+ family inet6 {
+ ipv6-nd;
+ }
+ interface xe-0/0/1.0;
+ interface xe-0/0/2.0;
+ interface xe-0/0/3.0;
+ }
+ }
+ peer-as-list bgp_unnumbered_as_list;
+ }
+ }
[edit policy]
+ policy-statement default-v6 {
+ from {
+ route-filter ::/0 exact;
+ }
+ then accept;
+}
+ policy-statement ceph-loopback {
+ from {
+ route-filter 2001:db8:100::/64 upto /128;
+ }
+ then accept;
+}This will set up the BGP sessions via the interfaces xe-0/0/1 until xe-0/0/3 using IPv6 Autodiscovery.
The Ceph nodes should now be able to ping the other nodes:
PING 2001:db8:100::2(2001:db8:100::2) 56 data bytes
64 bytes from 2001:db8:100::2: icmp_seq=1 ttl=63 time=0.058 ms
64 bytes from 2001:db8:100::2: icmp_seq=2 ttl=63 time=0.063 ms
64 bytes from 2001:db8:100::2: icmp_seq=3 ttl=63 time=0.071 ms

--- 2001:db8:100::2 ping statistics ---
3 packets transmitted, 3 received, 0% packet loss, time 2037ms
rtt min/avg/max/mdev = 0.058/0.064/0.071/0.005 ms
Ceph configuration
From Ceph’s perspective there is not much to do. We just need to specify the IPv6 subnet Ceph is allowed to use and bind to.
[global]
	 mon_host = 2001:db8:100::1, 2001:db8:100::2, 2001:db8:100::3
	 ms_bind_ipv4 = false
	 ms_bind_ipv6 = true
	 public_network = 2001:db8:100::/64
This is all the configuration needed for Ceph 🙂
wdh@ceph01:~$ sudo ceph health
HEALTH_OK
wdh@infra-04-01-17:~$ sudo ceph mon dump
election_strategy: 1
0: [v2:[2001:db8:100::1]:3300/0,v1:[2001:db8:100::1]:6789/0] mon.ceph01
1: [v2:[2001:db8:100::2]:3300/0,v1:[2001:db8:100::2]:6789/0] mon.ceph02
2: [v2:[2001:db8:100::3]:3300/0,v1:[2001:db8:100::3]:6789/0] mon.ceph02
dumped monmap epoch 6
wdh@infra-04-01-17:~$